はじめに
こんにちは、ネクスティ エレクトロニクス開発部メンバーです。
筆者は、各種GPUサーバーの自由度の高いトライアルができる、GPU Advanced Test Drive(GAT) の技術サポートを担当しています。
昨今、自動運転の実現に向けてカメラだけでなく、Lidar、ミリ波などの複数のセンサーを組み合わせたシステムを構築しながら車両周辺の検出・認識を行う事が重要となっており、その一つとしてセンサーフュージョンをBEV(鳥瞰図視点)で行う、BEVFusionが注目されています。技術解説については、今回は割愛します。
オープンソースで公開されており、PCとGPU環境があれば誰でも試すことができるのですが、いざ実際動かそうとやってみると、単に動かすだけでも難しい所があります。
このコラムでは、BEVFusion のTensorRT実装版である CUDA-BEVFusion を 手元で実際に動かしてみる、というところを解説します。
必要なハードウェア
PC+GPU
- GPUは今回はCUDAを動かすため、NVIDIA社製のものが必要です
- RTX3060等でも、動作実績があります
- OSはUbuntuを基本としていますが、Windowsのwsl2でのUbuntuで動かす事ができます
事前準備(docker動作環境の構築)
事前準備として、docker(with GPU環境)をインストールしてください。
1. Ubuntuの場合
- 公式のaptインストール手順がおすすめです。
- その後、nvidia-container-toolkitのインストールが必要です(dockerからGPUを使えるようになります)
2. Windowsの場合
- docker-desktop(Windows版)をインストールしてください
(インストール時に「WSL2 Integration」を有効化しておけば、wslのUbuntuから利用できます)。 - Windowsの場合は、nvidia-container-toolkitの追加インストールは不要です
- wsl2にて、ubuntu20.04やubuntu22.04を使えるようにしてください
Dockerで仮想環境を
CUDA-BEVFusionを動かすことが難しい要因としては、公開されたのが数年前のため、少し出遅れて今動かそうとすると、バージョンの上がった他ライブラリとの不整合などが起こりやすい事が挙げられます。
そのため、「少し古い環境」を用意する必要があるのですが、そこで有用なのが、Dockerでの仮想環境です。
CUDA-BEVFusion用のdockerイメージ
以下のテキストを「Dockerfile」という名前で保存します。
(長いですが、右下のcopyボタンからクリップボードにコピーできるため、また以後プロンプト表記などを省いて、容易にコピー&ペーストできます。)
|
Dockerfile FROM nvidia/cuda:11.3.1-cudnn8-devel-ubuntu20.04 # Environment settings ENV DEBIAN_FRONTEND noninteractive ENV CONDA_DIR /opt/conda ENV PATH /usr/local/cuda/bin:$CONDA_DIR/bin:$PATH ENV FORCE_CUDA="1" ENV MMCV_WITH_OPS=1 # System dependencies RUN apt-get update && apt-get install -y \ wget \ build-essential g++ gcc \ libgl1-mesa-glx libglib2.0-0 \ openmpi-bin openmpi-common libopenmpi-dev libgtk2.0-dev git \ gnupg2 curl software-properties-common \ cmake \ protobuf-compiler \ libprotobuf-dev \ && rm -rf /var/lib/apt/lists/* # Add NVIDIA package repositories and install TensorRT RUN curl -fsSL https://developer.download.nvidia.com/compute/cuda/repos/ubuntu2004/x86_64/3bf863cc.pub | apt-key add - && \ curl -fsSL https://developer.download.nvidia.com/compute/machine-learning/repos/ubuntu2004/x86_64/7fa2af80.pub | apt-key add - && \ echo "deb https://developer.download.nvidia.com/compute/cuda/repos/ubuntu2004/x86_64/ /" > /etc/apt/sources.list.d/cuda.list && \ echo "deb https://developer.download.nvidia.com/compute/machine-learning/repos/ubuntu2004/x86_64/ /" > /etc/apt/sources.list.d/nvidia-ml.list && \ apt-get update && \ apt-get install -y --allow-downgrades cuda-toolkit-config-common=11.3.58-1 && \ apt-get install -y tensorrt=8.5.2.2-1+cuda11.8 \ libnvinfer8=8.5.2-1+cuda11.8 \ libnvinfer-plugin8=8.5.2-1+cuda11.8 \ libnvparsers8=8.5.2-1+cuda11.8 \ libnvonnxparsers8=8.5.2-1+cuda11.8 \ libnvinfer-bin=8.5.2-1+cuda11.8 \ libnvinfer-dev=8.5.2-1+cuda11.8 \ libnvinfer-plugin-dev=8.5.2-1+cuda11.8 \ libnvparsers-dev=8.5.2-1+cuda11.8 \ libnvonnxparsers-dev=8.5.2-1+cuda11.8 \ libnvinfer-samples=8.5.2-1+cuda11.8 && \ apt-get install -y python3-libnvinfer=8.5.2-1+cuda11.8 python3-libnvinfer-dev=8.5.2-1+cuda11.8 \ && rm -rf /var/lib/apt/lists/* # Install Miniconda RUN wget --quiet https://repo.anaconda.com/miniconda/Miniconda3-latest-Linux-x86_64.sh -O ~/miniconda.sh && \ /bin/bash ~/miniconda.sh -b -p $CONDA_DIR # Python packages RUN conda install -y python=3.8 pytorch==1.10.1 torchvision==0.11.2 torchaudio==0.10.1 cudatoolkit=11.3 -c pytorch && \ pip install Pillow==8.4.0 tqdm torchpack mmcv==1.4.0 mmcv-full==1.4.0 mmdet==2.20.0 nuscenes-devkit mpi4py==3.0.3 numba==0.48.0 numpy==1.23.0 #Enviroment(for bevfusion) ENV CPATH /usr/local/cuda-11.3/include:$CPATH ENV LIBRARY_PATH /usr/local/cuda-11.3/lib64:$LIBRARY_PATH ENV LD_LIBRARY_PATH /usr/local/cuda-11.3/lib64:$LD_LIBRARY_PATH ENV PATH /usr/local/cuda-11.3/bin:$PATH ENV CUDA_HOME /usr/local/cuda-11.3 FROM nvidia/cuda:11.3.1-cudnn8-devel-ubuntu20.04 # Environment settings ENV DEBIAN_FRONTEND noninteractive ENV CONDA_DIR /opt/conda ENV PATH /usr/local/cuda/bin:$CONDA_DIR/bin:$PATH # System dependencies RUN apt-get update && apt-get install -y \ wget \ build-essential g++ gcc \ libgl1-mesa-glx libglib2.0-0 \ openmpi-bin openmpi-common libopenmpi-dev libgtk2.0-dev git \ gnupg2 curl software-properties-common \ cmake \ libprotobuf-dev \ protobuf-compiler \ && rm -rf /var/lib/apt/lists/* # Add NVIDIA package repositories and install TensorRT RUN curl -fsSL https://developer.download.nvidia.com/compute/cuda/repos/ubuntu2004/x86_64/3bf863cc.pub | apt-key add - && \ curl -fsSL https://developer.download.nvidia.com/compute/machine-learning/repos/ubuntu2004/x86_64/7fa2af80.pub | apt-key add - && \ echo "deb https://developer.download.nvidia.com/compute/cuda/repos/ubuntu2004/x86_64/ /" > /etc/apt/sources.list.d/cuda.list && \ echo "deb https://developer.download.nvidia.com/compute/machine-learning/repos/ubuntu2004/x86_64/ /" > /etc/apt/sources.list.d/nvidia-ml.list && \ apt-get update && \ apt-get install -y --allow-downgrades cuda-toolkit-config-common=11.3.58-1 && \ apt-get install -y tensorrt=8.5.2.2-1+cuda11.8 \ libnvinfer8=8.5.2-1+cuda11.8 \ libnvinfer-plugin8=8.5.2-1+cuda11.8 \ libnvparsers8=8.5.2-1+cuda11.8 \ libnvonnxparsers8=8.5.2-1+cuda11.8 \ libnvinfer-bin=8.5.2-1+cuda11.8 \ libnvinfer-dev=8.5.2-1+cuda11.8 \ libnvinfer-plugin-dev=8.5.2-1+cuda11.8 \ libnvparsers-dev=8.5.2-1+cuda11.8 \ libnvonnxparsers-dev=8.5.2-1+cuda11.8 \ libnvinfer-samples=8.5.2-1+cuda11.8 && \ apt-get install -y python3-libnvinfer=8.5.2-1+cuda11.8 python3-libnvinfer-dev=8.5.2-1+cuda11.8 \ && rm -rf /var/lib/apt/lists/* # Install Miniconda RUN wget --quiet https://repo.anaconda.com/miniconda/Miniconda3-latest-Linux-x86_64.sh -O ~/miniconda.sh && \ /bin/bash ~/miniconda.sh -b -p $CONDA_DIR # Python packages RUN conda install -y python=3.8 pytorch==1.10.1 torchvision==0.11.2 torchaudio==0.10.1 cudatoolkit=11.3 -c pytorch && \ pip install Pillow==8.4.0 tqdm torchpack nuscenes-devkit mpi4py==3.0.3 numba==0.48.0 numpy==1.23.0 #Enviroment(for bevfusion) ENV CPATH /usr/local/cuda-11.3/include:$CPATH ENV LIBRARY_PATH /usr/local/cuda-11.3/lib64:$LIBRARY_PATH ENV LD_LIBRARY_PATH /usr/local/cuda-11.3/lib64:$LD_LIBRARY_PATH ENV PATH /usr/local/cuda-11.3/bin:$PATH ENV CUDA_HOME /usr/local/cuda-11.3 #mmcv install RUN pip install --no-cache-dir mmcv==1.4.0 mmcv-full==1.4.0 mmdet==2.20.0 -f https://download.openmmlab.com/mmcv/dist/cu113/torch1.10/index.html |
|---|
このようなDockerfileになっている理由は、調査検討の血と汗と涙の結晶のため説明しきることが難しいものですが、「軽い」解説を以下に記します。
- 後にbevfusionフォルダ(本家のようなものです)の方も動かすため、そちらも睨んだ古めの環境(cuda11.3)になっています。
- issueに挙がっていますが、tensorrtのバージョンが古めでないと、正しい推論ができない様子のため、バージョン指定でインストールしています。
- その他のライブラリについても、当時の記法と現在でズレが存在するため、古いものを指定してある場合が多いです。
以下コマンドでイメージを生成します。-tの部分は何でも良いですが、作成されるイメージにあだ名を付けておきます。
(当記事内では「cubev-nexty」で説明致します)
| docker build . -f Dockerfile -t cubev-nexty |
|---|
ファイルの準備
リポジトリの取得
作業用ディレクトリを作成し、その下にリポジトリを取得します。
(作業用ディレクトリは、どこでも良いです。当記事では/home/xxx/bev/としています)
|
cd /home/xxx/ mkdir bev cd /bev |
|---|
gitコマンドで取得します。参照型のところがありますので、recursiveオプションを付けます。
| git clone --recursive https://github.com/NVIDIA-AI-IOT/Lidar_AI_Solution |
|---|
最近のバージョンだと上手く動かない事があるため、2024前半頃のバージョンに戻します。
|
cd Lidar_AI_Solution git checkout 8cd961f |
|---|
サンプルを実行してみよう
ここからは、CUDA-BEVFusionの READMEの「Quick Start for Inference」 に従い、用意されているサンプルデータ(camera + Lidarの1セット)に対してInference(推論)を行ってみます。
CUDA-BEVFusionのサンプルデータとモデルデータ
ここはREADME内の「1.Download models and datas to CUDA-BEVFusion directory」の部分の手順になります。
まず、以下の2つを上記リンク先よりダウンロードします。
- nuScenes-example_data.zip
- model.zip
これらを指定のディレクトリ Lidar_AI_Solution/CUDA-BEVFusion/ に展開します。
|
cd Lidar_AI_Solution/CUDA-BEVFusion/ unzip hogehoge/nuScenes-example-data.zip unzip hogehoge/models.zip |
|---|
以下のようなディレクトリ構成になります
|
Lidar_AI_Solution/CUDA-BEVFusion/ |-- example-data/ |-- model/ |
|---|
コンパイルと実行(Docker内)
ここからはREADMEの「2.Configure the environment.sh」から「5.Compile and run」(なぜか数字が飛んでますね)の部分の手順になります。
ここまでは単にファイルの準備でしたのでローカル環境でも良かったのですが、以後はライブラリ環境などが関係するため、Dockerの仮想環境内での作業になります。ということで、上の方で準備しましたdockerイメージを起動します。起動は今回は以下のようなスクリプトで行います。
|
#!/bin/bash #edit according to your environment D_WORK_DIR=/home/xxx/bev/ #run docker run --name cbev --gpus all -it --network host -w "${D_WORK_DIR}" -v "${D_WORK_DIR}":"${D_WORK_DIR}" --shm-size 16g cubev-nexty /bin/bash |
|---|
- 作業用ディレクトリの「D_WORK_DIR」を、ご自身の環境に合わせて編集してください。ここを起動時の初期ディレクトリ(-w)&docker内と外で共有するディレクトリ(-v)としています。
- --name cbev にて、起動したdockerにあだ名を付けます。
- --gpus allにて、GPUを全てdocker内からも使えるようにしています。
- --shm-size 16gにて、dockerで使うメモリ量を決めています。ご自身の環境に合わせてください。
- cubev-nextyは、Dockerfileより生成したイメージの名前です。変更した場合は修正してください。
上記の起動スクリプトにて無事dockerが起動すると、以下のように「dockerの仮想環境内で管理者権限(root)」のbashが立ち上がります。
| root:/home/xxx/bev/ # |
|---|
docker内で、ディレクトリの移動を行います(以後、ここがベースになります)
| cd Lidar_AI_Solution/CUDA-BEVFusion/ |
|---|
ここからはREADMEの「2.Configure the environment.sh」の部分になります。環境変数の設定を行います。試しに以下を実行してみます。
| bash tool/enviroment.sh |
|---|
出力が以下のようになるかと思います。
|
root:/home/xxx/bev/Lidar_AI_Solution/CUDA-BEVFusion# bash tool/environment.sh ========================================================== || MODEL: resnet50int8 || PRECISION: int8 || DATA: example-data || USEPython: OFF || || TensorRT: /path/to/TensorRT/lib || CUDA: /usr/local/cuda || CUDNN: /path/to/cudnn/lib ========================================================== Try to get the current device SM Current CUDA SM: 89 Configuration done! |
|---|
お手元のGPUから、自動でCUDA_SMが算出され、表示されます。 以下注意点です。
- 「Current CUDA SM:」の欄(GPUの世代によって変わります)が80~86だと問題無いのですが、89
など大きい場合は(今回扱うバージョンでは)上手く動きませんので、上書きで86に下げる必要があります。
tool/environment.shを以下のように編集します。
|
#export CUDASM=$cudasm export CUDASM=86 |
|---|
またこの場合、環境によってはNVIDIAドライバのダウングレード等が必要になる場合もございます。
- model/precisionなどはtool/environment.shを編集することで変更可能です。
以下は一番性能の良さそうなswint/fp16へと変更した例です。
|
# resnet50/resnet50int8/swint #export DEBUG_MODEL=resnet50int8 export DEBUG_MODEL=swint # fp16/int8 #export DEBUG_PRECISION=int8 export DEBUG_PRECISION=fp16 |
|---|
READMEにあるenvironment.sh内のパスの変更は、Dockerの環境変数で対応しているため、今回は不要かと思いますが、もし問題が起きましたらご対応ください。
次にREADMEの「5.Compile and run」に進みます。まず「モデルのTRTエンジン化」を行います。
| bash tool/build_trt_engine.sh |
|---|
以下のような表示が出ます。
|
root:/home/xxx/bev/Lidar_AI_Solution/CUDA-BEVFusion# bash tool/build_trt_engine.sh ========================================================== || MODEL: resnet50int8 || PRECISION: int8 || DATA: example-data || USEPython: OFF || || TensorRT: /path/to/TensorRT/lib || CUDA: /usr/local/cuda || CUDNN: /path/to/cudnn/lib ========================================================== Try to get the current device SM Current CUDA SM: 89 Configuration done! Building the model: model/resnet50int8/build/camera.backbone.plan, this will take several minutes. Wait a moment ???~. Building the model: model/resnet50int8/build/fuser.plan, this will take several minutes. Wait a moment ???~. Building the model: model/resnet50int8/build/camera.vtransform.plan, this will take several minutes. Wait a moment ???~. Building the model: model/resnet50int8/build/head.bbox.plan, this will take several minutes. Wait a moment ???~. |
|---|
次に「コンパイル&サンプルの推論」を行います。以下を実行します。
| bash tool/run.sh |
|---|
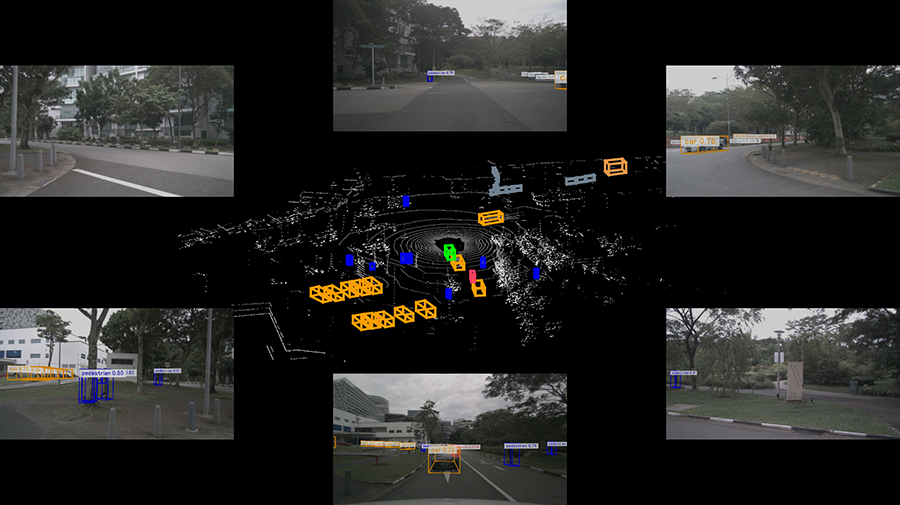
これを実行すると、build/cuda-bevfusion.jpg という画像が生成されます。 以下にも貼り付けておきますので、同様のものが生成されたかをご確認ください。 今回の起動法だとdocker外からも参照できますので、任意の画像ビューワーでご確認ください。
nuScenesで動画を作ろう
ここまででCUDA-BEVFusionの推論を行いましたが、「えっ?1枚だけ?」「Demonstrationの所の派手な動画は?」というような疑問があるかと思います(私もそうでした)。
実は作成のためのpythonスクリプト等は存在するのですが、この辺りの解説が全く無いため、通常は分からないような状態です。
ということで、ここからはネクスティ開発部が編み出しました、Demonstrationの派手な動画
を作るまでの手順を、解説していきたいと思います。
nuScenes データセットのダウンロード
上記の動画では、自動運転用の nuScenes というデータセットの、「v1.0 mini」というセットを使っています。
ということで、nuScenesのダウンロード から、以下のものをダウンロードしておきます。
(ダウンロードには、nuscenes.orgへのアカウント登録が必要です)
- Full Dataset(V1.0)の、mini(3.88GB)
v1.0-mini.tar
- Map Expansionの Map expansion pack(v1.3)
nuscenes-map-expansion-v1.3.zip
nuScenes データセットの展開
データの準備ですので、以下はdocker外で行います。 データの置き場所を、Lidar_AI_Solution/CUDA-BEVFusion/ 以下に作成します。
|
cd Lidar_AI_Solution/CUDA-BEVFusion/ mkdir data mkdir data/nuscenes |
|---|
nuscenes v1.0-mini.tarのdata以下への解凍を行います。
| tar xvf v1.0-mini.tar -C data/nuscenes |
|---|
nuscenes-map-expansion-v1.3.zipをdata/nuscenes/maps以下に解凍を行います。
| unzip -d data/nuscenes/maps/ nuscenes-map-expansion-v1.3.zip |
|---|
解凍後の状態は以下になります。
|
Lidar_AI_Solution/CUDA-BEVFusion/data/nuscenes/ |-- samples/ |-- sweeps/ |-- v1.0-mini/ |-- maps/ |-- basemap/ |-- expansion/ |-- prediction/ |-- xxxxxx.png が4枚 |
|---|
この data/ディレクトリを、bevfusion/data/ ディレクトリからも同様に参照できるように、シンボリックリンクを張っておきます。
|
cd bevfusion ln -s ../data/ . |
|---|
最終フォルダ構成はこんな感じになってます
(どこから見てもdata/でアクセスするため)
|
Lidar_AI_Solution/CUDA-BEVFusion/ |-- bevfusion/data/ (link) |-- data/ (本物) |
|---|
bevfusion(本家)側での準備
最後の前準備として、Lidar_AI_Solution/CUDA-BEVFusion/ ディレクトリにて、configs/ をbevfusion/
以下側にもコピーしておきます。こちらもdocker外で行います。
(同名の深いディレクトリの先にある、resnet50/ フォルダをコピーする目的です)
| cp -r configs/ bevfusion/ |
|---|
これでファイル関係の準備は完了です。
以後はdocker内での作業となります。Lidar_AI_Solution/CUDA-BEVFusion/
ディレクトリの下に、bevfusionというディレクトリがあり、こちらが本家のリポジトリクローンになっています。
nuScenesのデータ準備など、本家側のツールを使いますので、docker内でディレクトリを移動します。
| cd bevfusion |
|---|
bevfusionのコンパイルを実行します。
| python setup.py develop |
|---|
以下が出力例です。最後の方の出力が同様であればコンパイル成功です。
|
root:/home/xxx/bev/Lidar_AI_Solution/CUDA-BEVFusion/bevfusion#python setup.py
develop ...(中略)... Installed /home/xxx/bev/Lidar_AI_Solution/CUDA-BEVFusion/bevfusion Processing dependencies for mmdet3d==0.0.0 Finished processing dependencies for mmdet3d==0.0.0 |
|---|
bevfusion(本家)側の create_data.py を使い、nuScenesをbevfusionが使える形式に変換します。
今回はv1.0-miniですので、以下のようなスクリプトを実行します。
| python tools/create_data.py nuscenes --root-path ./data/nuscenes --out-dir ./data/nuscenes --version v1.0-mini --extra-tag nuscenes |
|---|
実行時の出力例です。
|
root:/home/xxx/bev/Lidar_AI_Solution/CUDA-BEVFusion/bevfusion# python
tools/create_data.py nuscenes --root-path ./data/nuscenes --out-dir ./data/nuscenes
--version v1.0-mini --extra-tag nuscenes ====== Loading NuScenes tables for version v1.0-mini... 23 category, 8 attribute, 4 visibility, 911 instance, 12 sensor, 120 calibrated_sensor, 31206 ego_pose, 8 log, 10 scene, 404 sample, 31206 sample_data, 18538 sample_annotation, 4 map, Done loading in 0.313 seconds. ====== Reverse indexing ... Done reverse indexing in 0.1 seconds. |
|---|
この結果、data/nuscenes以下が以下の様になればOKです。
|
data/nuscenes/ |-- maps/ |-- samples/ |-- sweeps/ |-- v1.0-mini/ |-- nuscenes_gt_database/ ←追加 |-- nuscenes_dbinfos_train.pkl ←追加 |-- nuscenes_infos_train.pkl ←追加 |-- nuscenes_infos_val.pkl ←追加 |
|---|
以上で本家bevfusion側での準備は完了です。
CUDA-BEVFusionでnuScenes miniの推論
docker内で、ディレクトリを元の Lidar_AI_Solution/CUDA-BEVFusion/ に戻します。
ここでおもむろに、以下のように dump-data.py というツールを実行します。
| python tool/dump-data.py |
|---|
こちらは、先程用意したdata/nuscenesを、1枚絵のexampleが使っていた形式に変換してくれるツールになっています。
実行例は以下のようになっています。81枚目でエラーで止まりますが、正常です(このスクリプトの終端実装が雑なためです、直せますがとりあえずそのままで・・)
|
root:/home/xxx/bev/Lidar_AI_Solution/CUDA-BEVFusion# python tool/dump-data.py Save tensor[(1, 6, 3, 256, 704), float16] to dump/00000/images.tensor Save tensor[(207998, 5), float16] to dump/00000/points.tensor Save tensor[(23, 9), float32] to dump/00000/gt_bboxes_3d.tensor Save tensor[(23,), int64] to dump/00000/gt_labels_3d.tensor Save tensor[(1, 6, 4, 4), float32] to dump/00000/camera_intrinsics.tensor ... (中略) ... Save tensor[(1, 4, 4), float32] to dump/00079/lidar_aug_matrix.tensor Save tensor[(1, 6, 3, 256, 704), float16] to dump/00080/images.tensor Save tensor[(235496, 5), float16] to dump/00080/points.tensor Save tensor[(37, 9), float32] to dump/00080/gt_bboxes_3d.tensor Save tensor[(37,), int64] to dump/00080/gt_labels_3d.tensor Save tensor[(1, 6, 4, 4), float32] to dump/00080/camera_intrinsics.tensor Save tensor[(1, 6, 4, 4), float32] to dump/00080/camera2ego.tensor Save tensor[(1, 4, 4), float32] to dump/00080/lidar2ego.tensor Save tensor[(1, 6, 4, 4), float32] to dump/00080/lidar2camera.tensor Save tensor[(1, 6, 4, 4), float32] to dump/00080/camera2lidar.tensor Save tensor[(1, 6, 4, 4), float32] to dump/00080/lidar2image.tensor Save tensor[(1, 6, 4, 4), float32] to dump/00080/img_aug_matrix.tensor Save tensor[(1, 4, 4), float32] to dump/00080/lidar_aug_matrix.tensor Traceback (most recent call last): File "tool/dump-data.py", line 97, in dump_tensor(args) File "tool/dump-data.py", line 61, in dump_tensor data = next(data_iter) File "/opt/conda/lib/python3.8/site-packages/torch/utils/data/dataloader.py", line 521, in __next__ data = self._next_data() File "/opt/conda/lib/python3.8/site-packages/torch/utils/data/dataloader.py", line 1176, in _next_data raise StopIteration StopIteration |
|---|
実行した結果、dump/ 以下に、00000~00080の81セット分、フォルダが作成されているかと思います。
次に先程の1枚サンプルを出力したrun.shを改造して、このdump/ 以下の81セットのデータに対して推論をするスクリプトを作成します。
run.shの最後の部分(./build/bevfusion ... の行)を以下に変更し、tools/run_nexty.sh など別名で保存してください。
|
#元のこの行をコメントアウトし、下のものに変更(dump以下に対して連続実行) #./build/bevfusion $DEBUG_DATA $DEBUG_MODEL $DEBUG_PRECISION #最終の出力先を作成 mkdir -p out_dump #dump/以下の81枚分のループ for i in {0..80} ; do TMP="00000${i}" ./build/bevfusion dump/${TMP: -5} $DEBUG_MODEL $DEBUG_PRECISION mv build/cuda-bevfusion.jpg out_dump/${TMP: -5}.jpg done Copy |
|---|
作成したtool/run_nexty.shを実行しますと、out_dump/以下に連番jpgが出力されます。
| bash tool/run_nexty.sh |
|---|
1枚目(00000.jpg)の出力例を以下に示します。
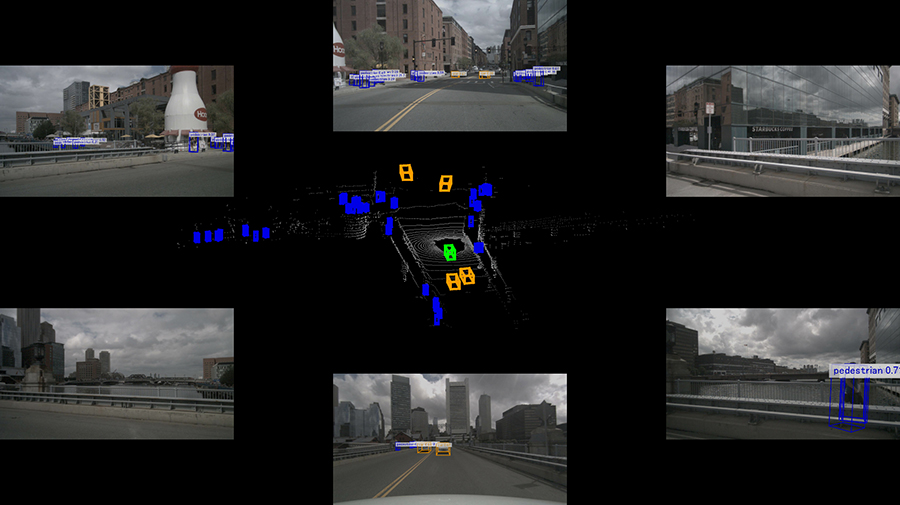
連番jpgからの動画化は、docker外でffmpegなどで行います。動画での結果は、ぜひご自身の目でお確かめください!
bevfusion(本家)側での準備
最後の前準備として、Lidar_AI_Solution/CUDA-BEVFusion/ ディレクトリにて、configs/ をbevfusion/
以下側にもコピーしておきます。こちらもdocker外で行います。
(同名の深いディレクトリの先にある、resnet50/ フォルダをコピーする目的です)
| cp -r configs/ bevfusion/ |
|---|
これでファイル関係の準備は完了です。
以後はdocker内での作業となります。Lidar_AI_Solution/CUDA-BEVFusion/
ディレクトリの下に、bevfusionというディレクトリがあり、こちらが本家のリポジトリクローンになっています。
nuScenesのデータ準備など、本家側のツールを使いますので、docker内でディレクトリを移動します。
| cd bevfusion |
|---|
bevfusionのコンパイルを実行します。
| python setup.py develop |
|---|
以下が出力例です。最後の方の出力が同様であればコンパイル成功です。
|
root:/home/xxx/bev/Lidar_AI_Solution/CUDA-BEVFusion/bevfusion#python setup.py
develop ...(中略)... Installed /home/xxx/bev/Lidar_AI_Solution/CUDA-BEVFusion/bevfusion Processing dependencies for mmdet3d==0.0.0 Finished processing dependencies for mmdet3d==0.0.0 |
|---|
bevfusion(本家)側の create_data.py を使い、nuScenesをbevfusionが使える形式に変換します。
今回はv1.0-miniですので、以下のようなスクリプトを実行します。
| python tools/create_data.py nuscenes --root-path ./data/nuscenes --out-dir ./data/nuscenes --version v1.0-mini --extra-tag nuscenes |
|---|
実行時の出力例です。
|
root:/home/xxx/bev/Lidar_AI_Solution/CUDA-BEVFusion/bevfusion# python
tools/create_data.py nuscenes --root-path ./data/nuscenes --out-dir ./data/nuscenes
--version v1.0-mini --extra-tag nuscenes ====== Loading NuScenes tables for version v1.0-mini... 23 category, 8 attribute, 4 visibility, 911 instance, 12 sensor, 120 calibrated_sensor, 31206 ego_pose, 8 log, 10 scene, 404 sample, 31206 sample_data, 18538 sample_annotation, 4 map, Done loading in 0.313 seconds. ====== Reverse indexing ... Done reverse indexing in 0.1 seconds. |
|---|
この結果、data/nuscenes以下が以下の様になればOKです。
|
data/nuscenes/ |-- maps/ |-- samples/ |-- sweeps/ |-- v1.0-mini/ |-- nuscenes_gt_database/ ←追加 |-- nuscenes_dbinfos_train.pkl ←追加 |-- nuscenes_infos_train.pkl ←追加 |-- nuscenes_infos_val.pkl ←追加 |
|---|
以上で本家bevfusion側での準備は完了です。
CUDA-BEVFusionでnuScenes miniの推論
docker内で、ディレクトリを元の Lidar_AI_Solution/CUDA-BEVFusion/ に戻します。
ここでおもむろに、以下のように dump-data.py というツールを実行します。
| python tool/dump-data.py |
|---|
こちらは、先程用意したdata/nuscenesを、1枚絵のexampleが使っていた形式に変換してくれるツールになっています。
実行例は以下のようになっています。81枚目でエラーで止まりますが、正常です(このスクリプトの終端実装が雑なためです、直せますがとりあえずそのままで・・)
|
root:/home/xxx/bev/Lidar_AI_Solution/CUDA-BEVFusion# python tool/dump-data.py Save tensor[(1, 6, 3, 256, 704), float16] to dump/00000/images.tensor Save tensor[(207998, 5), float16] to dump/00000/points.tensor Save tensor[(23, 9), float32] to dump/00000/gt_bboxes_3d.tensor Save tensor[(23,), int64] to dump/00000/gt_labels_3d.tensor Save tensor[(1, 6, 4, 4), float32] to dump/00000/camera_intrinsics.tensor ... (中略) ... Save tensor[(1, 4, 4), float32] to dump/00079/lidar_aug_matrix.tensor Save tensor[(1, 6, 3, 256, 704), float16] to dump/00080/images.tensor Save tensor[(235496, 5), float16] to dump/00080/points.tensor Save tensor[(37, 9), float32] to dump/00080/gt_bboxes_3d.tensor Save tensor[(37,), int64] to dump/00080/gt_labels_3d.tensor Save tensor[(1, 6, 4, 4), float32] to dump/00080/camera_intrinsics.tensor Save tensor[(1, 6, 4, 4), float32] to dump/00080/camera2ego.tensor Save tensor[(1, 4, 4), float32] to dump/00080/lidar2ego.tensor Save tensor[(1, 6, 4, 4), float32] to dump/00080/lidar2camera.tensor Save tensor[(1, 6, 4, 4), float32] to dump/00080/camera2lidar.tensor Save tensor[(1, 6, 4, 4), float32] to dump/00080/lidar2image.tensor Save tensor[(1, 6, 4, 4), float32] to dump/00080/img_aug_matrix.tensor Save tensor[(1, 4, 4), float32] to dump/00080/lidar_aug_matrix.tensor Traceback (most recent call last): File "tool/dump-data.py", line 97, in dump_tensor(args) File "tool/dump-data.py", line 61, in dump_tensor data = next(data_iter) File "/opt/conda/lib/python3.8/site-packages/torch/utils/data/dataloader.py", line 521, in __next__ data = self._next_data() File "/opt/conda/lib/python3.8/site-packages/torch/utils/data/dataloader.py", line 1176, in _next_data raise StopIteration StopIteration |
|---|
実行した結果、dump/ 以下に、00000~00080の81セット分、フォルダが作成されているかと思います。
次に先程の1枚サンプルを出力したrun.shを改造して、このdump/ 以下の81セットのデータに対して推論をするスクリプトを作成します。
run.shの最後の部分(./build/bevfusion ... の行)を以下に変更し、tools/run_nexty.sh など別名で保存してください。
|
#元のこの行をコメントアウトし、下のものに変更(dump以下に対して連続実行) #./build/bevfusion $DEBUG_DATA $DEBUG_MODEL $DEBUG_PRECISION #最終の出力先を作成 mkdir -p out_dump #dump/以下の81枚分のループ for i in {0..80} ; do TMP="00000${i}" ./build/bevfusion dump/${TMP: -5} $DEBUG_MODEL $DEBUG_PRECISION mv build/cuda-bevfusion.jpg out_dump/${TMP: -5}.jpg done Copy |
|---|
作成したtool/run_nexty.shを実行しますと、out_dump/以下に連番jpgが出力されます。
| bash tool/run_nexty.sh |
|---|
1枚目(00000.jpg)の出力例を以下に示します。
連番jpgからの動画化は、docker外でffmpegなどで行います。動画での結果は、ぜひご自身の目でお確かめください!
bevfusion(本家)側での準備
最後の前準備として、Lidar_AI_Solution/CUDA-BEVFusion/ ディレクトリにて、configs/ をbevfusion/
以下側にもコピーしておきます。こちらもdocker外で行います。
(同名の深いディレクトリの先にある、resnet50/ フォルダをコピーする目的です)
| cp -r configs/ bevfusion/ |
|---|
これでファイル関係の準備は完了です。
以後はdocker内での作業となります。Lidar_AI_Solution/CUDA-BEVFusion/
ディレクトリの下に、bevfusionというディレクトリがあり、こちらが本家のリポジトリクローンになっています。
nuScenesのデータ準備など、本家側のツールを使いますので、docker内でディレクトリを移動します。
| cd bevfusion |
|---|
bevfusionのコンパイルを実行します。
| python setup.py develop |
|---|
以下が出力例です。最後の方の出力が同様であればコンパイル成功です。
|
root:/home/xxx/bev/Lidar_AI_Solution/CUDA-BEVFusion/bevfusion#python setup.py
develop ...(中略)... Installed /home/xxx/bev/Lidar_AI_Solution/CUDA-BEVFusion/bevfusion Processing dependencies for mmdet3d==0.0.0 Finished processing dependencies for mmdet3d==0.0.0 |
|---|
bevfusion(本家)側の create_data.py を使い、nuScenesをbevfusionが使える形式に変換します。
今回はv1.0-miniですので、以下のようなスクリプトを実行します。
| python tools/create_data.py nuscenes --root-path ./data/nuscenes --out-dir ./data/nuscenes --version v1.0-mini --extra-tag nuscenes |
|---|
実行時の出力例です。
|
root:/home/xxx/bev/Lidar_AI_Solution/CUDA-BEVFusion/bevfusion# python
tools/create_data.py nuscenes --root-path ./data/nuscenes --out-dir ./data/nuscenes
--version v1.0-mini --extra-tag nuscenes ====== Loading NuScenes tables for version v1.0-mini... 23 category, 8 attribute, 4 visibility, 911 instance, 12 sensor, 120 calibrated_sensor, 31206 ego_pose, 8 log, 10 scene, 404 sample, 31206 sample_data, 18538 sample_annotation, 4 map, Done loading in 0.313 seconds. ====== Reverse indexing ... Done reverse indexing in 0.1 seconds. |
|---|
この結果、data/nuscenes以下が以下の様になればOKです。
|
data/nuscenes/ |-- maps/ |-- samples/ |-- sweeps/ |-- v1.0-mini/ |-- nuscenes_gt_database/ ←追加 |-- nuscenes_dbinfos_train.pkl ←追加 |-- nuscenes_infos_train.pkl ←追加 |-- nuscenes_infos_val.pkl ←追加 |
|---|
以上で本家bevfusion側での準備は完了です。
CUDA-BEVFusionでnuScenes miniの推論
docker内で、ディレクトリを元の Lidar_AI_Solution/CUDA-BEVFusion/ に戻します。
ここでおもむろに、以下のように dump-data.py というツールを実行します。
| python tool/dump-data.py |
|---|
こちらは、先程用意したdata/nuscenesを、1枚絵のexampleが使っていた形式に変換してくれるツールになっています。
実行例は以下のようになっています。81枚目でエラーで止まりますが、正常です(このスクリプトの終端実装が雑なためです、直せますがとりあえずそのままで・・)
|
root:/home/xxx/bev/Lidar_AI_Solution/CUDA-BEVFusion# python tool/dump-data.py Save tensor[(1, 6, 3, 256, 704), float16] to dump/00000/images.tensor Save tensor[(207998, 5), float16] to dump/00000/points.tensor Save tensor[(23, 9), float32] to dump/00000/gt_bboxes_3d.tensor Save tensor[(23,), int64] to dump/00000/gt_labels_3d.tensor Save tensor[(1, 6, 4, 4), float32] to dump/00000/camera_intrinsics.tensor ... (中略) ... Save tensor[(1, 4, 4), float32] to dump/00079/lidar_aug_matrix.tensor Save tensor[(1, 6, 3, 256, 704), float16] to dump/00080/images.tensor Save tensor[(235496, 5), float16] to dump/00080/points.tensor Save tensor[(37, 9), float32] to dump/00080/gt_bboxes_3d.tensor Save tensor[(37,), int64] to dump/00080/gt_labels_3d.tensor Save tensor[(1, 6, 4, 4), float32] to dump/00080/camera_intrinsics.tensor Save tensor[(1, 6, 4, 4), float32] to dump/00080/camera2ego.tensor Save tensor[(1, 4, 4), float32] to dump/00080/lidar2ego.tensor Save tensor[(1, 6, 4, 4), float32] to dump/00080/lidar2camera.tensor Save tensor[(1, 6, 4, 4), float32] to dump/00080/camera2lidar.tensor Save tensor[(1, 6, 4, 4), float32] to dump/00080/lidar2image.tensor Save tensor[(1, 6, 4, 4), float32] to dump/00080/img_aug_matrix.tensor Save tensor[(1, 4, 4), float32] to dump/00080/lidar_aug_matrix.tensor Traceback (most recent call last): File "tool/dump-data.py", line 97, in dump_tensor(args) File "tool/dump-data.py", line 61, in dump_tensor data = next(data_iter) File "/opt/conda/lib/python3.8/site-packages/torch/utils/data/dataloader.py", line 521, in __next__ data = self._next_data() File "/opt/conda/lib/python3.8/site-packages/torch/utils/data/dataloader.py", line 1176, in _next_data raise StopIteration StopIteration |
|---|
実行した結果、dump/ 以下に、00000~00080の81セット分、フォルダが作成されているかと思います。
次に先程の1枚サンプルを出力したrun.shを改造して、このdump/ 以下の81セットのデータに対して推論をするスクリプトを作成します。
run.shの最後の部分(./build/bevfusion ... の行)を以下に変更し、tools/run_nexty.sh など別名で保存してください。
|
#元のこの行をコメントアウトし、下のものに変更(dump以下に対して連続実行) #./build/bevfusion $DEBUG_DATA $DEBUG_MODEL $DEBUG_PRECISION #最終の出力先を作成 mkdir -p out_dump #dump/以下の81枚分のループ for i in {0..80} ; do TMP="00000${i}" ./build/bevfusion dump/${TMP: -5} $DEBUG_MODEL $DEBUG_PRECISION mv build/cuda-bevfusion.jpg out_dump/${TMP: -5}.jpg done Copy |
|---|
作成したtool/run_nexty.shを実行しますと、out_dump/以下に連番jpgが出力されます。
| bash tool/run_nexty.sh |
|---|
1枚目(00000.jpg)の出力例を以下に示します。
連番jpgからの動画化は、docker外でffmpegなどで行います。動画での結果は、ぜひご自身の目でお確かめください!
おわりに
本コラムでは、CUDA-BEVFusionを実際に手元で動かしてみる手順を解説しました。 本来は車載用の自動運転の技術ですが、手元のPCシミュレーションで動かしてみると、より理解が深まったり、細かい所が見えてきたりするものです。
ネクスティエレクトロニクス開発部では、先端の技術動向を調査し、 PCやGPUサーバー・NVIDIA DRIVE Orin等のエッジで実際に試してみる事例を数多く行っています。
また、ネクスティ エレクトロニクスでは、こういった自動運転・AIに関する技術サポートや、学習のためのDGX-H100/A100などの サーバートライアル環境サービス(GPU Advanced Test Drive:GAT) も行っています。 お気軽にお問い合わせください。