Introduction
What is Azure RTOS (ThreadX)?
Azure RTOS (ThreadX) is a real-time OS suite for embedded systems provided by Microsoft. It is centered around the core kernel ThreadX, and includes the file system FileX, the TCP/IP stack NetX Duo, the USB stack USBX, the GUI library GUIX, and more, all in one package, comprehensively covering the RTOS functions required for a standalone microcontroller.
Originally based on ThreadX, developed by Express Logic in the 1990s, it has a proven track record in billions of devices, including aerospace, medical, and industrial equipment. After being acquired by Microsoft in 2019 and released free of charge as Azure RTOS (ThreadX), it can now be adopted at no additional cost, including for commercial use. It can also be seamlessly integrated with Azure IoT middleware and security features, allowing you to quickly build the latest IoT solutions based on cloud connectivity.
The ThreadX kernel operates with approximately 2 KB of RAM and features sub-microsecond context SWITCHES, 100% deterministic scheduling, a MISRA-compliant code base, etc. Another major advantage is that it is included as standard in the BSPs/SDKs of major semiconductor vendors, allowing you to immediately check operation by connecting an evaluation board.
ThreadX Features and Benefits
The ThreadX kernel is designed to enable embedded developers to achieve high real-time performance even with small resources. Key features and benefits include:
| Features | Explanation | advantage |
|---|---|---|
| Small footprint | Code size 2-6 KB, RAM usage about 2 KB | Can be used on MCUs with limited memory |
| Fast and deterministic scheduling | Sub-microsecond context SWITCHES, all APIs run in O(1) | Reliable even in control systems where timing accuracy is important |
| Priority inheritance mutex | Automatically avoid priority inversion | Prevents degradation of real-time characteristics |
| Rich synchronization/communication APIs | Message queues, semaphores, event flags, block pools, etc. | Select the optimal IPC to meet your application requirements |
| Automatic error checking | Validate parameters and status when calling API | Early detection of bugs and improved development efficiency |
| Integrated Tool Chain | Provides visualization tools such as TraceX and GUIX Studio | Easy to analyze runtime behavior |
| Safety Certification Track Record | DO-178C (Aviation), IEC 61508 (Industrial), ISO 26262 (Automotive), etc. | Proven track record in mission-critical applications |
| Multi-core/AMP compatible | A separate kernel can run on each core | Heterogeneous SoC for easy scalability |
ThreadX has a simple API, low learning cost, and once you've mastered it, it's easy to port to other MCUs. These features make it an RTOS that can shorten development time while maintaining high quality, and it's used in a wide range of fields.
Hardware used
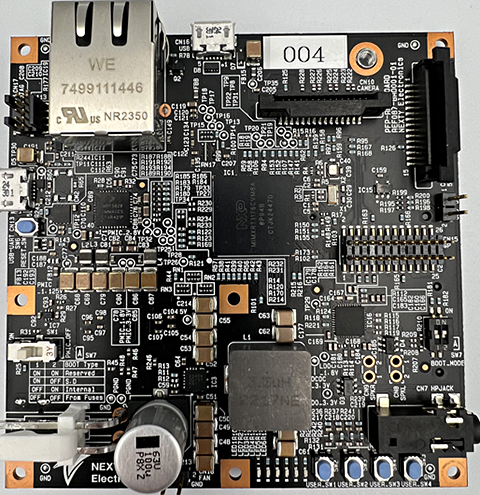
Board: NXT i.MX RT1170 reference board
Processor: ARM Cortex-M7 (up to 1GHz)
Development environment: MCUXpresso IDE 11.9.0
Implementing a "Hello World" Application
Understanding the project structure
A ThreadX application has the following basic structure:
プロジェクト/
    ├── source/
    │   └── threadx_demo.c    # メインアプリケーション
    ├── board/                # ボード固有の設定
    ├── drivers/              # ハードウェアドライバ
    └── azure_rtos/           # ThreadX ライブラリ
This timethreadx_demo.cWe will implement a simple "Hello World" application using the file as the core.
The role of the main() function
ThreadX Applicationmain()Functions have a slightly different role than in traditional C programs:
int main()
    {
        /* ボードハードウェアの初期化 */
        BOARD_ConfigMPU();
        BOARD_InitPins();
        BOARD_BootClockRUN();
        BOARD_InitDebugConsole();

        PRINTF("Azure RTOS ThreadX Hello World Demo\r\n");
        PRINTF("====================================\r\n");

        /* ThreadXカーネルに制御を移す */
        tx_kernel_enter();

        return 0;
    }
Key points:
- 1. Hardware initialization: Basic board configuration (clocks, pins, debug console, etc.)
- 2. Initial message: Announcing the start of the application
- 3. Kernel startup:
tx_kernel_enter()Pass control to ThreadX with - 4. Return statement: never actually reached (kernel keeps control)
Meaning of tx_kernel_enter()
tx_kernel_enter()is the most important function that launches the ThreadX kernel:
tx_kernel_enter();When this function is called:
- 1. Kernel initialization: Initialize ThreadX internal data structures
- 2. Application definition call:
tx_application_define()Automatically execute - 3. Scheduler starts: Created threads start running
- 4. Transfer of control: This function never returns
important:
tx_kernel_enter()No further code will be executed. All application LOGIC must be implemented within a thread.
Implementing tx_application_define()
tx_application_define()is the heart of a ThreadX application. This functiontx_kernel_enter()It is called automatically by:
void tx_application_define(void *first_unused_memory)
    {
        CHAR *thread_stack_pointer = TX_NULL;

        /* 未使用メモリパラメータを無視 */
        TX_THREAD_NOT_USED(first_unused_memory);

        PRINTF("ThreadXアプリケーションの初期化を開始...\r\n");

        /* バイトメモリプールを作成(スレッドスタック用) */
        tx_byte_pool_create(&byte_pool, "main byte pool",
                            (VOID *)memory_pool, BYTE_POOL_SIZE);

        /* Hello Worldスレッド用のスタックメモリを割り当て */
        tx_byte_allocate(&byte_pool, (VOID **)&thread_stack_pointer,
                         HELLO_THREAD_STACK_SIZE, TX_NO_WAIT);

        /* Hello Worldスレッドを作成 */
        tx_thread_create(&hello_thread,                    /* スレッド制御ブロック */
                         "Hello World Thread",            /* スレッド名 */
                         hello_thread_entry,               /* スレッドエントリ関数 */
                         0,                                /* スレッド入力パラメータ */
                         thread_stack_pointer,             /* スタックの開始アドレス */
                         HELLO_THREAD_STACK_SIZE,          /* スタックサイズ */
                         1,                                /* 優先度(1が最高) */
                         1,                                /* プリエンプション閾値 */
                         TX_NO_TIME_SLICE,                 /* タイムスライス無効 */
                         TX_AUTO_START);                   /* 自動開始 */

        PRINTF("Hello Worldスレッドが作成されました\r\n");
    }
What this function does:
- 1. Create a memory pool: Manage memory space for thread stacks
- 2. Memory allocation: Allocate the stack memory required for each thread
- 3. Thread Creation: Define and create threads for your application.
- 4. Initialization complete: Notify the kernel that the thread is ready to run
First thread creation
tx_thread_create()The function is the core API of ThreadX. Let's take a closer look at what each parameter means:
UINT tx_thread_create(
        TX_THREAD *thread_ptr,        // スレッド制御ブロックへのポインタ
        CHAR *name_ptr,               // スレッド名(デバッグ用)
        VOID (*entry_function)(ULONG), // スレッドエントリ関数
        ULONG entry_input,            // エントリ関数への入力パラメータ
        VOID *stack_start,            // スタック領域の開始アドレス
        ULONG stack_size,             // スタックサイズ(バイト)
        UINT priority,                // 優先度(0-31、0が最高)
        UINT preempt_threshold,       // プリエンプション閾値
        ULONG time_slice,             // タイムスライス(0で無効)
        UINT auto_start               // 自動開始フラグ
    );
Parameter details:
- priority: 0 is the highest priority, 31 is the lowest priority
- preempt_threshold: Preemption is only possible if the priority is equal to or higher than this value.
- time_slice: time sharing between threads of the same priority
- auto_start:
TX_AUTO_STARTStart execution as soon as it is created
How to output debug messages
In ThreadX applications,PRINTF()Use a macro to print a debug message:
#include "fsl_debug_console.h"  // PRINTF マクロの定義

    // 使用例
    PRINTF("Hello, ThreadX World!\r\n");
    PRINTF("カウンタ値: %lu\r\n", counter);
    PRINTF("スレッド名: %s\r\n", tx_thread_identify()->tx_thread_name);
Important note:
- Line ending code:
\r\n(Serial communication convention) - Format specifiers:
%lufor ULONG,%sfor string - Thread-safe: Can be called from multiple threads simultaneously
Actual code explanation
Let's take a closer look at the completed Hello World thread entry function:
void hello_thread_entry(ULONG thread_input)
    {
        ULONG counter = 0;

        /* スレッド入力パラメータを無視 */
        TX_THREAD_NOT_USED(thread_input);

        /* 美しいバナー表示 */
        PRINTF("\r\n");
        PRINTF("*********************************************\r\n");
        PRINTF("*    Azure RTOS ThreadX Hello World!       *\r\n");
        PRINTF("*********************************************\r\n");
        PRINTF("\r\n");

        /* スレッド情報の表示 */
        PRINTF("Hello Worldスレッドが開始されました\r\n");
        PRINTF("スレッド名: %s\r\n", tx_thread_identify()->tx_thread_name);
        PRINTF("優先度: %d\r\n", tx_thread_identify()->tx_thread_priority);
        PRINTF("\r\n");

        /* メインループ */
        while (1)
        {
            counter++;

            PRINTF("[カウンタ: %lu] Hello, Azure RTOS ThreadX World!\r\n", counter);

            /* 1秒間スリープ(100 ticks = 1秒、デフォルト設定では100Hz) */
            tx_thread_sleep(100);

            /* 10回ごとにシステム情報を表示 */
            if (counter % 10 == 0)
            {
                PRINTF("\r\n--- システム情報 ---\r\n");
                PRINTF("システムタイマー: %lu ticks\r\n", tx_time_get());
                PRINTF("スレッド実行回数: %lu\r\n", counter);
                PRINTF("\r\n");
            }
        }
    }
Code highlights:
- 1. Infinite Loop: Threads usually run in an infinite loop
- 2. tx_thread_sleep(): Sleeps a thread for a specified number of ticks
- 3. tx_thread_identify(): Get information about the currently running thread
- 4. tx_time_get(): Get the number of ticks since the system started
- 5. Counter: Tracks the number of times a thread has run
Example of execution result
Azure RTOS ThreadX Hello World Demo
    ====================================
    ThreadXアプリケーションの初期化を開始...
    Hello Worldスレッドが作成されました

    *********************************************
    *    Azure RTOS ThreadX Hello World!       *
    *********************************************

    Hello Worldスレッドが開始されました
    スレッド名: Hello World Thread
    優先度: 1

    [カウンタ: 1] Hello, Azure RTOS ThreadX World!
    [カウンタ: 2] Hello, Azure RTOS ThreadX World!
    [カウンタ: 3] Hello, Azure RTOS ThreadX World!
    ...
    [カウンタ: 10] Hello, Azure RTOS ThreadX World!

    --- システム情報 ---
    システムタイマー: 1000 ticks
    スレッド実行回数: 10
This simple example will help you understand the basic program structure and working principles of threads in ThreadX.
Learning Points:
- ThreadX startup sequence (main → tx_kernel_enter → tx_application_define → thread execution)
- Memory Management Basics (Byte Pools and Memory Allocation)
- Thread creation and execution control
- How to get system information
- Using debug output effectively
Build and run
How to build the project
1. Clean and build the project
- Right-click on this project in the Project Explorer of MCUXpresso IDE and run Clean Project.
- Next, run Build Project.
"Finished building target"If a message appears on the console, it's successful.
2. Check for errors
- Please make sure there are no error logs. If there is only a warning, you can proceed.
Debug Settings
1. Create a Debug configuration
- Right-click on the project → Debug As → Debug Configurations...
- Select MCUXpresso IDE LinkServer Debug,
evkbmimxrt1170_threadx_demoCreate a configuration. - If you are using another probe such as J-Link, select the appropriate option.
2. Flash Options
- Checking the Program Flash option will automatically write to flash when you start debugging.
3. Serial port settings
115200 8N1is the default (same as the NXP SDK example).
Writing and running the program
1. Connect the board via USB
- Connect both the Debug port (JTAG/SWD) and the UART port to your PC.
2. Click the Debug button
- The pre-built binary will be written to flash and the IDE will automatically attach the debugger.
3. Run/Resume (F8)
- If it stops at the initial breakpoint
F8will start the execution.
Checking the serial output
1. Start the terminal software
- Use your favorite terminal such as Tera Term or PuTTY.
- Select the corresponding COM port and set the baud rate
115200, data bits8,parityNone, stop bits1Set the
2. Check the output
- If the Hello World message and counter are displayed every second as shown below, the operation is successful.

Conclusion
In this article, we explained how to create and run a simple "Hello World" application as your first step using Azure RTOS (ThreadX).
What I learned:
- Basic program structure of ThreadX (main → tx_kernel_enter → tx_application_define → thread execution)
- Memory Management Basics (Byte Pools and Memory Allocation)
- Thread creation and execution control
- Obtaining system information and debug output
By understanding this simple example, you have gained a foundation for developing ThreadX applications. The next step is to explore more practical features such as communication and scheduling between multiple threads.
NEXTY Electronics Initiatives
NEXTY Electronics Corporation is a core company in the Toyota Tsusho Group's electronics business and boasts one of the largest scales in the field of car electronics.
With technology and products at our core, we will meet the needs of our customers and society in a wide range of fields, provide solutions to social issues, and contribute to the realization of a better society.
Additionally, NEXTY Electronics' development team utilizes the products it handles to carry out in-house development and contract development (hardware and software development).
We will be happy to assist you with any problems you may have, so please feel free to contact us.