
This is the second installment of our series of articles on how to build an i.MX development environment.
In the previous column, we covered the topic of building an i.MX development environment, from setting up the host machine to building Yocto and using bitbake. In this column, we will show you how to write the files generated by bitbake to an i.MX evaluation board and perform a simple functionality check.
Overall flow
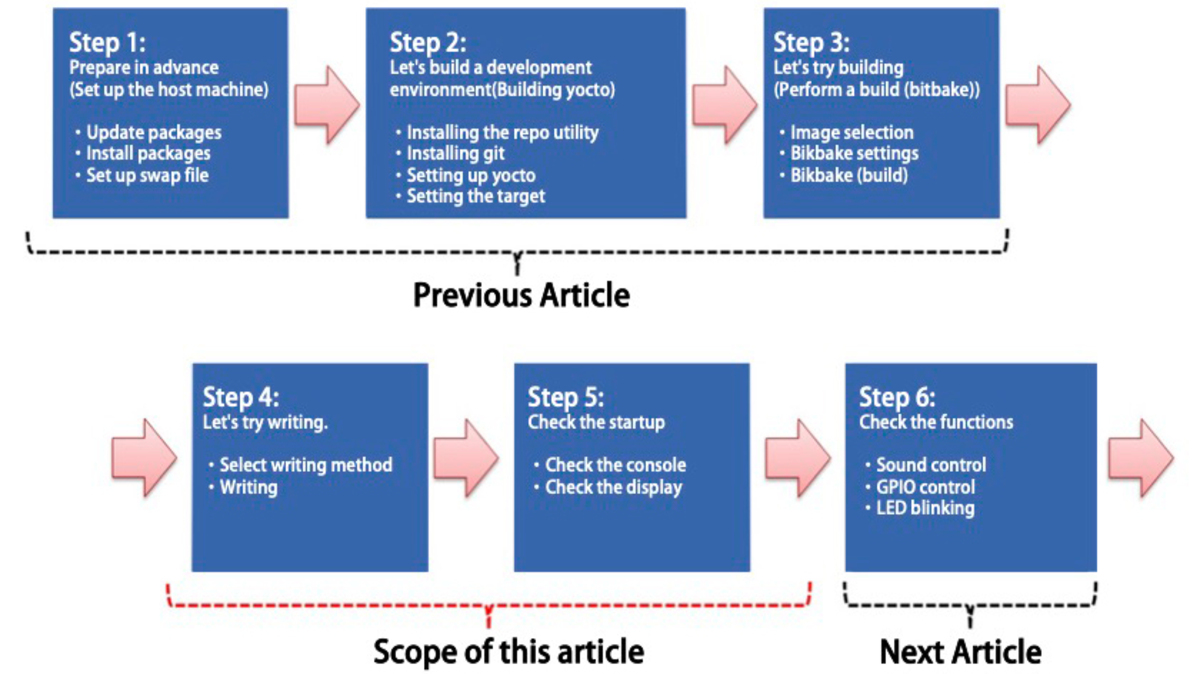
The overall process from setting up the Yocto development environment, building an image file, writing it to the i.MX evaluation board, and verifying functionality is as follows:
① Preparation: Setting up the host machine
② Let's build a development environment: Build a development environment with Yocto
③Let's try building it: Build the image
④ Let's try writing: Write the generated image to the evaluation board
⑤ Let’s check the startup: Check that the evaluation board starts up
⑥ Let's check the functionality: Check the actual operation on the evaluation board
In the previous column, we introduced steps 1 to 3. In this column, we will introduce steps 4 to 5 (" 3. Let's try writing" and "4.Let's check the startup"), and step 6 will be introduced in the next column.
Flow of building an i.MX development environment using Yocto
Review of last time and what we will prepare this time
In the previous column, we created a Yocto Project build environment on the host machine and built an image for the i.MX evaluation board. The evaluation board we used was the i.MX 8M Plus (8MPPLUSLPD4-EVK).

Reference image: i.MX 8M Plus (8MPPLUSLPD4-EVK)
- Reference URL: 8MPLUSLPD4-EVK
- Reference URL: i.MX Yocto Project User's Guide
- Reference URL: Embedded Linux for i.MX Applications Processors
1. Check the generated files
Check that the image file (imx-image-full-imx8mp-lpddr4-evk-20240710002334.rootfs.wic.zst) was created in the folder with the following path during the build (bitbake) in the previous column.
| $ cd ~/imx-yocto-bsp/build/tmp/deploy/images/imx8mp-lpddr4-evk $ ls ~~~~~~~~ ~~~~~~~~ imx-image-full-imx8mp-lpddr4-evk.rootfs.manifest imx-image-full-imx8mp-lpddr4-evk.rootfs.tar.zst imx-image-full-imx8mp-lpddr4-evk.rootfs.wic.bmap imx-image-full-imx8mp-lpddr4-evk.rootfs.wic.zst ~~~~~~~~ |
|---|
If the file is not there, go back to the previous column and run bitbake again.
2. What to prepare
This time we will write an image file to the evaluation board. The necessary items are listed below.
| Item | Content |
|---|---|
| Host Machine | PC used in the previous column |
| Evaluation board | i.MX 8M Plus (8MPPLUSLPD4-EVK) |
| Evaluation board power supply | AC power supply (USB-C) included with evaluation board |
| USB CABLES | For connecting the host machine and evaluation board (evaluation board side: USB-C connection) |
| USB CABLES | For connecting the host machine and evaluation board (evaluation board side: USB-microB connection) |
| MicroSD card | 8GB or more (32-128GB recommended) |
| Display | LCD display that can be connected via HDMI |
Let's try writing
Before writing the image file to the evaluation board, consider how to start (boot) the evaluation board. According to the reference manual, the following boot devices are supported.
The boot devices for the evaluation board are listed below.
| Boot Method | Content |
|---|---|
| FlexSPI NOR Flash | Serial NOR Flash via FlexSPI |
| FlexSPI NAND Flash | Serial NAND flash via FlexSPI |
| NAND Flash | NAND Flash |
| SD/eMMC | SD/eMMC |
| Serial (SPI) NOR | Serial (SPI) NOR |
In this column, we will write an image file via serial download to the microSD card attached to the evaluation board and then boot it. We will use a microSD card of about 32GB.
Supplementary Note: An 8GB microSD will be sufficient for the image file used in this column, but if you are self-building applications on the evaluation board you will be developing on, you may need a microSD of 32GB or more.
We have confirmed that a microSD of 128GB capacity will work.
3. Select the writing method
There are two main ways to write an image file to the microSD card that will be the boot device. You can connect the host machine and evaluation board via USB and write the image to the microSD card attached to the evaluation board (uuu), or you can write the image to a microSD card attached to a card reader connected to the host machine (dd).
The writing method for each is described below.
| Writing method | Description |
|---|---|
| uuu | Abbreviation for Universal Update Utility A method to write to the evaluation board by connecting the host machine and the evaluation board via USB A writing tool (uuu) must be downloaded separately from the following site https://github.com/nxp-imx/mfgtools |
| dd | A LINUX command that reads a file in blocks and outputs it using the specified conversion. Insert the microSD into the host machine and extract files directly to the microSD card via commands. |
This article describes how to write using uuu. We plan to introduce the method using dd in another article.
4. Write
We will explain how to write using uuu.
Insert the microSD card into the evaluation board and connect the host machine and the USB-C terminal on the evaluation board with a USB cable.

Figure: Connection diagram between host machine and evaluation board
If you want to use uuu to write an image file to a microSD card, you will need to install uuu on your host machine.
Download uuu (the latest version, Release uuu_1.5.182, at the time of writing this column) fromhttps://github.com/nxp-imx/mfgtools/releases
| $ cd ~/Downloads $ wget https://github.com/nxp-imx/mfgtools/releases/download/uuu_1.5.182/uuu |
|---|
Change the attributes of the downloaded file and copy it to /user/bin
| $ chmod +x uuu $ sudo cp uuu /usr/bin |
|---|
See below for the command details.
| Command | Content | ||
|---|---|---|---|
| chmod +<permission> <file> | Sets <permission> on <file> | ||
| <permission> | Assign values or permissions | ||
| Number | Authority | Content | |
| 0 | No permissions | ||
| 1 | x | Executable | |
| 2 | w | Writable | |
| 3 | wx | Write and execute | |
| 4 | r | Readable | |
| 5 | rx | Can be read and executed | |
| 6 | rw | Read and write allowed | |
| 7 | rwx | Read, write, and execute | |
| <file> | File name | ||
| cp <file1> <file2> | Copy from <folder/file> to <folder/file> | ||
Operate the Boot Switch (4-bit DIP switch) on the upper left of the evaluation board to set the BOOT MODE to Serial Download “0001.”
Table Boot Switch and BOOT MODE of the evaluation board
| Boot Switch | BOOT MODE |
|---|---|
| 0000 | Boot From Fuse |
| 0001 | Serial Download |
| 0010 | eMMC/SDHC3 |
| 0011 | MicroSD/SDHC2 |
| 0100 | NAND 256 page |
| 0101 | NAND 512 page |
| 0110 | QSPI 3B Read |
| 1000 | ECSPI Flash |
| 1110 | Infinite Loop |
Once the hardware is ready, power up the evaluation board and begin programming.
| $ cd ~/imx-yocto-bsp/build/tmp/deploy/images/imx8mp-lpddr4-evk $ sudo uuu -b sd_all imx-image-full-imx8mp-lpddr4-evk.wic.zst |
|---|
If "Success 1" appears on the screen, the writing was successful.
| uuu (Universal Update Utility) for nxp imx chips -- libuuu_1.5.182-0-gda3cd53 Success 1 Failure 2:1-1F0A3000 6/ 6 [Done] FB: done |
|---|
See below for the contents of command uuu.
| Command | Content | ||
|---|---|---|---|
| uuu <command> <device> <file> | Write files in the specified way | ||
| <command> | -b write | ||
| <device> | emmc | Write to the boot partition of the eMMC | |
| emmc_all | Write image file to emmc | ||
| fat_write | Write the file to the uboot of the running board | ||
| namd | Write image file to NAND Flash | ||
| qspi | Write image file to QSPI NOR Flash | ||
| sd | Write to the boot partition on the SD card | ||
| sd_all | Write the image file to the SD card | ||
| spl | Start SPL and uboot | ||
There are other commands, but we will not cover them in this article. For details, please refer to the following.
Reference URL: nxp-imx/mfgtools
Once programming is complete, turn off the power to the evaluation board.
Check that the image file you wrote starts up.
When the evaluation board with the image file written to it starts up, it outputs startup information via serial communication and to the display. Here we will check whether the evaluation board has started up correctly using serial communication and display output.
To boot from microSD, set the Boot Switch on the evaluation board to “0011” and change the BOOT MODE to MicroSD/SDHC2.
As shown in the diagram below, connect the DEBUG terminals of the host machine and evaluation board with a USB-micro B cable, and connect the display and evaluation board with an HDMI cable.

Figure: Connection diagram between host machine and evaluation board
1. Check the startup from the DEBUG terminal of the evaluation board
Install gtkterm on the host machine to read boot information from the DEBUG terminal (USB micro).
| $ sudo apt install gtkterm $ sudo gtkterm |
|---|
Once gtkterm is running, select "Configuration" → "Port" and configure serial communication. "Port" will vary depending on the host machine environment, but on the host machine used in this column it was "/dev/ttyUSB2".

Power on the evaluation board and confirm that the following text is displayed in gtkterm. This is a message sent by the evaluation board to the DEBUG terminal via serial communication, and indicates that the image file written to the evaluation board started up without any problems.
| ~~~omission~~~ imx8mp-lpddr4-evk login: |
|---|
If the above message does not appear, please check the gtkterm settings again. In most cases, the communication port recognized by the host machine has not been selected correctly in gtkterm, so set the correct connection destination.
2. Check the display to see if it's booting
You can also check from the display whether the evaluation board has started up correctly with the image file you wrote. If the following screen appears on the display, there is no problem with the start-up. *This is not a required item for checking the start-up.

Conclusion
In this column, we explained how to write an image file to an evaluation board and check whether the image file can be started without any problems.
In the next issue, we will check the functions and operation of the started evaluation board and image file (LINUX). We will explain how to check the operation of various functions installed on the evaluation board using the written image file, so we hope you will be able to get a closer idea of actual development.
The NEXTY Electronics Development Department provides product development and technical support using the i.MX series, so please feel free to contact us. .
Inquiry
Link to Related Technical Columns
Related Product Information

An In-Depth Look at the Advantages of NXP's Automotive Microcontroller S12 MagniV
NXP’s integrated microcontroller, S12 MagniV, helps miniaturize ECUs and shorten development time, contributing to the electrification of automotive systems. This article explains its features and benefits.
- NXP Semiconductors NV
- NEXT Mobility
- ICT and Industrial

Introducing NXP's automotive LED DRIVER
Introducing NXP's automotive LED DRIVER. This product line supports constant voltage, constant current, high-precision PWM, and I2C/SPI, making it ideal for dimming multiple LEDs and displays.
- NXP Semiconductors NV
- NEXT Mobility

In-Depth Guide to NXP's Automotive PMICs (Page 1/2): Fundamentals and Key Features
This article explains the importance of PMICs in automotive ECUs and introduces the features, advantages, and portfolio of NXP’s automotive PMICs. It covers the basics of PMICs and highlights NXP’s offerings.
- NXP Semiconductors NV
- NEXT Mobility

An In-Depth Look at the Features of NXP's Automotive CAN/LIN Transceiver Products
This article explains the features of NXP’s automotive CAN/LIN transceivers, designed to withstand harsh in-vehicle conditions, for ECU developers looking for reliable in-car network products.
- NXP Semiconductors NV
- NEXT Mobility
- ICT and Industrial

Introduction to Edge AI Solutions with NXP's NPU-equipped i.MX/MCX
This article explains the rapidly growing edge AI with real device examples and introduces NXP’s processors and microcontrollers equipped with NPUs.
- NXP Semiconductors NV
- NEXT Mobility
- ICT and Industrial
- Smart Factories and Robotics

Introduction to NXP's Automotive Millimeter-Wave Radar Products
This article provides an overview of automotive millimeter-wave radar, a key sensor in advanced driver-assistance systems (ADAS), and introduces NXP’s leading radar product family driving the market.
- NXP Semiconductors NV
- NEXT Mobility
- ICT and Industrial
- Smart Factories and Robotics