
NXP Semiconductors' (hereinafter referred to as NXP) Arm-based microprocessor "i.MX series" is used in a wide range of fields including industrial, consumer, and automotive. The i.MX series is ideal for applications that require advanced graphics, machine vision, audio, voice, video, and safety.
To make it easier for i.MX developers to use, NXP provides project image files for some i.MX evaluation boards, but the functions that users actually want to use in their applications may not be implemented. Therefore, in this column, we will introduce how to build an i.MX development environment using Yocto.
Yocto is a framework for creating Linux distributions that can be customized to allow for unique features and development to be launched smoothly.
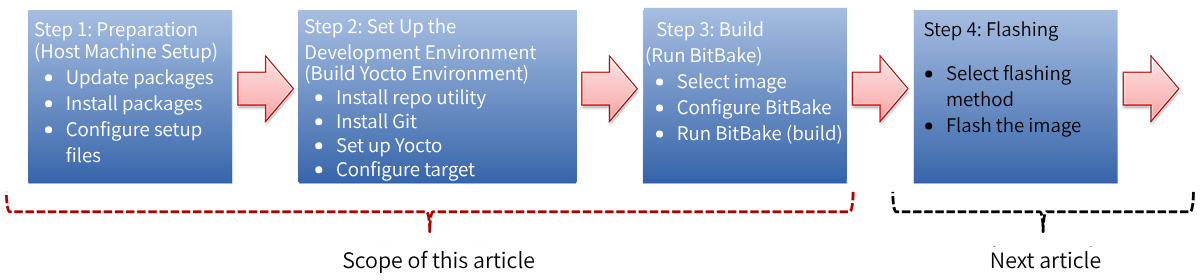
Overall flow
Here is the overall flow for building an i.MX development environment using Yocto:
① Preparation: Setting up the host machine
② Let's build a development environment: Build a development environment with Yocto
③ Let's try building it: Build the image
④ Let's try writing: Write the generated image to the evaluation board
In this column, we will introduce steps 1 to 3 (" 3. Preparations", "4. Creating a development environment", and "5. Building"), and step 4 will be introduced in the next column. Also, an image refers to a boot image that contains a Linux file system.
Overall flow for building an i.MX development environment using Yocto
Know the hardware you need
Building images for the i.MX evaluation board using the Yocto Project build environment is covered in the NXP i.MX Yocto Project User's Guide.
The following i.MX products support the Yocto Project build environment:
| i.MX family name | i.MX product name |
|---|---|
| i.MX6 | 6QuadPlus, 6Quad, 6DualLite, 6SoloX, 6SLL, 6UltraLite, 6ULL, 6ULZ |
| i.MX7 | 7Dual, 7ULP |
| i.MX8 | 8QuadMax, 8QuadPlus |
| i.MX8M | 8M Plus, 8M Quad, 8M Mini, 8M Nano |
| i.MX8X | 8QuadXPlus, 8DXL, 8ULP |
| i.MX9 | i.MX 91, i.MX 93, i.MX 95 |
i.MX Products Supporting the Yocto Project Build Environment
In this column, we will introduce how to set up the environment using the evaluation board "i.MX 8M Plus" equipped with i.MX 8M Plus.

Reference image: i.MX 8M Plus
- Reference URL: 8MPLUSLPD4-EVK
- Reference URL: i.MX Yocto Project User's Guide
- Reference URL: Embedded Linux for i.MX Applications Processors
Prepare in advance
Set up the host machine. The host machine requirements are as follows:
| Item | Requirements |
|---|---|
| OS | Ubuntu 20.04 and later |
| HDD | Minimum 50GB, recommended 250B or more |
| CPU core | Recommended 8 threads |
| Memory devices | 16GB or more recommended |
| USB | One or more USB 2.0 or 3.0 ports |
If the above requirements are met, there will be no problem as a host machine. However, we recommend a HDD capacity of 500GB or more. The recommended HDD capacity is 250GB, but when you build, including intermediate files and generated files, a considerable amount of HDD capacity will be used. Considering future expandability, it is safer to have an HDD capacity of 500GB or more.
In addition, an Internet connection is required to run the Yocto environment. If you are using it in a company environment, you may need to configure a proxy or other settings to connect to the Internet from behind a firewall. Please consult with your company's IT department.
The host machine used in this column was the PC that the author uses for development work. Therefore, various packages used in building the Yocto environment were pre-installed. If your host machine is missing any packages, please install the software or packages according to the error message.
1. Update package information required for Yocto
Command operations are performed in the host machine's terminal. No directory is specified.
| $ sudo apt update $ sudo apt upgrade |
|---|
The command content is shown below.
| Command | Content |
|---|---|
| apt update | Update the list of available packages |
| apt upgrade | Upgrade the installed packages |
When the prompt symbol ($) appears in the terminal, proceed to the next step.
2. Install the packages required for Yocto
Install the packages required to build the Yocto Project.
| $ sudo apt-get install gawk wget git-core diffstat unzip texinfo gcc-multilib \ build-essential chrpath socat cpio python python3 python3-pip python3-pexpect \ xz-utils debianutils iputils-ping python3-git python3-jinja2 libegl1-mesa libsdl1.2-dev \ pylint3 xterm rsync curl zstd lz4 libssl-dev |
|---|
The command content is shown below.
| Command | Content |
|---|---|
| apt-get install <package> | Install <package> |
| gawk | package: Search for a pattern |
| wget | package: Download a file by specifying a URL |
| git-core | package:git |
| diffstat | package:Read the diff output and count the insertions, deletions and changes to each file |
| unzip | package: Extracts files from a zip file |
| texinfo | package: Manually output source files to TEX, HTML, etc. |
| gcc-multilib | package: 32bit binary output |
| build-essential | package: A set of development packages such as GNU C, C++, etc. |
| chrpath | package: Change, list, and delete rpath and runpath settings |
| socat | package: TCP and standard input/output communication conversion |
| cpio | package: copies individual files, groups of files, or entire file systems |
| python | package:python language |
| python3 | package:python3 language |
| python3-pip | package: install pip with python3 |
| python3-pexpect | package: Python3 for interactive program automation |
| xz-utils | package: lossless compression |
| debianutils | package: Adds functions such as shell, kernel, and log saving. |
| iputils-ping | package:ping |
| python3-git | package:git on python3 |
| python3-jinja2 | package: Generates HTML or XML |
| libegl1-mesa | package: compiles graphics functionality |
| libsdl1.2-dev | package: SDL1.2 binary compatibility |
| pylint3 | package: Run a code checker to find errors |
| xterm | package: Adds standard terminal emulator functionality for the X Window System |
| rsync | package: Sync files and directories remotely |
| curl | package:Request from client to server |
| zstd | package: lossless compression |
| lz4 | package: lossless compression |
| libssl-dev | package: Adds OpenSSL headers and libraries |
| apt upgrade | Upgrade the already installed packages |
When the prompt symbol ($) appears in the terminal, proceed to the next step.
3. Set up the swap file
When building on the host machine, builds are performed for each thread. If the memory size used by the thread exceeds the memory size of the host machine, a build error will occur. To avoid this, set up a swap file (32GB).
Note: If the host machine has sufficient memory, this step is not necessary.
| $ sudo swapoff /swapfile $ sudo rm /swapfile $ sudo fallocate -l 32G /swapfile $ sudo chmod 600 /swapfile $ sudo mkswap /swapfile $ sudo swapon /swapfile |
|---|
The command content is shown below.
| Command | Content |
|---|---|
| swapoff <path> | Disable swap space on <path> |
| rm <path> | Delete the directory at <path> |
| fallocate -l 32G <path> | Reserve the file size (32GB) of <path> |
| chmod <permission> <path> | Set access permissions for <path> |
| mkswap <path> | Prepare swap space at <path> |
| swapon <path> | Enable swap space on <path> |
When the prompt symbol ($) appears in the terminal, proceed to the next step.
Let's set up a development environment
Build the Yocto i.MX development environment on the host machine.
1. Install the repo utility
| $ mkdir ~/bin $ curl https://storage.googleapis.com/git-repo-downloads/repo > ~/bin/repo $ chmod a+x ~/bin/repo $ export PATH=~/bin:$PATH |
|---|
The command content is shown below.
| Command | Content |
|---|---|
| mkdir <path> | Disable swap space on <path> |
| curl <URL> <path> | Delete the directory at <path> |
| chmod a+x <path> | Set full access for <path> |
| export PATH=<path> | Set the PATH environment variable |
When the prompt symbol ($) appears in the terminal, proceed to the next step.
2. Install git
| $ git config --global user.name "Your Name" $ git config --global user.email "Your Email" $ git config --list |
|---|
The command content is shown below.
| Command | Content |
|---|---|
| git config --global user.name <name> | Set the username to use with git |
| git config --global user.email <email> | Set the email address to use with git |
| git config --list | Check the username and email address used for git |
When the prompt symbol ($) appears in the terminal, proceed to the next step.
3. Set up Yocto
Set up Yocto. Create the directory imx-yocto-bsp and set up Yocto in it. Select and download the manifest file you want to use from https://github.com/nxp-imx/imx-manifest/tree/imx-linux-scarthgap. In this article, we will use imx-6.6.36-2.1.0.xml.
| $ mkdir imx-yocto-bsp $ cd imx-yocto-bsp $ repo init -u https://github.com/nxp-imx/imx-manifest -b imx-linux-scarthgap -m imx-6.6.36-2.1.0.xml $ repo sync |
|---|
The command content is shown below.
| Command | Content |
|---|---|
| repo | A management tool that complements Git |
| repo init | Install Repo in the current directory |
| –u <url> | -u <url> Specifies the URL from which the manifest repository is obtained |
| -b <revision> | -b <revision> Specify the revision |
| -m <manifest> | -m <manifest> Select a manifest file in the repository |
| repo sync | Sync all project files in a remote repository |
When the prompt symbol ($) appears in the terminal, proceed to the next step.
4. Select the build target and supported window systems (graphics capabilities)
i.MX provides a script file (imx-setup-release.sh) that simplifies the setup of the build image. To use this script file, execute the script by specifying the name of the evaluation board and distribution to be built.
The names of evaluation boards that can be specified in the script file are listed below.
| i.MX Series | Selectable evaluation board names |
|---|---|
| i.MX6 | imx6qpsabresd imx6ulevk imx6ulz-14x14-evk imx6ull14x14evk imx6ull9x9evk imx6dlsabresd imx6qsabresd imx6solosabresd imx6sxsabresd imx6sllevk |
| i.MX7 | imx7dsabresd imx7ulpevk |
| i.MX8 | imx8qmmek imx8qxpc0mek imx8mqevk imx8mm-lpddr4-evk imx8mm-ddr4-evk imx8mn-lpddr4-evk imx8mn-ddr4-evk imx8mp-lpddr4-evk imx8mp-ddr4-evk imx8dxla1-lpddr4-evk imx8dxlb0-lpddr4-evk imx8dxlb0-ddr3l-evk imx8mnddr3levk imx8ulp-lpddr4-evk imx8ulp-9x9-lpddr4-evk |
| i.MX9 | imx91-11x11-lpddr4-evk imx93-11x11-lpddr4x-evk imx93-14x14-lpddr4x-evk imx93-9x9-lpddr4-qsb imx95-19x19-lpddr5-evk imx95-15x15-lpddr4x-evk imx95-19x19-verdin |
The names of distributions that can be specified in the script file are listed below.
| Graphics Features | Available distributions |
|---|---|
| Wayland | fsl-imx-wayland |
| Wayland, X11 *X11 apps that use EGL cannot be used. | fsl-imx-xwayland |
| Frame Buffer *X11 and Wayland cannot be used. *i.MX8 and i.MX9 cannot be used. | fsl-imx-fb |
In this column, we will use the imx8mp-lpddr4-evk, which is compatible with i.MX8M Plus, and the fsl-imx-xwayland, which includes graphics functions (Wayland, X11).
Run the script file with the following command:
| $ MACHINE=imx8mp-lpddr4-evk DISTRO=fsl-imx-xwayland source ./imx-setup-release.sh -b build |
|---|
Let's build it
Let's try building (bitbake) in the development environment created in the previous section.
1. Select the i.MX image
Yocto Project provides several images. You can select one of them to build the features you need and generate an image.
The image names are listed below.
| Image Name | Content | Provisioning Layer |
|---|---|---|
| core-image-minimal | An image that simply boots the target. | poky |
| core-image-base | Console-specific images with full support for your target hardware. | poky |
| core-image-sato | An image of Sato, an environment and visual style for mobile devices. This image supports the Sato theme and uses Pimlico applications, including the terminal, editor and file manager. | poky |
| imx-image-core | An i.MX image containing an i.MX test application for use with Wayland. | meta-imx/meta-sdk |
| fsl-image-machine-test | FSL Community i.MX core image with console environment. No GUI interface. | meta-freescale-distro |
| imx-image-multimedia | i.MX image with GUI that does not contain Qt content. | meta-imx/meta-sdk |
| imx-image-full | Open source Qt6 image with machine learning capabilities. Only supported on i.MX SoCs with hardware graphics, not supported on i.MX 6UltraLite, i.MX 6UltraLiteLite, i.MX 6SLL, i.MX 7Dual, i.MX 8M NoLite, i.MX 8DXL. | meta-imx/meta-sdk |
You can use any of the images listed above, but in this article we will use imx-image-full.
2. Run the build (bitbake)
| $ bitbake imx-image-full |
|---|
In Yocto, the build is performed using the bitbake command.
- *The build process may take several tens of hours.
If the message "all succeeded" is returned on the console screen, the build is successful.
- Supplementary information
Depending on the performance of the host machine, a build may take several hours to several tens of hours. By default, the bitbake command generates the same number of threads as the number of multi-cores on the host machine to speed up the build process. Therefore, if memory capacity is insufficient when memory is allocated for each thread, swapping may occur or the build may stop due to a build error depending on the order of build generation. In that case, we recommend that you run bitbake again in section 4.4 or limit parallel processing during the build.
| Parallel Processing Command Options | Explanation | Configuration Example |
|---|---|---|
| BB_NUMBER_THREADS | Number of threads to process in parallel | 2 |
| PARALLEL_MAKE | Number of cores to use when building | -j 2 |
Below is an example of the execution command when the number of threads is 2.
| $ BB_NUMBER_THREADS=2 bitbake imx-image-full |
|---|
About the next column
In the next article, we will try to write the image file created in this column to an i.MX evaluation board.
Conclusion
This time, we explained how to build a Yocto development environment for the i.MX series. By actually building a development environment, you will gain a deeper understanding of the i.MX series and be able to see the finer details of the construction method. In the next column, we will write the image file generated this time to an evaluation board. In addition, the NEXTY Electronics Development Department is engaged in product development and technical support using the i.MX series, so please feel free to contact us.
NXP Tech Blog
Inquiry
Link to Related Technical Columns
Related Product Information

Introduction to NXP's Automotive Millimeter-Wave Radar Products
This article provides an overview of automotive millimeter-wave radar, a key sensor in advanced driver-assistance systems (ADAS), and introduces NXP’s leading radar product family driving the market.
- NXP Semiconductors NV
- NEXT Mobility
- ICT and Industrial
- Smart Factories and Robotics

An In-Depth Look at the Features of NXP's Automotive CAN/LIN Transceiver Products
This article explains the features of NXP’s automotive CAN/LIN transceivers, designed to withstand harsh in-vehicle conditions, for ECU developers looking for reliable in-car network products.
- NXP Semiconductors NV
- NEXT Mobility
- ICT and Industrial

Introducing NXP's CAN TRANSCEIVER products with signal improvement (SIC)
NXP's SIC-equipped CAN TRANSCEIVER actively suppresses ringing on the transmitting side, stabilizing high-speed CANFD communications. It is software and pin compatible, allowing it to be replaced with existing designs, and is compliant with automotive standards.
- NXP Semiconductors NV
- NEXT Mobility

Introduction to Edge AI Solutions with NXP's NPU-equipped i.MX/MCX
This article explains the rapidly growing edge AI with real device examples and introduces NXP’s processors and microcontrollers equipped with NPUs.
- NXP Semiconductors NV
- NEXT Mobility
- ICT and Industrial
- Smart Factories and Robotics

An In-Depth Look at the Advantages of NXP's Automotive Microcontroller S12 MagniV
NXP’s integrated microcontroller, S12 MagniV, helps miniaturize ECUs and shorten development time, contributing to the electrification of automotive systems. This article explains its features and benefits.
- NXP Semiconductors NV
- NEXT Mobility
- ICT and Industrial

A thorough explanation of the appeal of NXP's automotive PMICs (Page 2/2) | An explanation of NXP's automotive PMIC portfolio and the features of its representative products.
This article explains the necessity of PMICs in automotive ECUs, as well as the features, advantages, and portfolio of NXP's automotive PMICs. This first part focuses on the automotive PMIC portfolio and the characteristics of its representative products.
- NXP Semiconductors NV
- NEXT Mobility