"I connected the LiDAR but data isn't arriving" or "The software doesn't recognize it" - these problems are often caused by IP address inconsistencies. If this problem is left unaddressed, it can stall evaluation plans and significantly reduce verification lead time.
This connection issue can be resolved quickly and reproducibly by following the steps in this column and understanding network basics.
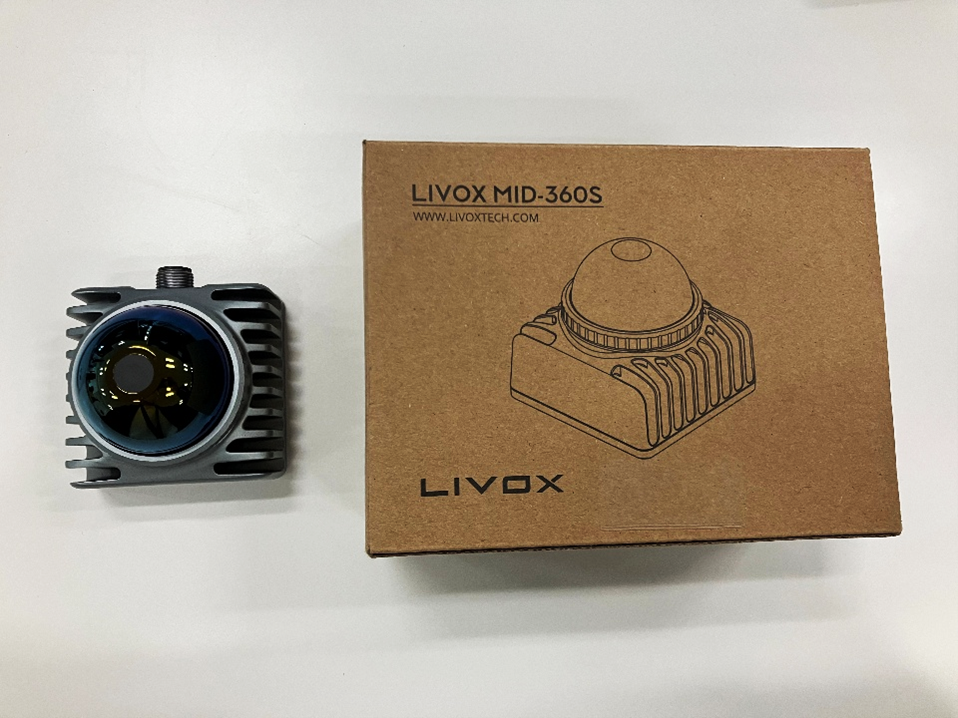
By understanding the basics of IP addresses and configuring them to avoid duplication and a fixed IP on the same network segment, you will be able to receive point cloud data from LiDAR stably and reliably. In this article, we will explain the PC configuration procedure and how to change the IP address of the MID-360 made by Livox, a LiDAR manufacturer for which Nexty Electronics is an authorized distributor, step by step, and introduce key points for ensuring a reliable connection.
What is an "IP address"?
An IP address (Internet Protocol Address) is like an address on the Internet that is assigned to all devices on a network (such as PCs, smartphones, and LiDARs). In order to properly connect a LiDAR and a PC, both devices must belong to the same network segment. Understanding the basic role and components of an IP address can help prevent connection problems and ensure stable data communication.
The role of IP addresses
- Device Identification: Used to accurately identify the source and destination of data (e.g., point cloud data) among a vast number of network devices.
- Determining the communication route: This determines the communication route so that data packets do not get lost within the network and reach the correct device.
Important components (for IPv4)
Commonly used IPv4 addresses are written as four blocks of numbers separated by periods, such as "192.168.1.50".
- Network part: This part indicates the network group (e.g. 192.168.1.). This part must match in order for the LiDAR and PC to communicate.
- Host part: This part identifies an individual device within that group (e.g., .50). This part must be unique within the network.
- Subnet mask: Determines the boundary between the network portion and the host portion. "255" indicates the network portion and "0" indicates the host portion. For example, "255.255.255.0" indicates that the first three numbers (192.168.1) are the network portion and the last number (50) is the host portion.
To receive LiDAR point cloud data, it is necessary to set the IP addresses so that the PC and LiDAR have the same network section but different host sections.
 | This column assumes the use of a standard IPv4 address (e.g., 192.168.1.50), but there is also the next-generation IP address standard, IPv6. IPv6 is a 128-bit address format designed to support a wider range of devices, and is written as 2001:db8::1. IPv4 is the mainstream in current LiDAR connection settings, and IPv6 is not supported. |
Basics of connection between LiDAR and PC (illustrated)
The LiDAR outputs point cloud data via an Ethernet connection, so it is important to configure both devices to belong to the same network segment.
Important Network Parameters
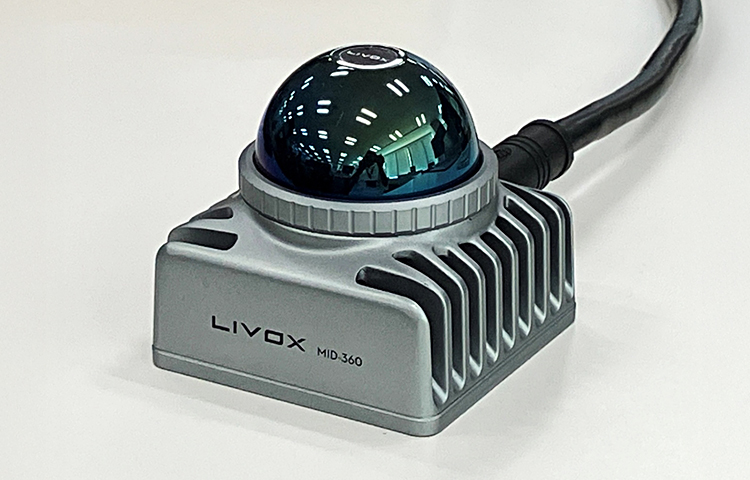
Livox LiDAR products (e.g. MID-360, Avia, etc.) are generally set to a fixed IP address like the following when shipped from the factory:
- LiDAR default IP address: 192.168.1.1XX (XX may vary depending on the model, such as the last two digits of the serial number)
- Recommended PC IP address: 192.168.1.50 (or within the 192.168.1.x range that does not conflict with the LiDAR's IP)
- Subnet Mask: 255.255.255.0 (the first three numbers are the network part)
For the LiDAR and PC to communicate, the PC's IP address must be set to a static (fixed) IP address and must be in the same network segment as the LiDAR's IP address (e.g., 192.168.1.x).

IP address configuration for PC and LiDAR
How to Set a Static IP Address in Windows 10/11: 3 Steps
This article explains how to fix the IP address of a network adapter on a Windows PC for communication with LiDAR.
Step 1: Open Network Connections
1. Type "Control Panel" in the Windows search bar and open it.
2. Open the Network and Sharing Center.
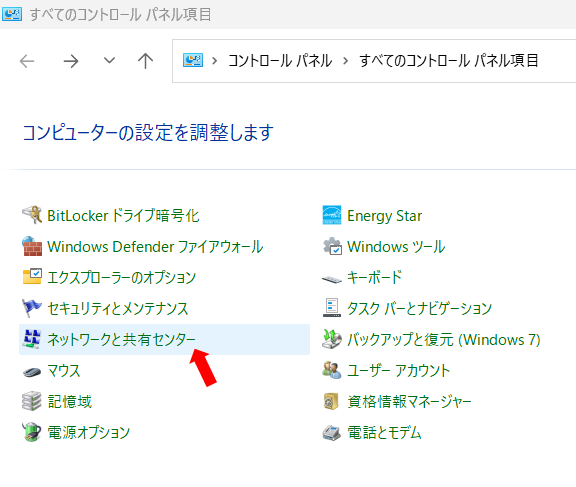
3. Click "Change adapter settings" from the menu on the left.
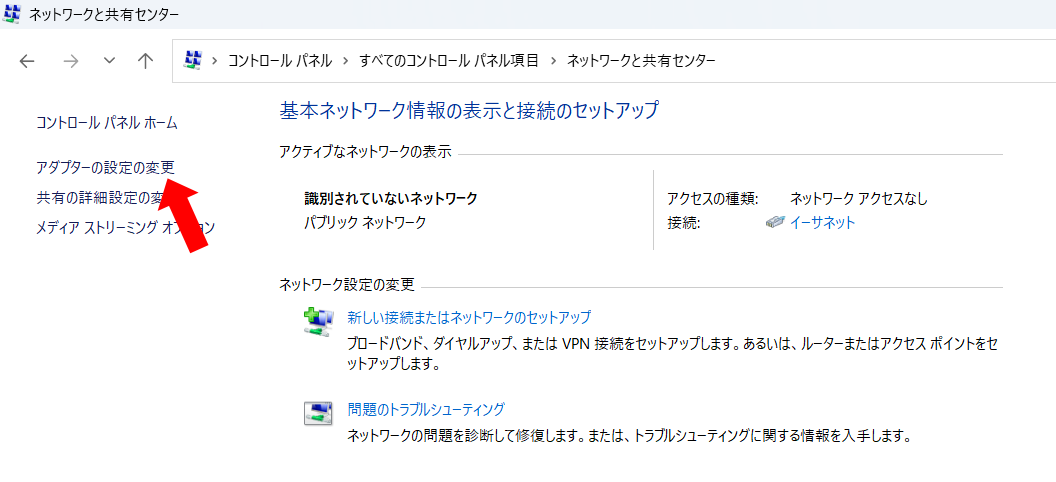
Step 2: Open the properties of your Ethernet adapter
1. Right-click the Ethernet connection (wired LAN) that you want to connect to the LiDAR and select "Properties".
2. Find and select "Internet Protocol Version 4 (TCP/IPv4)" from the list in the Properties window and click the "Properties" button.
3. If "Obtain an IP address automatically" is currently checked, change it to "Use the following IP address."

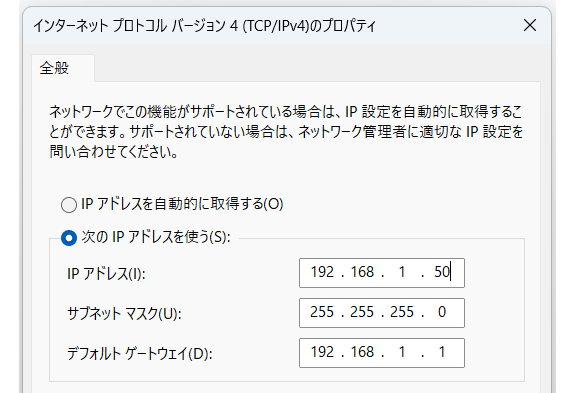
Step 3: Enter a static IP address
Enter the following values:
| Setting items | Recommended values (example) | Remarks |
|---|---|---|
| IP address | 192.168.1.50 | Set an address that is different from the LiDAR's IP (e.g. 192.168.1.XX). |
| Subnet mask | 255.255.255.0 | This must match the settings on the LiDAR side. |
| Default Gateway | (Leave blank) | This is usually not necessary if the LiDAR and PC are directly connected via Ethernet. |
3. Click "OK" to close the TCP/IPv4 settings.
4. Click OK again to close the adapter properties window.
Your PC's Ethernet adapter will now operate with a fixed IP address that belongs to the same network segment (192.168.1.x) as the LiDAR.
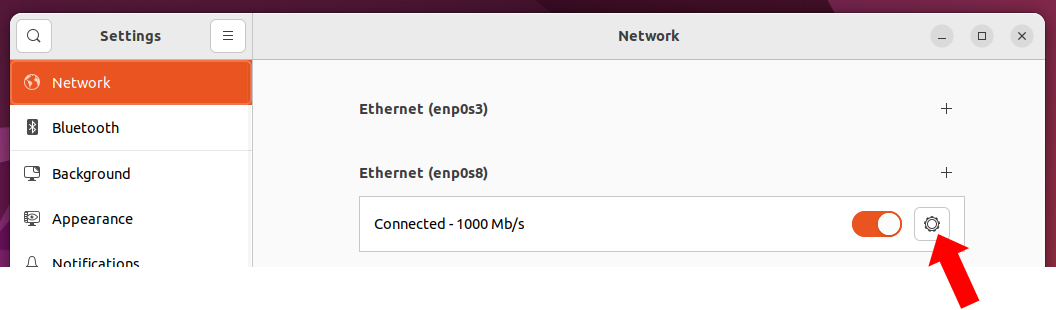
Static IP on Ubuntu: 3 steps
In Ubuntu, you can set a static IP address using both the GUI and CLI. Here we will show you the easy way to do it using the GUI.
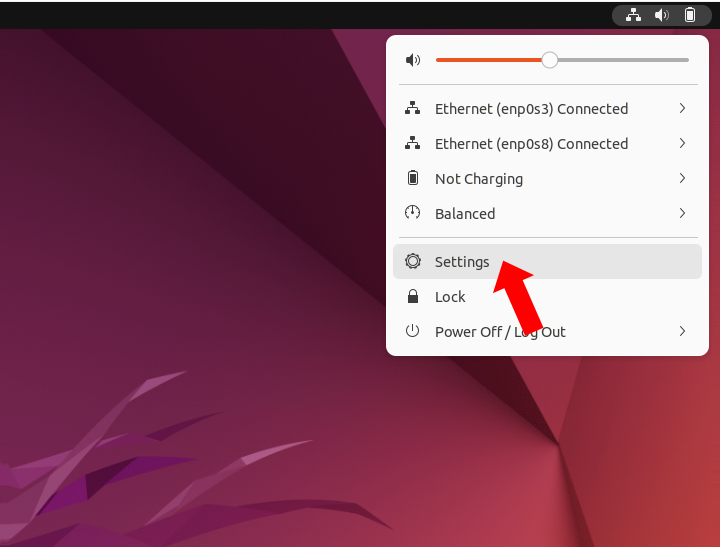
Step 1: Open Network Settings
1. Click the network icon in the top right corner of the screen and select "Settings."
2. Select the Network tab and click the gear icon.
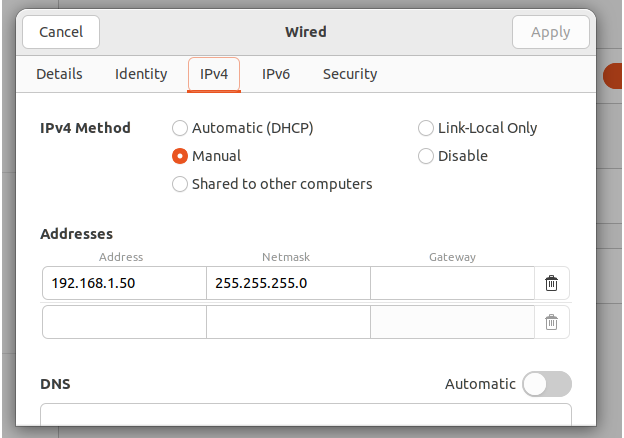
Step 2: Change IPv4 settings
1. Select the "IPv4" tab.
2. Switch "Automatic (DHCP)" to "Manual".
3. Enter the following values:
- IP address: 192.168.1.50 (different from the LiDAR IP)
- Subnet mask: 255.255.255.0
Step 3: Save your settings and reconnect
Click "Apply" and reconnect to the network.
After setting up, check the connection with the LiDAR by pinging 192.168.1.XX.
Checking LiDAR connection: ping
Once you have configured the IP address of your PC, connect the LiDAR and PC directly with an Ethernet CABLES, or connect them to the same network SWITCHES /router.
Verifying Connection
After setting up, run the following command in the command prompt to check if you can ping the IP address set on the LiDAR. Here, the PC's IP address is 192.168.1.50 and the LiDAR's IP address is 192.168.1.101.

ping command (please replace with the IP address of your LiDAR)
If you get a "response," the connection at the network level is successful.
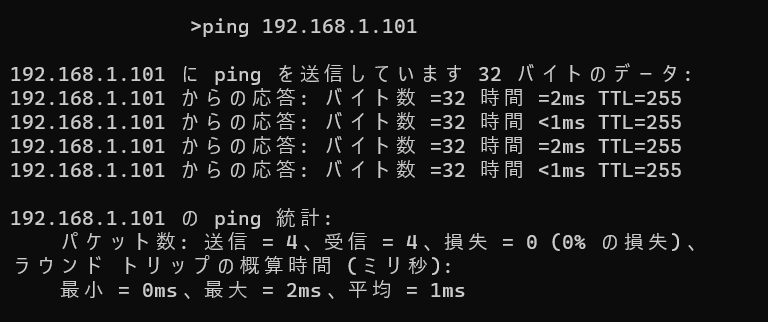
ping command response example
 | Firewall ①: A firewall such as Windows Defender may be blocking UDP ports. You will need to change the settings to allow reception on the port number used by LiDAR (e.g., 2368). Firewall ②: If a firewall such as Windows Defender does not allow communication for the app, you may not be able to receive LiDAR point cloud data even if ping is successful. When using Livox Viewer 2 or similar, please allow the relevant app in the firewall settings. IP address conflict: When connecting multiple LiDARs, be careful not to overlap the IP address of your PC with the IP address of a LiDAR. |
Change the IP address of MID-360 with Livox Viewer 2
If the MID-360's default IP address conflicts with an existing network environment or if you are operating multiple LiDARs, you will need to change the IP address of the MID-360 itself. This can be easily done using Livox's dedicated software, "Livox Viewer 2." This function allows you to flexibly change the LiDAR's IP address to suit your network environment, making it possible to support more complex system configurations.
*For detailed instructions on how to use Livox Viewer 2, please refer to our column (here).
How to change the IP address of the LiDAR
1. Set the IP address of the PC to the default segment of the LiDAR, then connect the LiDAR to the PC.
2. Launch "Livox Viewer 2" and it will automatically detect the connected LiDAR.
3. Right-click on the detected LiDAR device and select Settings.
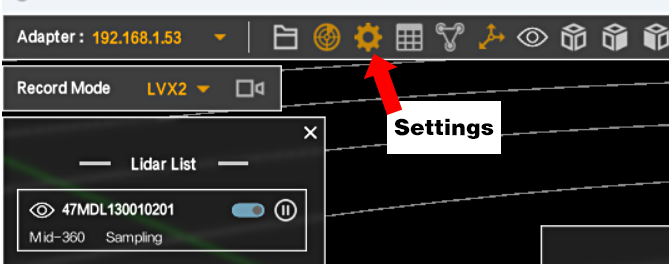
4. Enter the new IP address in LiDAR IP and Subnet Mask (e.g. 255.255.255.0).
5. Click "Confirm" to save and apply the settings. The LiDAR will reboot and start communicating with the new IP address.

*When connecting to a PC in the future, the IP address on the PC will also need to be adjusted to match the new network segment (e.g., 192.168.1.x).
Summary
To ensure stable transmission of point cloud data from the LiDAR to a PC, it is important to set a fixed IP address on the PC's Ethernet adapter in the same network segment as the LiDAR. Matching the subnet mask with that on the LiDAR side will also help prevent communication problems. A default gateway is not required when connecting directly via Ethernet, but may need to be configured when connecting via network equipment.
The procedure introduced in this article is specific to the Livox MID-360, but the PC settings are basic and common to other LiDARs. By setting the correct IP address, you can maximize the LiDAR's performance and achieve stable data acquisition.
Related Info
Livox's main products
MID-360 & Livox Viewer 2 Manual

![Making your own CABLES for the Livox MID-360 [Practical Guide]](/uploads/media_files/livox_10_thumbnail-3954867486.jpg)