We achieved sensor fusion using the inexpensive and highly functional Livox HAP and a USB camera.
- Adding color information input from the camera to LiDAR point clouds
- Adding distance information calculated from point clouds to camera images

Overview
- Hardware Configuration
| Livox 3D-LiDAR | HAP-TX (details) |
|---|---|
| NVIDIA Corporation | Jetson AGX-Xavier |
| BUFFALO USB camera | BSW500MBK |
- environment
ROS (Melodic)
- Prerequisites
Camera calibration completed
- set up
- Install and set up Livox_SDK2
- Install and set up Livox_ros_driver2
- Download the sensor_fusion package published on github and compile it.
$ cd ~/catkin_ws/src/
$ git clone https://github.com/Sadaku1993/velodyne_camera_calibration
$ cd ~/catkin_ws
$ catkin_make
- Modifying the launch file (sensor_fusion.launch)
The launch file downloaded from github is for Velodyne, so you need to change it to Livox.
<?xml version="1.0"?>
<!--Sensor Fusion-->
<launch>
<arg name="rviz_enable" default="true"/>

<!--tf-->
<node pkg="tf" type="static_transform_publisher" name="livox2camera_link"
args="-0.15 0 0.25 -1.571 0.0 -1.571 livox_frame head_camera 100" />

<!--velodyne-->
<!--include file="$(find velodyne_pointcloud)/launch/32e_points.launch" /-->
<!--Livox-->
<include file="$(find livox_ros_driver2)/launch_ROS1/rviz_HAP.launch" />

<!--USB camera-->
<node name="head_camera" pkg="usb_cam" type="usb_cam_node">
<param name="camera_info_url" value="file://$(find livox_camera_calibration)/config/camera.yaml"/>
<param name="pixel_format" value="yuyv" />
<param name="image_width" value="640" />
<param name="image_hight" value="480" />
</node>

<!--image_proc-->
<node name="image_proc" pkg="image_proc" type="image_proc" output="screen">
<remap from="/camera_info" to="/head_camera/camera_info" />
<remap from="/image_raw" to="/head_camera/image_raw" />
<remap from="/image_rect_color" to="/head_camera/image_rect_color" />
</node>

<!--sensor fusion-->
<node pkg="livox_camera_calibration" type="sensor_fusion" name="sensor_fusion">
<remap from="/image" to="/head_camera/image_rect_color" />
<remap from="/cinfo" to="/head_camera/camera_info" />
<remap from="/lidar" to="/livox/lidar" />
<remap from="/colored_cloud" to="/livox_points/colored" />
<remap from="/projection" to="/head_camera/projection" />
</node>

<!--rviz-->
<group if="$(arg rviz_enable)">
<node pkg="rviz" type="rviz" name="rviz" args="-d $(find livox_camera_calibration)/config/sensor_fusion.rviz"/>
</group>

<!--rosbag play-->
<!--node pkg="rosbag" type="play" name="play" args="$(find velodyne_camera_calibration)/bagfiles/data.bag" /-->
</launch>
Commentary
- Specifying LiDAR and camera positions using TF
LiDAR frame:livox_frame
camera frame: head_camera
Distance between LiDAR and camera: X/Y/Z = -0.15, 0, 0.25
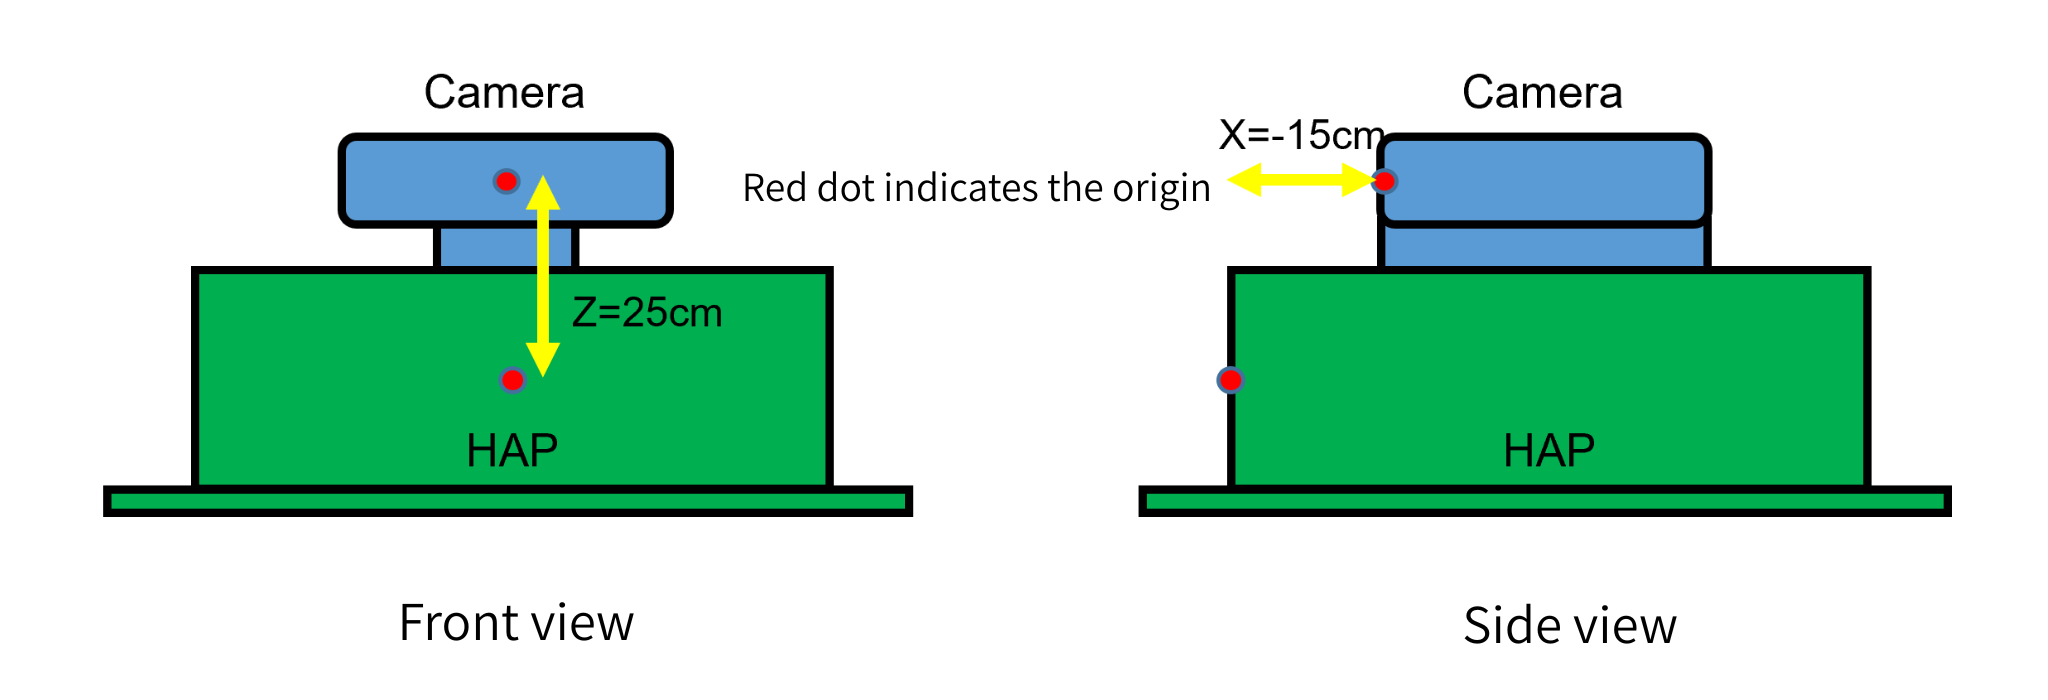
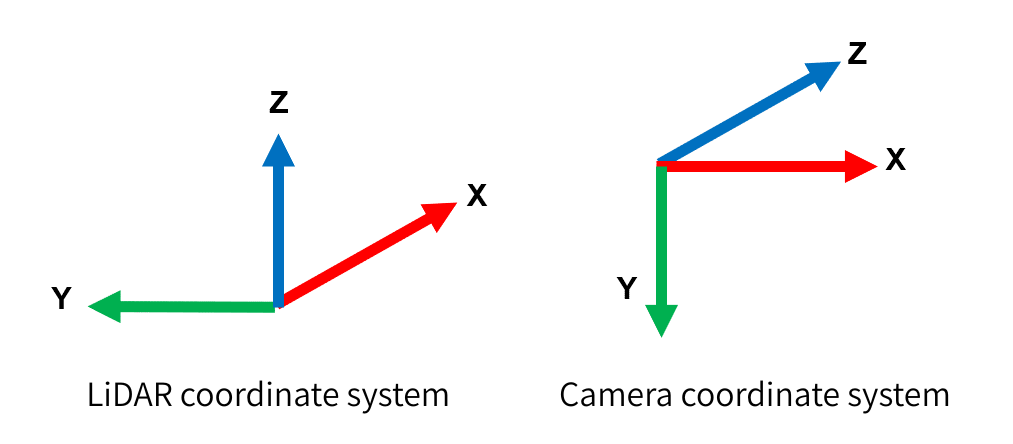
LiDAR and camera coordinate axis transformation: yaw/pitch/roll=π/2, 0 , π/2 = -1.571,0,-1.571
<node pkg="tf" type="static_transform_publisher" name="livox2camera_link"
args="-0.15 0 0.25 -1.571 0.0 -1.571 livox_frame head_camera 100" />
- Starting livox_ros_drvier
<include file="$(find livox_ros_driver2)/launch_ROS1/rviz_HAP.launch" />
- Starting the USB camera
<!--USB camera-->
<node name="head_camera" pkg="usb_cam" type="usb_cam_node">
<param name="camera_info_url" value="file://$(find livox_camera_calibration)/config/camera.yaml"/>
<param name="pixel_format" value="yuyv" />
<param name="image_width" value="640" />
<param name="image_hight" value="480" />
</node>
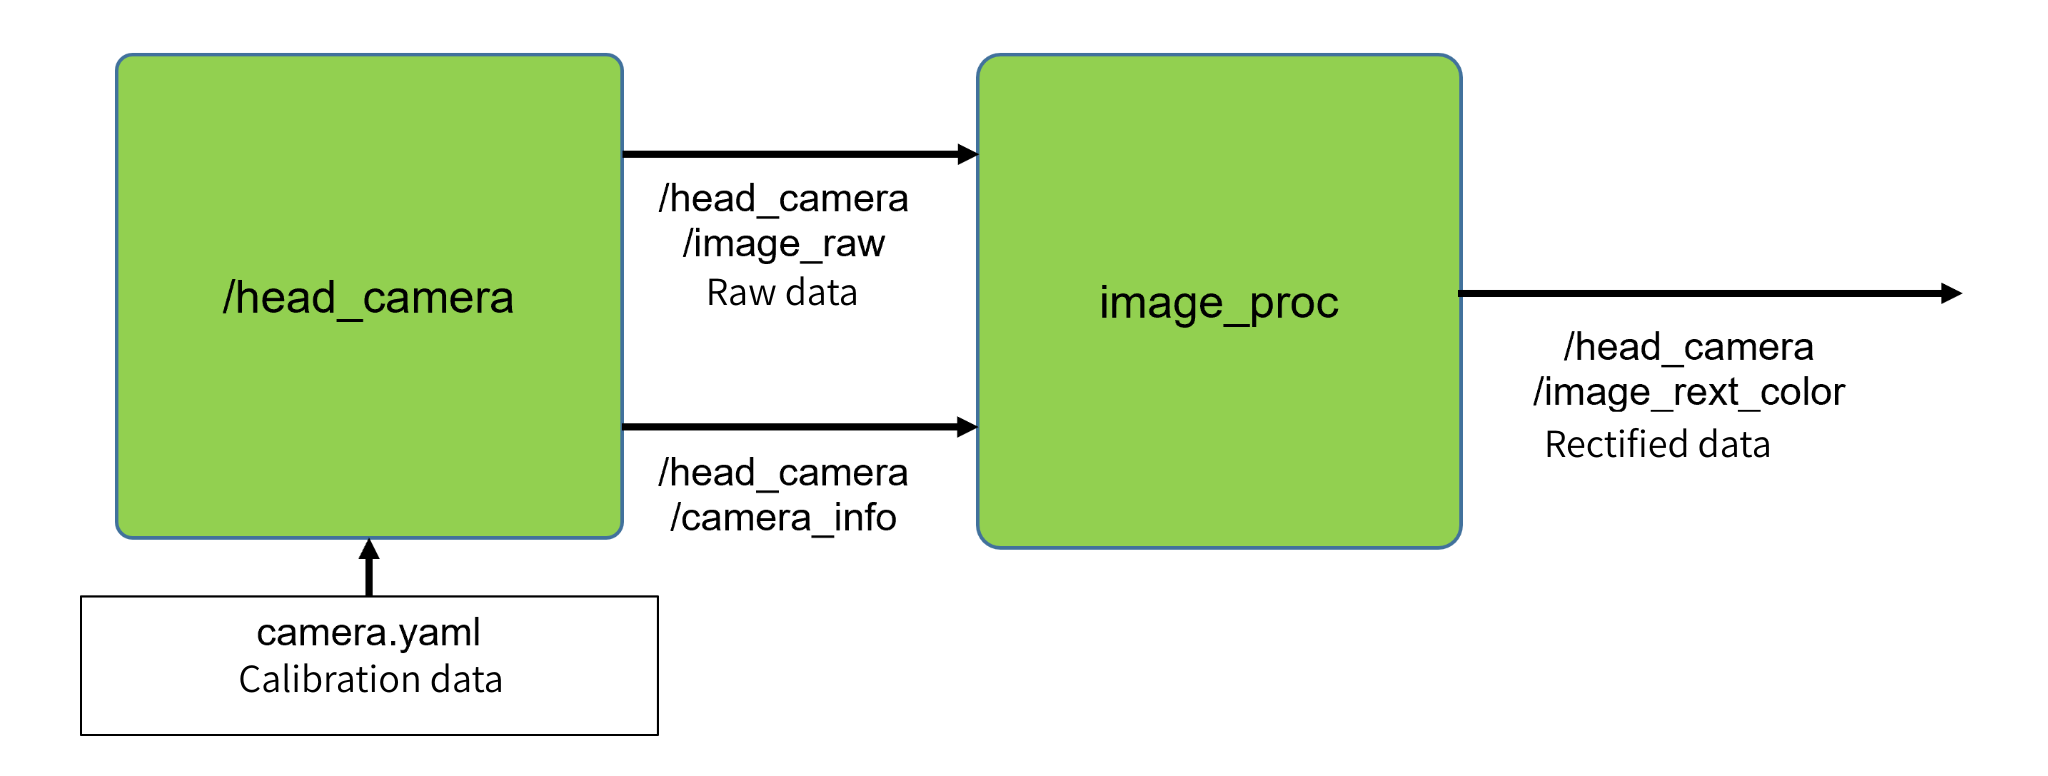
- Starting image_proc
Correct the original image using the loaded calibration data
Input the raw data from the camera (/head_camera/image_raw), calibration data (camera.yaml), and camera_iinfo into image_proc to obtain the corrected color data (/head_camera/image_rect_color).
<!--image_proc-->
<node name="image_proc" pkg="image_proc" type="image_proc" output="screen">
<remap from="/camera_info" to="/head_camera/camera_info" />
<remap from="/image_raw" to="/head_camera/image_raw" />
<remap from="/image_rect_color" to="/head_camera/image_rect_color" />
</node>
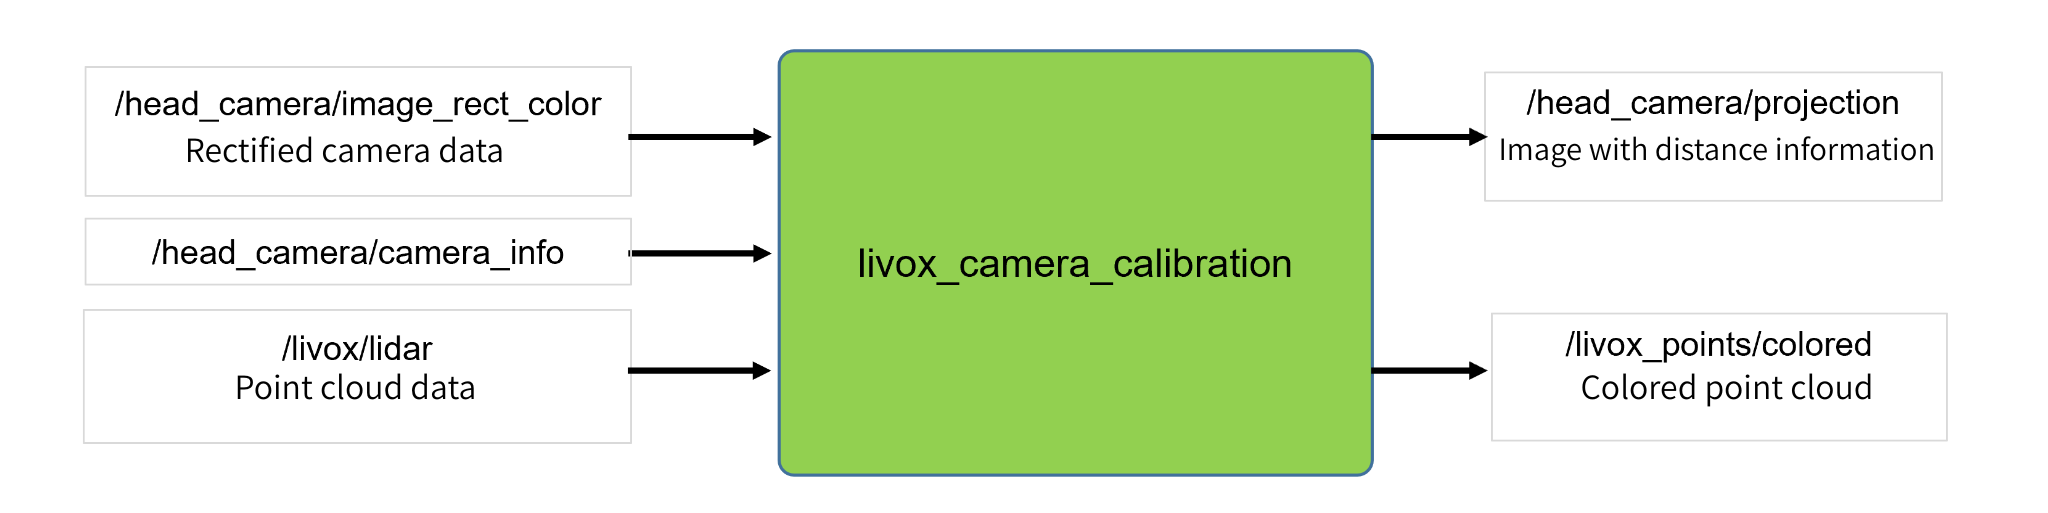
- Sensor Fusion
Inputs corrected camera data (/head_camera/image_rect_color), camera_info (head_camera/camera_info), and point cloud data from LiDAR (/livox/lidar), and outputs a colored point cloud (/livox_points/colored) and a camera image with distance information (/head_camera/projection).
<!--sensor fusion-->
<node pkg="livox_camera_calibration" type="sensor_fusion" name="sensor_fusion">
<remap from="/image" to="/head_camera/image_rect_color" />
<remap from="/cinfo" to="/head_camera/camera_info" />
<remap from="/lidar" to="/livox/lidar" />
<remap from="/colored_cloud" to="/livox_points/colored" />
<remap from="/projection" to="/head_camera/projection" />
</node>
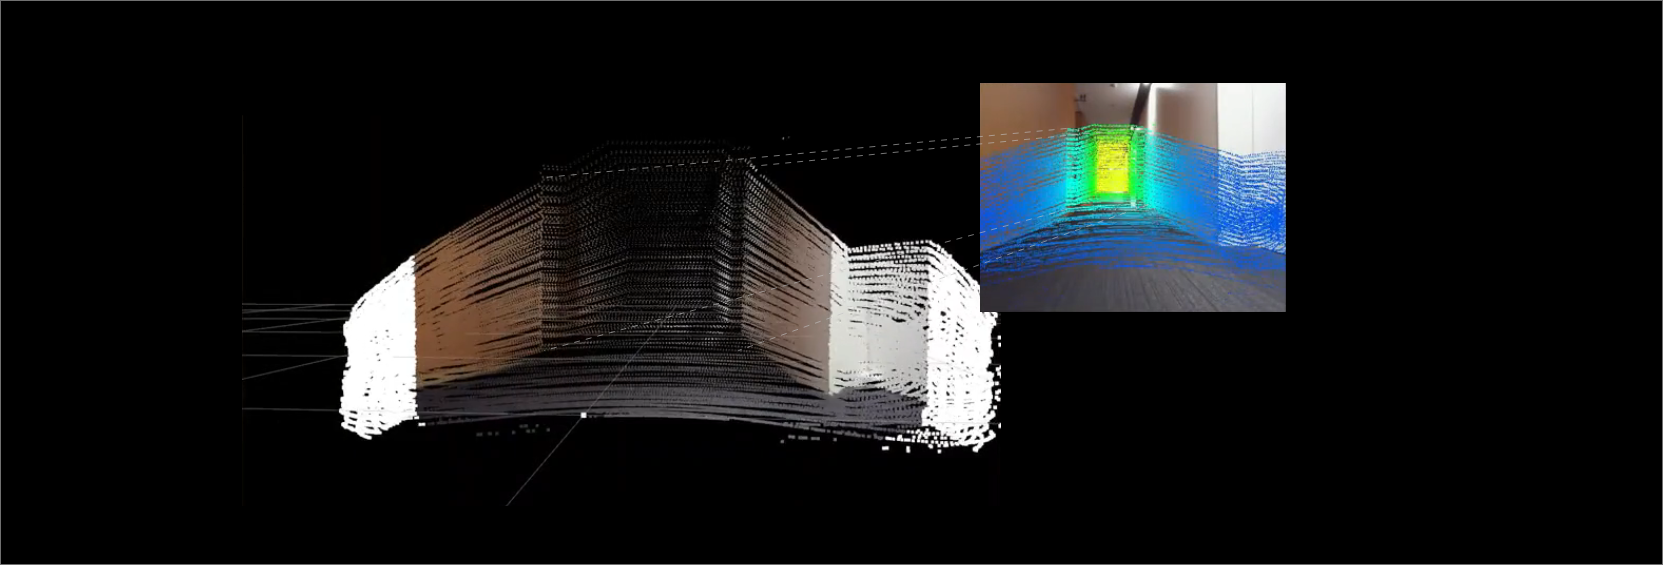
Execution result
As shown below, a colored point cloud obtained from the camera and camera images colored by distance are output on rviz.
Topic to display
- PointCloud
Topic: /livox_points/colored
- Imahe
Topic:/head_camera/projection
Of course, you can also perform MID-360 + Camera fusion by changing the ros_driver for MID-360.
Reference
- 3D LiDAR and camera sensor fusion
- Calibrate the camera
- velodyne_camera_calibration
- Livox 3D-LiDAR now available for full-scale industrial use
- Sensor fusion of 3D-LiDAR (Livox: HAP) and camera
- Creating a 3D map using 3D LiDAR (Livox: MID-360)
Disclaimer
The system introduced on this page has been confirmed for demonstration purposes only. Therefore, we cannot be held responsible for any problems that may arise from using the contents of this page. Also, if you intend to use it for commercial purposes, please check with the source code creator.
![Making your own CABLES for the Livox MID-360 [Practical Guide]](/uploads/media_files/livox_10_thumbnail-3954867486.jpg)