Introduction
In this column, we will demonstrate how to run the Hailo-8 edge AI accelerator on Radxa's ROCK 5 Model B single-board computer and modify an application sample provided by Hailo to perform real-time object detection processing for HDMI input.
In the previous article, "This is what you can do with small devices: Pose estimation using a fanless edge AI accelerator (YOLOv8-pose)," we showed an example of running sample code to process still images.
This time, I'll try using the HDMI input of the ROCK 5 Model B to process video in real time and display it on the screen.
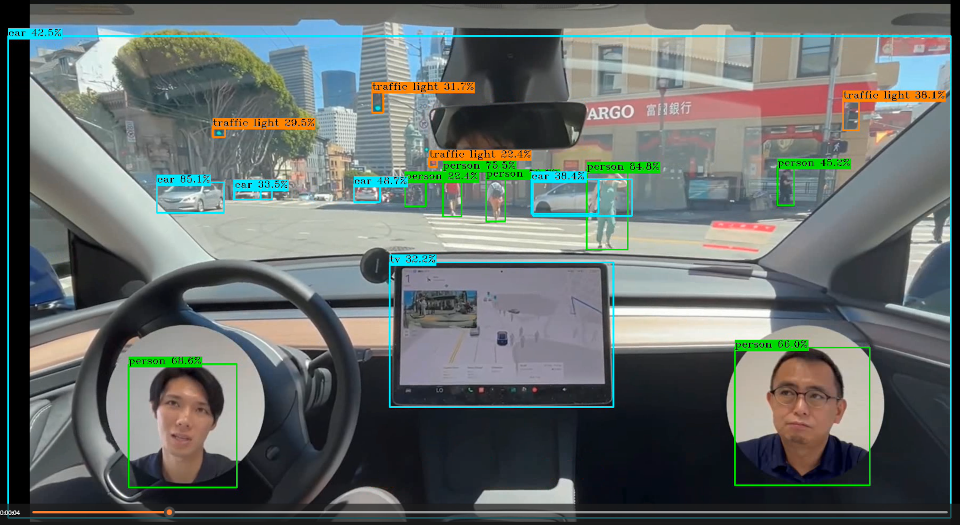
By using the HDMI input, you can experience the high performance of Hailo-8 with various content sources such as video websites and DVD players. The following video is an example of our company's introductory video being used as input.
Please try it out as an example of evaluation and testing.
Preparation
Please refer to the previous article to configure the ROCK 5 Model B and Hailo-8 environment. This time, we will be performing video processing, so you will need a device with HDMI output (PC, video camera) and a Mini HDMI to HDMI CABLES.
Execution of object detection sample code
Building object_detection
Let's get started. We'll be using hailo-apps, a sample application provided by Hailo.
Once you've launched the terminal on your ROCK 5 Model B, navigate to a suitable directory. Then execute the following command (the $ is the command prompt; do not type it):
$ git clone https://github.com/hailo-ai/hailo-apps.git
# 記事を執筆した時点のバージョンと合わせます
$ cd hailo-apps
$ git checkout 095deb51bd
We will add processing based on the object detection sample. First, let's run the sample as is.
Move to the directory and build.
# 物体検出サンプルへ移動
$ cd hailo_apps/cpp/object_detection

# 依存するライブラリをインストール
$ sudo apt update
$ sudo apt install -y libopencv-dev python3-opencv libboost-all-dev
# ビルド
$ cmake -S . -B build
$ cmake --build build -j
Once the build is complete, build/object_detection will be generated.
Download the model
Now, let's run the program. If you run it with the argument '--list-nets', a list of corresponding models will be displayed.
$ ./build/object_detection --list-nets
No --net was provided.
Fetching networks list... please wait

Supported networks for object_detection:
  - yolov10b         | arch=[hailo8,hailo8l,hailo10h] | src=model_zoo   | hefs=[yolov10b.hef] | desc=YOLOv10b
  - yolov10n         | arch=[hailo8,hailo8l,hailo10h] | src=model_zoo   | hefs=[yolov10n.hef] | desc=YOLOv10n
  - yolov10s         | arch=[hailo8,hailo8l,hailo10h] | src=model_zoo   | hefs=[yolov10s.hef] | desc=YOLOv10s
  - yolov10x         | arch=[hailo8,hailo8l,hailo10h] | src=model_zoo   | hefs=[yolov10x.hef] | desc=YOLOv10x
  - yolov11l         | arch=[hailo8,hailo8l,hailo10h] | src=model_zoo   | hefs=[yolov11l.hef] | desc=YOLOv11l
  - yolov11m         | arch=[hailo8,hailo8l,hailo10h] | src=model_zoo   | hefs=[yolov11m.hef] | desc=YOLOv11m
  - yolov11n         | arch=[hailo8,hailo8l,hailo10h] | src=model_zoo   | hefs=[yolov11n.hef] | desc=YOLOv11n
  - yolov11s         | arch=[hailo8,hailo8l,hailo10h] | src=model_zoo   | hefs=[yolov11s.hef] | desc=YOLOv11s
  - yolov11x         | arch=[hailo8,hailo8l,hailo10h] | src=model_zoo   | hefs=[yolov11x.hef] | desc=YOLOv11x
  - yolov5m          | arch=[hailo8,hailo8l,hailo10h] | src=model_zoo   | hefs=[yolov5m.hef ] | desc=YOLOv5m
  - yolov5s          | arch=[hailo8,hailo8l,hailo10h] | src=model_zoo   | hefs=[yolov5s.hef ] | desc=YOLOv5s
  - yolov6n          | arch=[hailo8,hailo8l,hailo10h] | src=model_zoo   | hefs=[yolov6n.hef ] | desc=YOLOv6n
  - yolov7           | arch=[hailo8,hailo8l,hailo10h] | src=model_zoo   | hefs=[yolov7.hef  ] | desc=YOLOv7
  - yolov7x          | arch=[hailo8,hailo8l,hailo10h] | src=model_zoo   | hefs=[yolov7x.hef ] | desc=YOLOv7x
  - yolov8l          | arch=[hailo8,hailo8l,hailo10h] | src=model_zoo   | hefs=[yolov8l.hef ] | desc=YOLOv8l
  - yolov8m          | arch=[hailo8,hailo8l,hailo10h] | src=model_zoo   | hefs=[yolov8m.hef ] | desc=YOLOv8m
  - yolov8n          | arch=[hailo8,hailo8l,hailo10h] | src=model_zoo   | hefs=[yolov8n.hef ] | desc=YOLOv8n
  - yolov8s          | arch=[hailo8,hailo8l,hailo10h] | src=model_zoo   | hefs=[yolov8s.hef ] | desc=YOLOv8s
  - yolov8x          | arch=[hailo8,hailo8l,hailo10h] | src=model_zoo   | hefs=[yolov8x.hef ] | desc=YOLOv8x
  - yolov9c          | arch=[hailo8,hailo8l,hailo10h] | src=model_zoo   | hefs=[yolov9c.hef ] | desc=YOLOv9c
Hailo's Model Explorer Vision allows you to view a list of model accuracy and processing speed. You can also download model data compiled for Hailo-8.
This time, we'll use YOLOv8m, which offers a good balance of accuracy and FPS. You can download it from Model Explorer, but let's try using the script provided in hailo-apps. This script is convenient because you can specify the model name displayed by --list-nets and download it.
The following command will save yolov8m.hef to the current directory.
# hailo-apps/hailo_apps/cpp/object_detectionから実行します
$ ../../config/get_hef.sh get --app object_detection --net yolov8m --hw-arch hailo8 --dest .
Using hailortcli, you can easily measure the FPS, latency, and power consumption of a single model. Try running the following command:
$ hailortcli benchmark yolov8m.hef
Starting Measurements...
Measuring FPS in HW-only mode
Network yolov8m/yolov8m: 100% | 794 | FPS: 52.91 | ETA: 00:00:00
Measuring FPS (and Power on supported platforms) in streaming mode
[HailoRT] [warning] Using the overcurrent protection dvm for power measurement will disable the overcurrent protection.
If only taking one measurement, the protection will resume automatically.
If doing continuous measurement, to enable overcurrent protection again you have to stop the power measurement on this dvm.
Network yolov8m/yolov8m: 100% | 794 | FPS: 52.82 | ETA: 00:00:00
Measuring HW Latency
Network yolov8m/yolov8m: 100% | 494 | HW Latency: 15.77 ms | ETA: 00:00:00

=======
Summary
=======
FPS     (hw_only)                 = 52.9069
        (streaming)               = 52.8196
Latency (hw)                      = 15.77 ms
Device 0000:01:00.0:
  Power in streaming mode (average) = 2.81216 W
                          (max)     = 2.87292 W
This model has a maximum frame rate of 52 FPS, a latency of 15.8 ms, and a power consumption of 2.8 W.
* The above figures are reference values based on this testing environment.
Test data is also available, just like the model, and can be easily downloaded. The following command will save full_mov_slow.mp4 to the current directory.
# hailo-apps/hailo_apps/cpp/object_detectionから実行します
$ ../../config/get_input.sh list --app object_detection
images:
name="bus"                  | description="Bus with walking people"
name="dog_bicycle"          | description="dog and a bicycle outdoor"
name="zidane"               | description="Zidane and Carlo Ancelotti Italian football manager"

videos:
name="cars"                 | description="drive in the city"

$ ../../config/get_input.sh get --app object_detection --i cars --target-dir .
Running object_detection
Now that we have the model and data from the steps above, let's try running it.
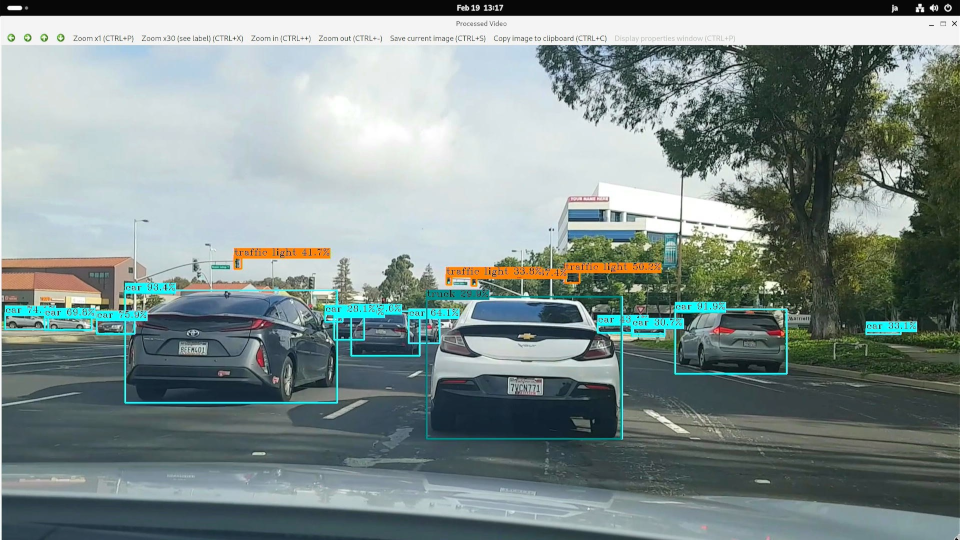
$ ./build/object_detection --net yolov8m.hef --input full_mov_slow.mp4As shown in the image, the results of object detection using YOLOv8m are displayed in a video. You can see that even distant traffic lights and cars are detected in real time, demonstrating the processing performance of Hailo-8.
Object detection processing for HDMI input
Checking the HDMI input function
The ROCK 5 Model B has an HDMI input interface, and with compatible OS images, it can receive video input as a V4L2 device (a user-space API implemented in the Linux Kernel for handling video in Linux). I would like to use this function to perform object detection on video input via HDMI.
*This article's analysis is based on the 1920x1080 / 30p format.
* Pipeline adjustments are required if the resolution or FRAMES rate differs.
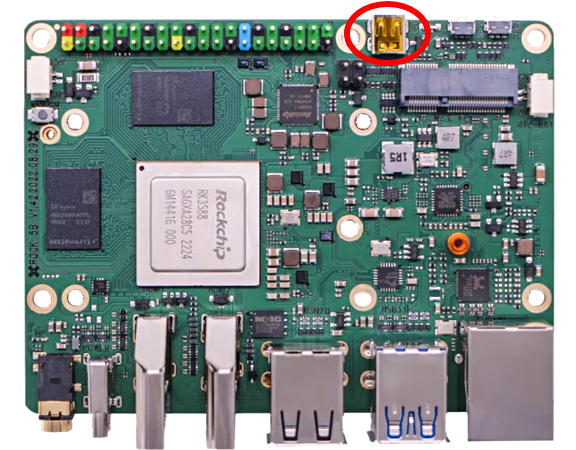
The HDMI input uses TERMINALS circled in red in the diagram below. Please prepare a Mini HDMI to HDMI CABLES and connect it to your PC or video camera.
Once connected, check if the capture screen is displayed using the following command.
# メディアプレーヤをインストール
$ sudo apt update
$ sudo apt install -y ffmpeg
$ ffplay -f v4l2 -input_format nv12 -video_size 1920x1080 /dev/video0
If it doesn't work, try fixing the output device's resolution to 1920x1080/30p. Also, the color may change depending on the output device. Try changing the output device's format.
Add features to your object_detection
We will use GStreamer from OpenCV for HDMI input. The sample code only assumes file and USB camera inputs, so we will add functionality to read GStreamer using OpenCV.
GStreamer is an open-source multimedia FRAMES. It's a very feature-rich library, and a detailed explanation of its functions is beyond the scope of this article, so I'll omit it here. There are many explanatory documents available online, so please refer to those.
Open object_detection.cpp in your editor and define the following function before main(). This function queries the HDMI input device for the corresponding image format and opens the first matching one.
/**
  * HDMI入力のためにGStreamerパイプラインを初期化します
  */
static InputType get_hdmi_input(const std::string &input_path,
                                cv::VideoCapture &capture,
                                double &org_height,
                                double &org_width,
                                size_t &frame_count,
                                size_t batch_size,
                                const std::string &camera_resolution)
{
    InputType input_type;
    input_type.is_video = true;

    // 入力は/dev/video0に固定
    if (input_path != "/dev/video0")
    {
        throw std::runtime_error("Unsupported input device: " + input_path + ".  If you use --rock5b-hdmi-in, set --input to /dev/video0 ");
    }

    // GStreamerパイプライン(デバイスのサポートフォーマットを自動検出)
    // 複数のフォーマットを試す(NV12, YUY2, UYVY, MJPEGなど)
    std::vector<std::pair<std::string, std::string>> format_candidates = {
        {"video/x-raw,format=NV12", "NV12"}, // NV12フォーマット
        {"video/x-raw,format=YUY2", "YUY2"}, // YUY2フォーマット
        {"video/x-raw,format=UYVY", "UYVY"}, // UYVYフォーマット
        {"video/x-raw", "auto-detect"}       // フォーマット指定なし(自動検出)
    };

    // 色変換マトリクスの設定
    // GStreamerのmatrix-coefficients: 0=Identity, 1=BT.709, 2=BT.601, 3=BT.
    // matrix_param = ""の場合は自動判別
    // HDで標準的なBT.709を設定しておきます
    std::string matrix_param = ",matrix-coefficients=1";

    bool opened = false;
    std::string successful_format;
    for (const auto &[format, format_name] : format_candidates)
    {
        // 各試行の前にcaptureをリセット
        capture.release();

        std::ostringstream pipeline;
        // その他のフォーマット
        pipeline << "v4l2src device=/dev/video0 io-mode=mmap ! "
                  << format << " ! "
                  << "videoscale ! video/x-raw,width=1920,height=1080" << matrix_param << " ! "
                  << "videoconvert ! video/x-raw,format=BGR ! "
                  << "appsink drop=true sync=false max-buffers=2";

        capture.open(pipeline.str(), cv::CAP_GSTREAMER);
        if (capture.isOpened())
        {
            opened = true;
            successful_format = format_name;
            break;
        }
    }

    if (!opened)
    {
        throw std::runtime_error("Unable to open HDMI input via GStreamer: " + input_path +
                                  " (tried multiple formats: NV12, YUY2, UYVY, MJPEG, auto-detect)");
    }

    // 成功したフォーマットを表示(警告が表示されても正常に動作していることを示す)
    std::cout << "-I- HDMI input opened successfully using format: " << successful_format << std::endl;
    // HDMI入力の解像度は固定(1920x1080)
    org_width = 1920;
    org_height = 1080;
    frame_count = 0; // カメラと同様にフレーム数は不明

    return input_type;
}
Next, add or remove the following content from main().
-    post_parse_args(APP_NAME, args, argc, argv);
-    HailoInfer model(args.net, args.batch_size);
-    input_type = determine_input_type(args.input,
-                                      std::ref(capture),
-                                      std::ref(org_height),
-                                      std::ref(org_width),
-                                      std::ref(frame_count),
-                                      std::ref(args.batch_size),
-                                      std::ref(args.camera_resolution));

+    // --rock5b-hdmi-inオプションが指定された場合は/dev/video0からのキャプチャ設定を行う
+    if (has_flag(argc, argv, "--rock5b-hdmi-in"))
+    {
+        // HDMI入力時はpost_parse_args(), determine_input_type()を利用しません。
+        input_type = get_hdmi_input(args.input,
+                                    std::ref(capture),
+                                    std::ref(org_height),
+                                    std::ref(org_width),
+                                    std::ref(frame_count),
+                                    std::ref(args.batch_size),
+                                    std::ref(args.camera_resolution));
+    }
+    else
+    {
+        // 通常の処理(ファイル、USBカメラなど)
+        post_parse_args(APP_NAME, args, argc, argv);
+        input_type = determine_input_type(args.input,
+                                          std::ref(capture),
+                                          std::ref(org_height),
+                                          std::ref(org_width),
+                                          std::ref(frame_count),
+                                          std::ref(args.batch_size),
+                                          std::ref(args.camera_resolution));
+    }
+    HailoInfer model(args.net, args.batch_size);
Build and run
First, install the GStreamer tools and related libraries.
$ sudo apt install -y gstreamer1.0-tools libgstreamer1.0-0 gstreamer1.0-plugins-base gstreamer1.0-plugins-good gstreamer1.0-plugins-bad gstreamer1.0-plugins-ugly gstreamer1.0-libavNext, build the modified code.
# hailo-apps/hailo_apps/cpp/object_detectionから実行します
$ cmake --build build -j
Connect your PC or video camera to the HDMI input TERMINALS. Now let's run the program.
$ ./build/object_detection --rock5b-hdmi-in --net yolov8m.hef --input /dev/video0* --rock5b-hdmi-in is a custom option added specifically for this article and will not be displayed in --help.
I entered our company's YouTube video from my PC. What do you think?
The video you entered is here
- Company Introduction Video: Nexty Electronics
- The future is here! Tesla's latest autonomous driving FSD (supervised) v12.5: A real-world report.
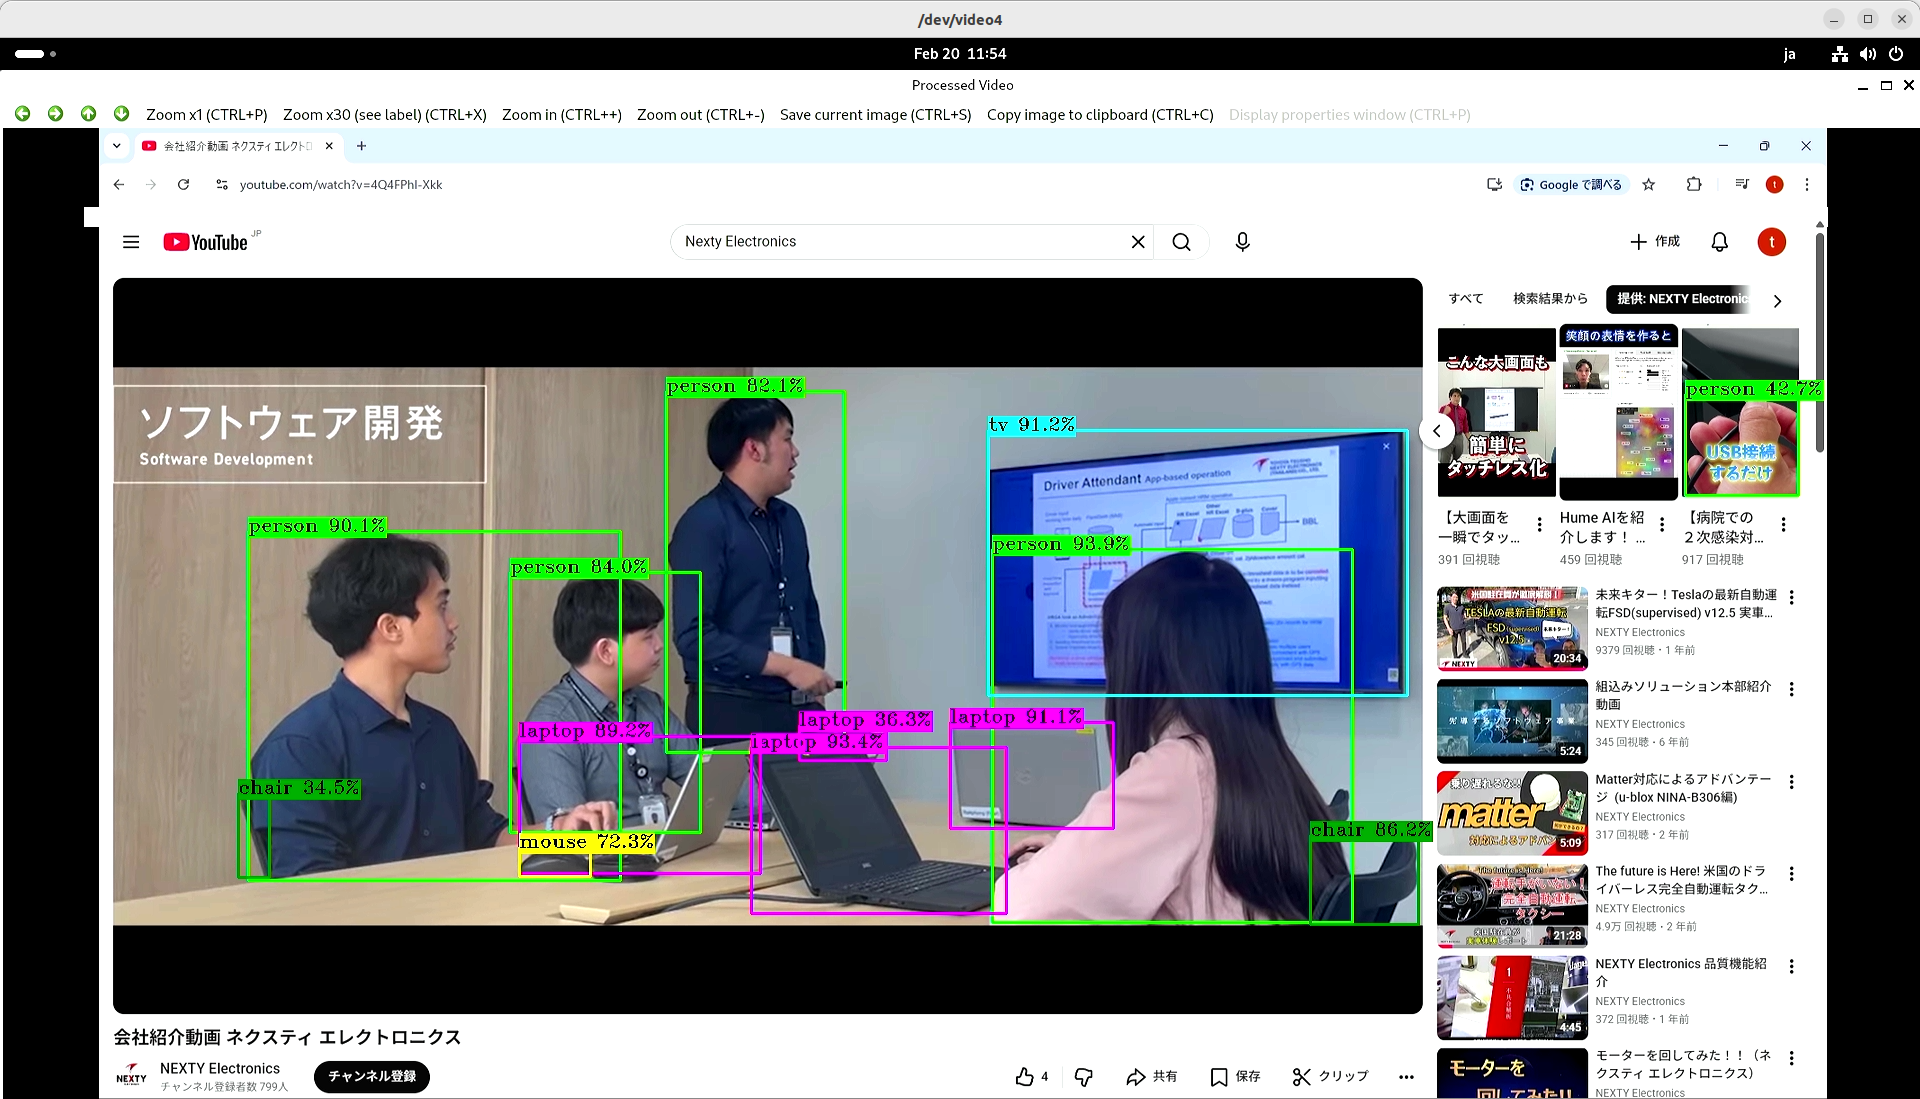

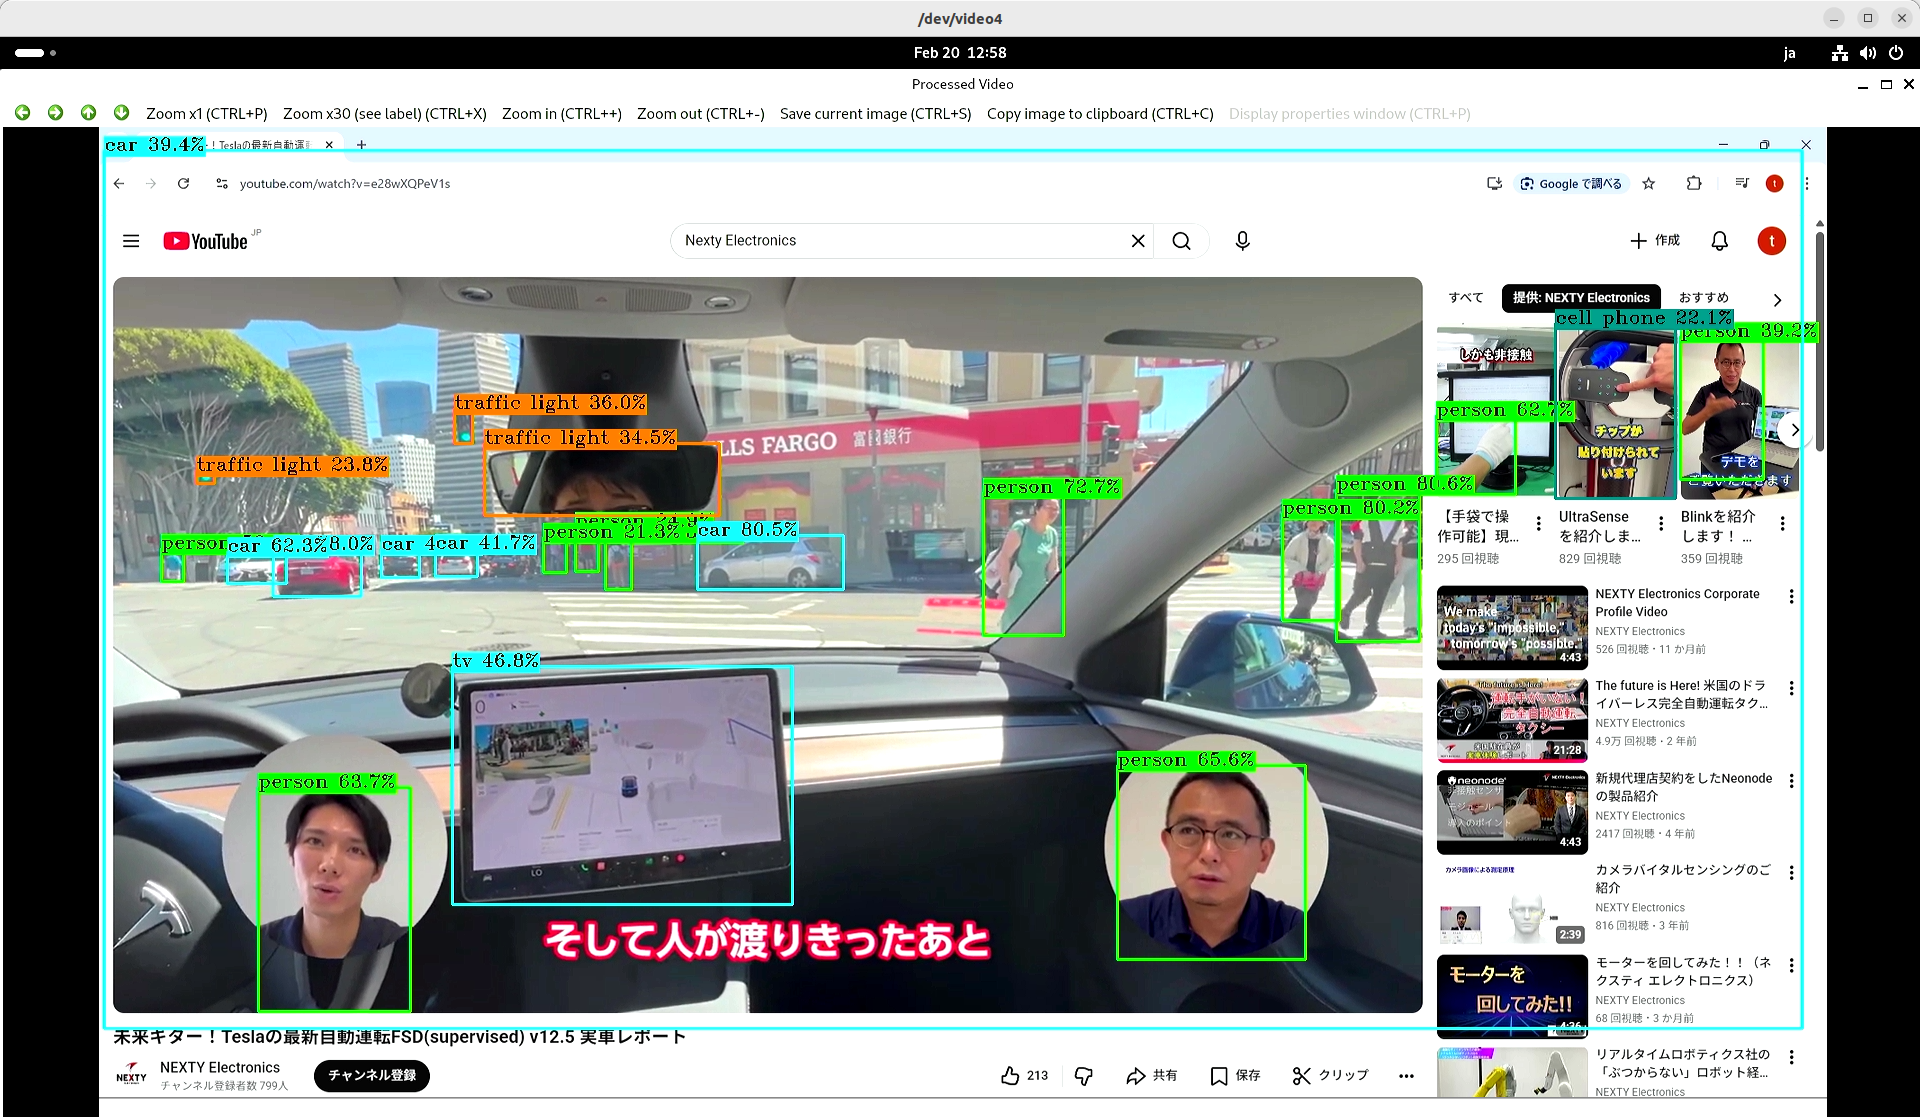
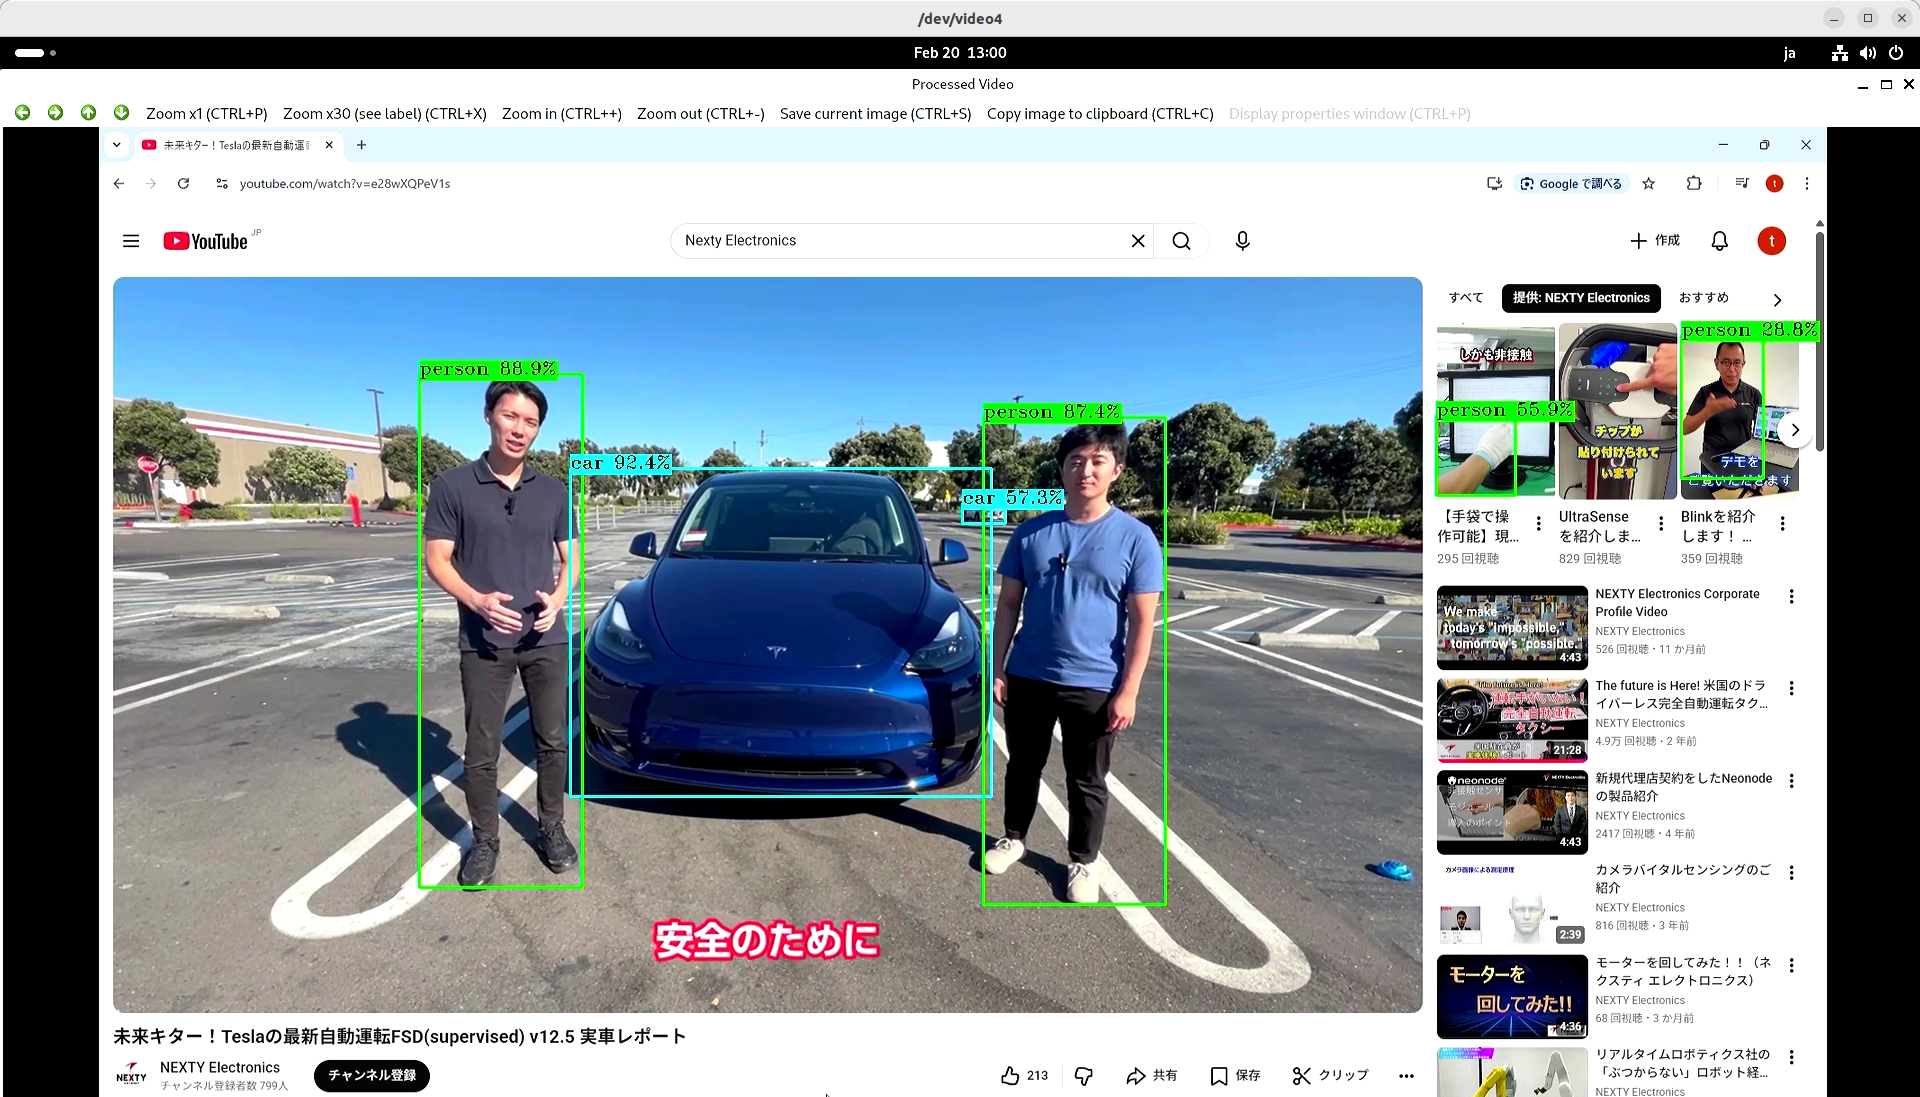
The measured speed, including object detection processing using Hailo-8, was approximately 20 FPS.
Even when object detection was disabled in this program and only the HDMI image was displayed, no change in FRAMES rate was observed. This strongly suggests that the OpenCV-based image acquisition process is the bottleneck. If you require faster processing, please consider a configuration that directly utilizes the GStreamer API without going through OpenCV.
Summary
In this article, I modified an application sample provided by Hailo to perform real-time object detection processing on an HDMI input.
Since Hailo-8's real-time processing can be applied to various online video content, I believe it can be easily used for evaluation and application development.
Furthermore, the method introduced here can be applied to other samples, so please try it out yourself.
In addition to Hailo-8, which was introduced here, Nexty Electronics' Development Department is also developing and supporting Hailo-10H, which is suitable for generative AI. We can also introduce and support examples of operation combining NXP's i.MX8 and i.MX95 with Hailo-8 and Hailo-10H, and propose various products and solutions tailored to your needs, so please feel free to ask.