Zephyr RTOS is an open-source real-time operating system (RTOS) led by the Linux Foundation. It is a lightweight, highly portable OS designed for IoT and embedded devices. It is widely used in everything from small devices to industrial equipment, and also supports security and long-term operation.
Vendors such as NXP Semiconductors, STMicroelectronics, and Infineon Technologies are hoping that Linux will be an option to fill areas where Linux has traditionally been too heavy, such as IoT sensors, wearable devices, and industrial equipment.
Therefore, in this article, we will introduce how to build a Zephyr RTOS development environment using the Zephyr SDK.
Zephyr SDK is FRAMES that supports multiple architectures, including ARM Cortex-M, Intel x86, and RISC-V, and has a modular structure that allows you to select and create only the functions you need. By customizing and adding to this FRAMES, you can smoothly launch your own functions and development.
1. About Zephyr RTOS
There are several RTOSes for MCUs, including FreeRTOS. In recent years, MCUs have become more powerful, requiring greater flexibility to be used in a variety of architectures and applications. Zephyr RTOS meets this flexibility and is attracting attention as it fills a different space than other RTOSes and Linux. A comparison is summarized below.
Comparison of RTOS and Linux
| Item | Zephyr RTOS | Free RTOS | Linux |
|---|---|---|---|
| Lightweight | Very lightweight Ideal for IoT | Very lightweight Limited functionality | heavy Resources are plentiful |
| Real-time capability | Expensive | Expensive | Standard Linux is weak RT patch required |
| Scalability | Modular structure and abundant | Relatively few features | Very high |
| Support Scope | IoT, industrial equipment, Wearables | Small-scale IoT | Servers, PCs High-performance embedded devices |
| Commercial Support | Linux Foundation + Corporate support | OSS community | Extensive commercial support |
| License | Apache License 2.0 Available for commercial use | MIT License Available for commercial use | GPLv2 Commercial use possible (compliance required) |
Zephyr RTOS is licensed under the Apache License 2.0, which clearly states that patent rights are granted, making it safe for corporate use. While the code is free to be modified and redistributed, it is important to note that copyright notices and license text must be retained. Zephyr RTOS (Apache 2.0) and Free RTOS (MIT) are easy to incorporate into commercial products. The Linux Kernel (GPLv2) has strong copyleft characteristics, so the decision to adopt it depends on whether you can accept the obligation to make the source code public.
2. Overall flow
The overall process for building a development environment for Zephyr RTOS using the Zephyr SDK is as follows:
Step 1: Preparation: Setting up the host machine
Step 2: Build a development environment: Build a development environment with Zephyr SDK
Step 3: Let's build it: First, build "Hello world"
Step 4: Try writing: Write the generated image to the board
Step 5: Build your development environment: Build with Visual Studio Code
This article will cover steps 1 to 4 (Step 1: Prepare in advance, Step 2: Create a development environment, Step 3: Build, and Step 4: Write). Step 5 will be covered in the next article. The image refers to the Zephyr RTOS boot image generated during the build.
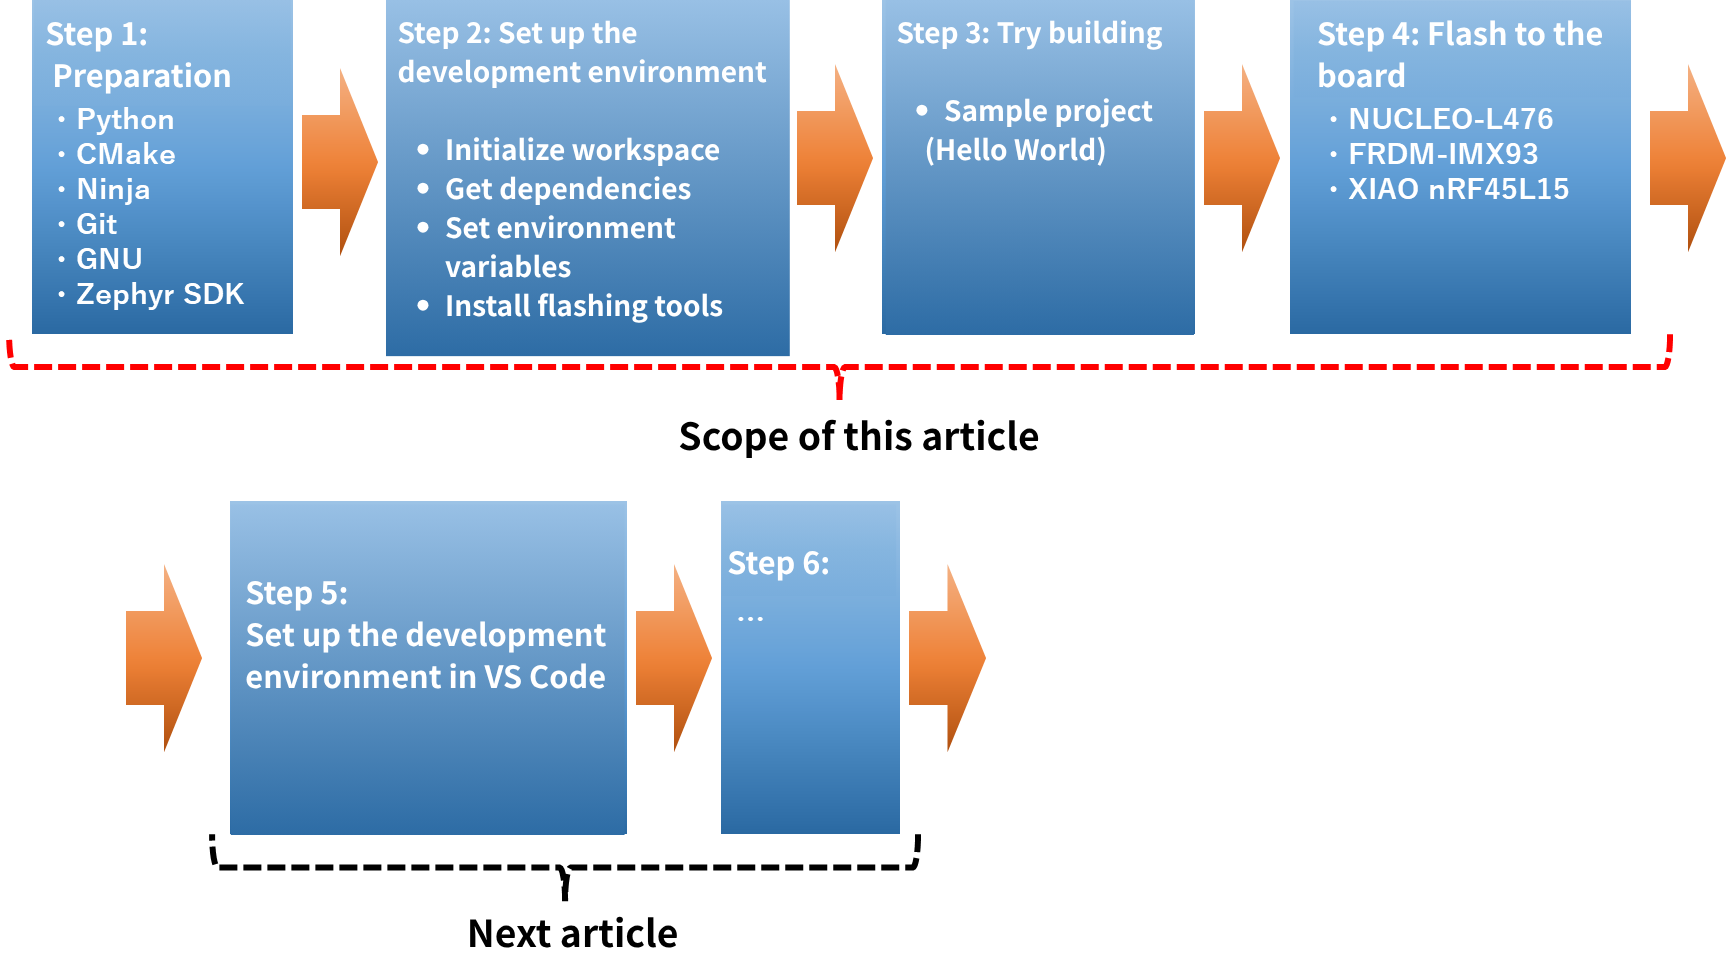
Overall flow for building a Zephyr RTOS development environment
3. Know the Supported Hardware
The method for outputting the Zephyr RTOS build file using the Zephyr SDK is explained in the "Getting Started Guide" on the Zephyr official website. The supported architectures for Zephyr are as follows:
Zephyr supported architectures
| Architecture | Representative MCUs | Major manufacturers | Main uses and features |
|---|---|---|---|
| ARM Cortex-M | STM32, Kinetis/MCX, nRF52/nRF53, RA/RX | ST, NXP, Nordic, Renesas | IoT, embedded, low power |
| ARM Cortex-A | i.MX, RZ | NXP, Renesas | High-performance MPU, industrial equipment |
| ARM Cortex-R | R-Car | Renesas | Real-time, safety-focused |
| RISC-V | HiFive, ESP32-C3, GD32V | SiFive, Espressif, GigaDevice | IoT, Embedded |
| x86 / x86-64 | Quark SE C1000 | Intel | Testing, PC-class development environment |
| ARC (Synopsys) | EM/HS | Synopsys | IoT, DSP applications |
| Xtensa | ESP32 | Espressif | IoT, wireless communication |
| MIPS | - | - | Embedded Applications |
| Others | RP2040 | Raspberry Pi | IoT, educational use |
In this article, we will introduce how to set up an environment using an evaluation board equipped with STM32L476, i.MX93, and nRF54L15.
Evaluation board used in this article
| Manufacturer | MCU | Evaluation Board Name |
|---|---|---|
| STMicroelectronics | STM32L476 | NUCLEO-L476RG |
| NXP Semiconductors | i.MX93 | FRDM-IMX93 |
| Nordic Semiconductor | nRF54L15 | XIAO nRF54L15 |
- Reference URL: Getting Started Guide [External link]
- Reference URL: Supported Boards and Shields [External link]
- Reference URL: Hardware Support [External link]
4. Step ①: Prepare in advance
Set up the host machine. The requirements for the host machine are as follows.
Host Machine Requirements
| Item | Requirements |
|---|---|
| OS | Windows, Linux, Mac OS |
| HDD | 10GB or more recommended |
| Memory devices | 8GB or more recommended |
| USB | One or more USB 2.0 or 3.0 ports *This is intended for connecting the host machine and evaluation board and writing. |
If the above requirements are met, there will be no problem using it as a host machine. However, the Zephyr SDK requires several GB of HDD space. Also, when building, including intermediate and generated files, a considerable amount of HDD space will be used.
In addition, an internet connection is required to run the development environment. If you are using it in a company environment, you may need to configure a proxy or other settings to connect to the internet from behind a firewall. Please consult your company's IT department.
The host machine used in this article was a Windows PC that the author uses for development work. Therefore, the various packages used to build the Zephyr development environment are written assuming a Windows PC, but if your host machine is Linux or Mac OS, please follow the instructions on the official website to build your development environment.
1. Installing the software and tools required for the development environment
The following software and tools are required to build a Zephyr development environment on a Windows PC. Install the latest versions of the software and tools.
Required software and tools
| Software, Tools | Explanation |
|---|---|
| Python 3.8 or higher | Required for Zephyr tools such as West commands to work Check "Add Python to PATH" during installation |
| Git | Required to get Zephyr source |
| CMake | Build Configuration Tools Enable "Add CMake to system PATH" during installation |
| Ninja | Rapid Build System Extract the downloaded ZIP file and add the path to ninja.exe to the environment variables. |
| GNU Arm Embedded Toolchain | Cross compiler for ARM |
| Zephyr SDK | Official Zephyr build environment |
In this article, we will create a Zephyr folder on the Windows C drive and place the SDK and project files inside it.

2. Install Python
Install Python. During installation, check "Add python.exe to PATH".
Check that the version is displayed by "python -–version". The following is an example.
python --version
    python 3.14.1
If the version does not appear, the Path is not set up, so either configure the Path or reinstall it.
3. Install CMake
Install CMake. During installation, check "Add CMake to the PATH environment variable".
Check that the version is displayed by "cmake -–version". The following is an example.
cmake --version
    cmake version 3.28.1
If the version does not appear, the Path is not set up, so either configure the Path or reinstall it.
4. Installing ninja
Install ninja. Download "ninja.exe" from the official website and set the Path in the system environment variables.
Check that the version is displayed by running "ninja --version". The following is an example.
ninja --version
    1.13.2
If the version does not appear, the Path is not set, so configure the Path accordingly.
5. Install Git
Install Git.
Check that the version is displayed by "git -–version". The following is an example.
git --version
    git version 25.0.windows.1
If the version does not appear, the Path is not set up, so either configure the Path or reinstall it.
6. Installing the GNU Arm Embedded Toolchain
Install the GNU Arm Embedded Toolchain.
Verify that the version is displayed by running "arm-none-eabi-gcc -–version". The following is an example.
arm-none-eabi-gcc --version
    arm-none-eabi-gcc.exe (GNU Tools for STM32 13.3.rel1.20240926-1715) 13.3.1 20240614
    Copyright (C) 2023 Free Software Foundation, Inc.
    This is free software; see the source for copying conditions. There is NO
    Warranty; not even for MERCHANTABILITY or FITNESS FOR A PARTICULAR PURPOSE.
If the version does not appear, the Path is not set, so configure the Path accordingly.
7. Installing the Zephyr SDK
Install the Zephyr SDK. Download the latest zephyr-sdk-<version>-setup.exe from the official website and install it in C:¥Zephyr¥zephyr-sdk-<version>. Enable "Add to PATH" during installation.
Verify that the version is displayed by entering "west --version". The following is an example.
west --version
    west version v1.5.0
If the version does not appear, the Path is not set, so configure the Path accordingly.
supplement:
Depending on the version of Python you are using and the Zephyr SDK version, you may need to install "pyelftools" and "jsonschema" separately.
In this case, install "pyelftools" and "jsonschema".
pip install jsonschema
    pip install pyelftools
5. Step ②: Let's build a development environment
Set up a Zephyr project on the host machine.
Use the following folder structure:

1. Initialize the workspace
Initializes a workspace at the specified location.
west init C:\Zephyr\Projects\zephyrprojectThe command content is shown below.
| Command | Content |
|---|---|
| west init <path> | 1. Creating a workspace Create a management directory called ".west" in <path> This will store the reference to the manifest repository. 2. Obtaining the manifest repository Usually, you clone the Git repository "zephyrproject-rtos/zephyr". This repository has a manifest file called "west.yml", which contains information about Zephyr itself and its dependent modules (HAL, tools, sample code, etc.). Details of "west.yml" are beyond the scope of this article. 3. Prepare your workspace structure At the time of "west init", no modules other than Zephyr itself will be acquired. Dependent modules will be updated in the next "west update" |
The directory structure after running west init will be as follows.

2. Obtaining dependent modules
Retrieve and update dependent modules in the workspace prepared by west init.
cd C:\Zephyr\Projects\zephyrproject
    west update
The command content is shown below.
| Command | Content |
|---|---|
| west update | 1. Loading the manifest file (west.yml) \Refer to "west.yml" in the zephyr repository This file contains the Git repository information for each module that Zephyr depends on (HAL, drivers, tools, samples, etc.). 2. Obtaining and updating dependent modules Clone or update each repository listed in "west.yml" For example: (modules/hal/nxp, modules/hal/stm32, modules/lib/cmsis) etc. 3. Syncing workspaces If a module has already been downloaded, execute "git fetch" or "git checkout" to match the version (SHA or tag) specified in the manifest. This ensures that the versions of Zephyr itself and its dependent modules are always consistent. |
The directory structure after running west update will be as follows.
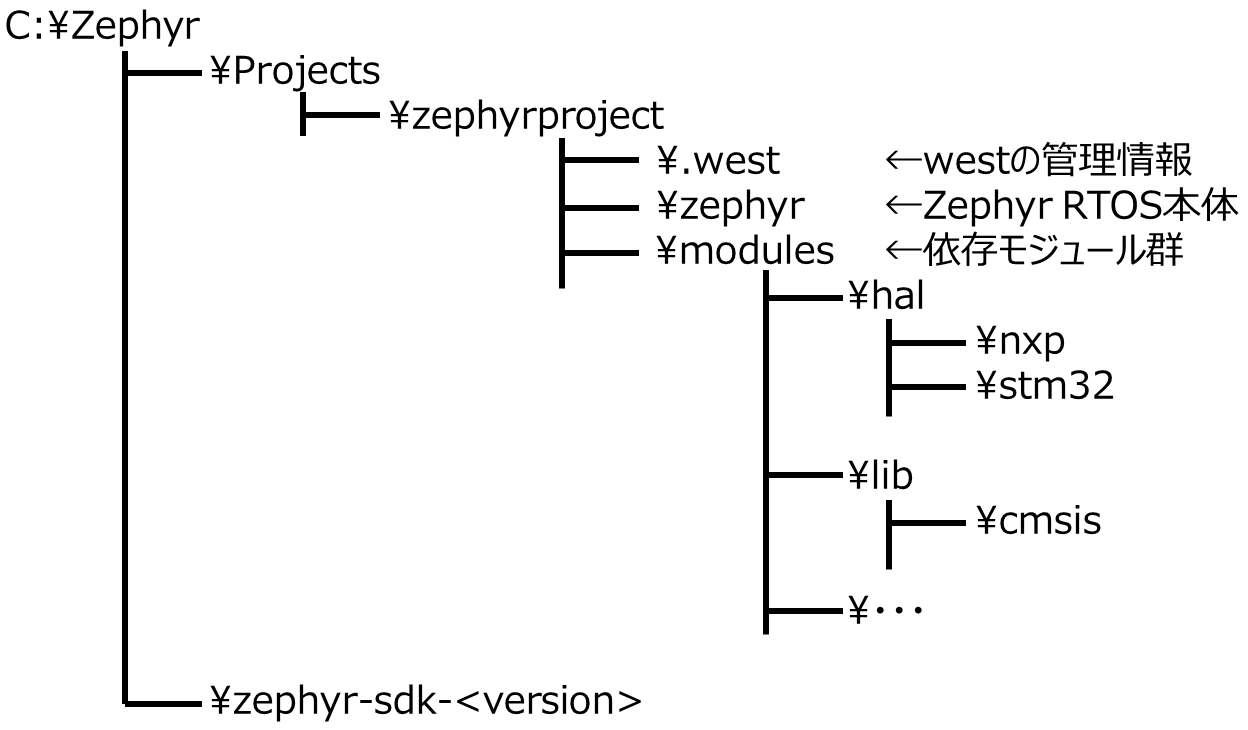
At this point, the Zephyr build environment is complete. The "west update" allows you to obtain HALs and drivers from each vendor, which is useful when dealing with multiple vendors and boards.
3. Set the environment variables
Although not required for this section, set the environment variables in case you want to integrate the cmake build system with external tools or plan to open Zephyr projects directly from other IDEs.
west zephyr-exportThe command content is shown below.
| Command | Content |
|---|---|
| west zephyr-export | 1. Setting environment variables Set "ZEPHYR_BASE" to the path of the Zephyr device itself. This allows you to recognize the Zephyr route when calling "CMakeList.txt" directly from outside. 2. Integration with external build tools Normally, if you use "west build", the environment will be automatically set up, This is required if you want to manually call "cmake" or open Zephyr projects directly from other IDEs (e.g. Eclipse, Clion, VS Code's CMake extension). 3. Temporary Preferences This will export the environment variables to the current shell. Therefore, if you open another terminal, you will need to run "west zephyr-export" again. |
4. Install the writing tool
When connecting a host machine and a vendor's board via USB, install the USB driver and writing tool provided by each vendor to match the host machine. Also, set the path for the writing tool.
The host machine in this article has J-Link and STM32CubeProgrammer installed.
Main writing tool
| Tool Name | Content |
|---|---|
| OpenOCD | Compatible with many ARM-based boards Supports a wide range of debug probes including ST-LINK, J-Link, and CMSIS-DAP |
| pyOCD | For Arm's CMSIS-DAP compatible debuggers It is especially used in NXP and Arm MCUs. |
| J-Link (SEGGER) | It can be used with vendor boards that officially support J-Link, such as Nordic and NXP. |
| STM32CubeProgrammer | For STMicroelectronics MCUs Used for writing via ST-LINK |
| OTHERS vendor-specific tools | NXP mcuboot system, OpenOCD settings for Raspberry Pi Pico, etc. |
6. Step③: Let's build it
Let's try building (west build) in the development environment created in the previous section.
The target boards are NUCLEO-L476RG, FRDM-IMX93, and XIAO nRF54L15, but we will first try building the NUCLEO-L476RG.
1. Go to the sample project
Let's build the sample project "Hello World". Go to the sample project.
cd C:\Zephyr\Projects\zephyrproject\zephyr\samples\hello_world2. Run the build
west build -b nucleo_l476rgIf the build is successful, the image file \build\zephyr\zephyr.elf will be generated.
The command content is shown below.
| Command | Content |
|---|---|
| west build -b <board> | 1. CMake wrapper Zephyr uses a CMake-based build system "west build" runs as an optimized wrapper for Zephyr instead of directly calling CMake. 2. Managing the build directory Running "west build -b <board>" will create a build directory for the specified board. By default, the "\build" directory is generated and the build artifacts (ELF, HEX, BIN, etc.) are output there. 3. Specifying the board and application Specify the target board with the "-b" option If you do not specify a source directory, the current directory will be used as the application. In this article, the source directory is not specified, so the build is performed in the current directory. 4. Incremental Build If there is an existing build directory, only the differences will be rebuilt, so the build time will be shorter. You can force a clean build (rebuild) using "west build -p always" |
If you try to build again after a build has already finished, the following message may be displayed.
ninja: no work to do.This message indicates that the build has already finished, but you may want to rebuild it for some reason. In this case, you can force a build.
Build with "-p always".
west build -p always -b nucleo_l476rg7. Step ④: Let's try writing something
In the previous section, we built the board and created an image file. In this section, we will actually use the board to write the image. Connect the host machine and the board. In this case, we will connect via USB.
1. Execute the write (flash)
west flashThe command content is shown below.
| Command | Content |
|---|---|
| west flash | 1. Transfer of deliverables Write the "zephyr.hex" and "zephyr.bin" generated by the "west build" to the target board. The writing method depends on the board definition, which is described in "west.yml" and CMake settings. 2. Calling the flash tool Different tools are used for different boards, for example: STM32 series → "openocd" or "stm32cubeprogrammer" Nordic nRF series → "nrfjprog" or "J-Link" NXP series → "pyocd" "West Flash" automatically invokes these functions, so users do not need to operate the tools directly. 3. Specify options You can explicitly specify the flash tool to use with "west flash -r <runner>" You can write to any file by specifying "west flash –hex-file <file>" |
2. Check the serial output
You can see the virtual COM port via ST-Link. If you connect with Tera Term or PuTTY and open it with a baud rate of 115200bps, you will see the following output.
Hello World! nucleo_l476rg/stm32l476xxI was able to confirm that Zephyr started up successfully.
3. Choose a board and build
I changed the board from NUCLEO-L476RG to FRDM-IMX93 and tried building and flashing it in the same way.
west build -b frdm_imx93The following error may occur here.
west build -b frdm_imx93
    ERROR: Build directory C:\Zephyr\Projects\zephyrproject\zephyr\samples\hello_world\build targets board nucleo_l476rg, but board frdm_imx93 was specified. (Clean the directory, use --pristine, or use --build-dir to specify a different one.)
    FATAL ERROR: refusing to proceed without --force due to above error
This is because the nucleo-l476rg settings remain in the previous build directory, so you will usually need to use different build directories for each board.
Solution ①: Clear the existing build with the "--pristine" option and then rebuild
west build -b frdm_imx93 --pristine"--pristine" will completely initialize the build directory and rebuild with the newly configured board.
The original nucleo_l476rg build will disappear.
Solution ②: Create a separate build directory for each board using the "--build-dir" option
west build -b frdm_imx93 –build-dir build_frdm_imx93You can leave the existing "build" directory as is, or you can create separate directories for each board.
In this article, we will rebuild using solution ①.
west build -b frdm_imx93 --pristineHowever, you may encounter the following error here.
CMake Error at C:/Zephyr/Projects/zephyrproject/zephyr/cmake/modules/boards.cmake:285 (message):
     Board qualifiers `/mimx9352` for board `frdm_imx93` not found. Please
     specify a valid board target.
     Valid board targets for frdm_imx93 are:
     frdm_imx93/mimx9352/a55
     frdm_imx93/mimx9352/m33
     frdm_imx93/mimx9352/m33/ddr
In Zephyr 4.x and later, you must specify the sub-target (CPU/SoC). Since the FRDM-IMX93 has Cortex-M33 and Cortex-A55, "-b frdm_imx93" is not sufficient; you must also specify the CPU core.
When using Cortex-A55
west build -b frdm_imx93/mimx9352/a55 --pristineWhen using Cortex-M33
west build -b frdm_imx93/mimx9352/m33 --pristineAfter building, the ELF is generated in the same "build/zephyr/zephyr.elf".
This time, we will build the Cortex-M33 and start Zephyr from Linux (U-Boot) already installed on the FRDM-IMX93's eMMC. Since U-Boot runs on the A55 core, we will run Zephyr from the A55 core to the M33 core. Place the built zephyr.bin on the SD card and connect the host machine to the FRDM-IMX93.
If there is no Linux in the eMMC of the FRDM-IMX93, download the Linux BSP from the NXP official website, extract it to the SD card, and place zephyr.bin in the same folder.
When connecting using Tera Term or PuTTY, there are two core outputs, A55 core output and M33 core output, so leave both open.
This is an example of running Zephyr with the following command when U-Boot on the A55 core is started.
setenv loadaddr 0x80400000
    load mmc 1:1 ${loadaddr} zephyr.bin
    cp.b ${loadaddr} 0x201e0000 ${filesize}
    bootaux 0x1ffe0000
The command content is shown below.
| Command | Content |
|---|---|
| setenv <variable> <address> | <variable> Sets an environment variable <address>0x80400000 is the memory address where the load is to be made In subsequent commands, ${loadaddr} will refer to this address. |
| load <device> <address> <filename> | <device> Loads a file from an MMC (SD card or eMMC) mmc 1:1 -> Partition 1 of device number 1 <address>${loadaddr} -> Places the loaded content at RAM address 0x80400000 <filename>zephyr.bin -> file name to load |
| cp.b <address> <address> <filesize> | <cp.b> Copy memory in bytes <address>Source: ${loadaddr} (0x80400000) <address> Destination: 0x201e0000 <filesize> Size: ${filesize} (File size automatically set by the previous load) → Transfer the loaded zephyr.bin to another memory area |
| bootaux <address> | Start the secondary CPU (Auxiliary core) with a special U-Boot command <address> argument 0x1ffe0000 is the start address → The firmware is passed from U-Boot on the main CPU to another core (for example, a Cortex-M core) and started. |
When connected via Tera Term or PuTTY on the M33 core side, you can see the following output.
Hello World! frdm_imx93/mimx9352/m33I was able to successfully confirm that Zephyr started up on the FRDM-IMX93.
Let’s change the board from FRDM-IMX93 to nRF54L15 and build and write it in the same way. Here too, you will need to specify the CPU core.
west build -b xiao_nrf54l15/nrf54l15/cpuapp --pristineWhen you write the built file, the following will be output from Tera Term or PuTTY.
Hello World! xiao_nrf54l15/nrf54l15/cpuappI was able to successfully confirm that Zephyr started up on the XIAO nRF54L15.
8. About the next time
Next time, we will build the development environment created in this article using Visual Studio Code and try using GPIO and other functions.
9. Conclusion
This article explained how to set up a development environment for Zephyr. In this article, we set up the development environment, built Hello World, and confirmed that Zephyr was running on multiple boards. In the next article, we will integrate the development environment with Visual Studio Code and run some arbitrary code. We also plan to create an article that will operate some sensors and make it more practical.
Additionally, the Nexty Electronics development team provides product development and technical support for STMicroelectronics and NXP Semiconductors, so please feel free Inquiry.