Many people who want to try using Mid-360S are unsure of what they need to prepare first or how much configuration is required before the point cloud is displayed.
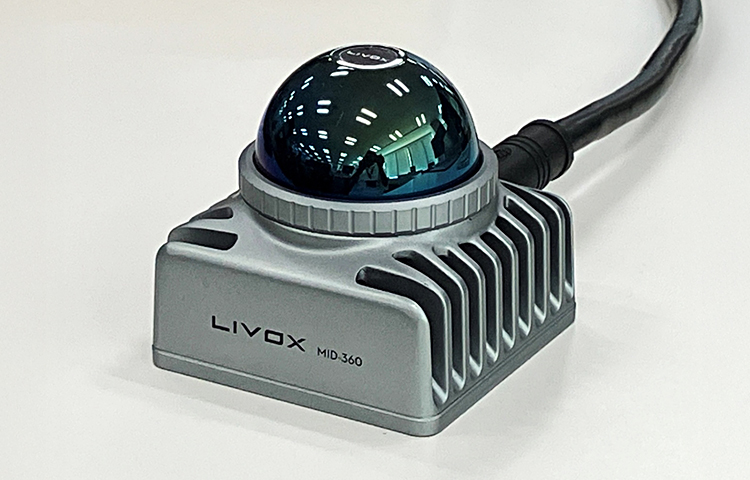
The Mid-360S is the latest model released in April 2026, succeeding Livox's compact 3D LiDAR "MID-360".
This column provides a clear and easy-to-understand guide for first-time users, explaining the process from receiving the Mid-360S to being able to view point cloud data using Livox Viewer and then ROS 2 (RViz).
This is a helpful starting guide for anyone considering introducing the Mid-360S or replacing their MID-360.
1. What is Mid-360S?
The Mid-360S is the latest model released in April 2026, succeeding Livox's compact 3D LiDAR "MID-360".
Building upon the wide field of view and ease of use that were highly praised in previous models, there are differences in appearance and CONNECTORS specifications. Specifically, the appearance (presence or absence of the Livox logo) and the position of the CONNECTORS have been adjusted, and support for the new SDK and Viewer has been improved. Therefore, those with experience using the MID-360 can transition smoothly while retaining the basic concepts. On the other hand, it is also easy to use for those using Livox LiDAR for the first time. However, while the Mid-360S is a high-performance sensor, there are several points in the initial setup where users may stumble, such as how to connect to POWER SUPPLIES, prepare CABLES, and configure the IP settings on the PC.
Therefore, in this column, we will explain the necessary preparations and procedures in order, with the goal of getting from the moment you get your hands on the Mid-360S to the point cloud being displayed on the screen.
Furthermore, the Mid-360S is not only more affordable than comparable 3D LiDARs in its class, but it is also a successor to the previous model, the MID-360, with a lower price. As a successor that inherits the features that were well-regarded in the MID-360, it is an easy choice for those who want to keep initial deployment costs down.
As an authorized distributor of Livox products, we deal directly with the manufacturer, allowing us to offer competitive pricing and technical support. We provide support from pre-purchase consultations, so even those new to LiDAR can use our services with confidence.
2. Points to check first when your Mid-360S arrives (Accessories and CABLES)
Neglecting to check the product immediately after opening the package can easily lead to unexplained problems later on. It's best to check the accessories and their condition right away.
2-1. Mid-360S Package Contents and Accessories List
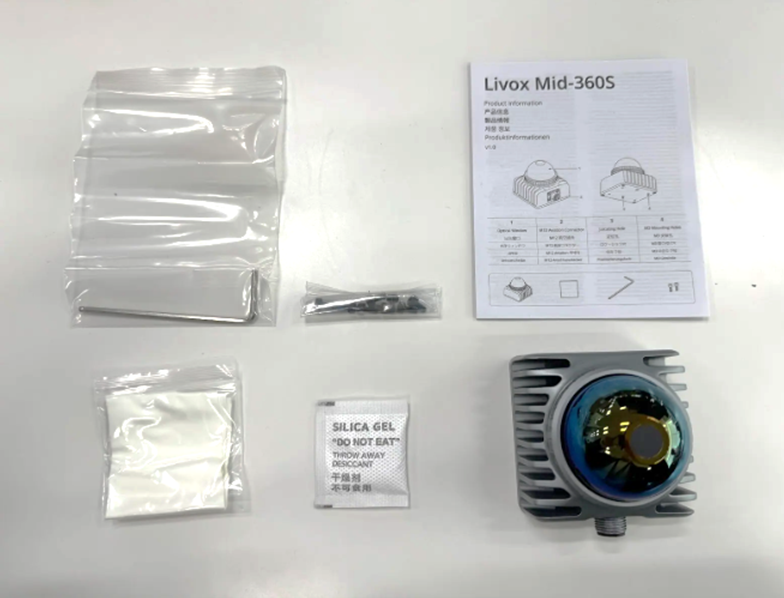
List of contents included with the Mid-360S. In addition to the main unit, a 3-wire aviation CONNECTORS and POWER SUPPLIES adapter are required separately.
The contents of the package are as follows:
- Mid-360S main unit
- Product Information (Documents containing product specifications and precautions)
- Hex wrench
- 8 screws (M3)
- Cleaning cloth
- Dehumidifier
* Livox 3-wire aviation CONNECTORS and POWER SUPPLIES adapter are not included.
If you suspect that any accessories are missing or damaged, we offer exchange or verification services only to customers who have purchased our products from us.
2-2. POWER SUPPLIES specifications and required CABLES for the Mid-360S (3-wire aviation CONNECTORS)
The following preparations are necessary to run Mid-360S:
- Livox 3-wire aviation CONNECTORS (1.5m)
- 9-27V POWER SUPPLIES
POWER SUPPLIES is supplied via a Livox 3-wire aviation CONNECTORS, rather than being connected directly to the unit.
The Livox 3-wire aviation CONNECTORS is a widely used accessory for POWER SUPPLIES and communication verification of the Mid-360S.
One is M12 Air CONNECTORS- (female),
the other is
- POWER SUPPLIES line
- Ethernet cable
- Functional line
It is structured into three separate systems.
Since POWER SUPPLIES section has exposed wiring, we use a DC JACKS (screw-type connector) to connect it to POWER SUPPLIES adapter. The DC JACKS we use is KM-DN291 (URL).
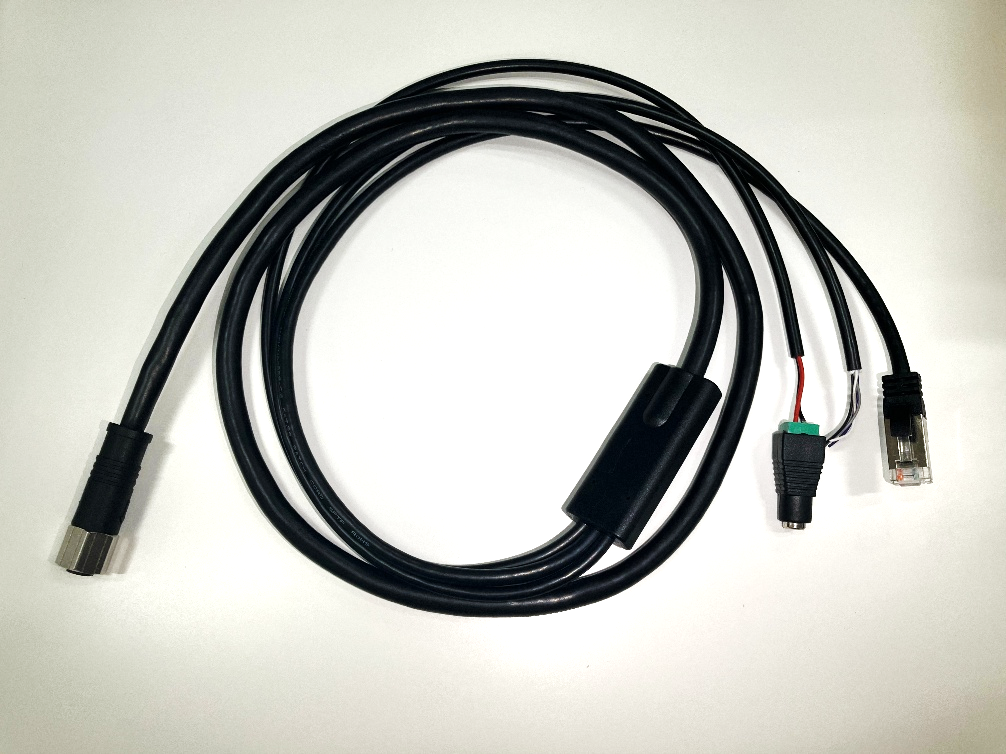
Livox 3-wire aviation CONNECTORS used for POWER SUPPLIES and communication in the MID-360/360S.
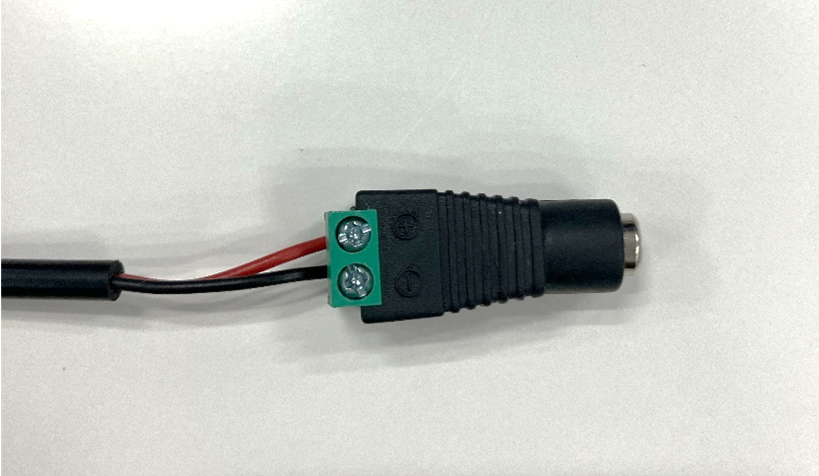
POWER SUPPLIES cord/DC JACKS
3. Connecting the Mid-360S to a PC and initial operation check procedure
3-1. Procedure for connecting POWER SUPPLIES and LAN
Connecting them in the correct order will ensure stability.
1. Connect the Livox 3-wire aviation CONNECTORS to the Mid-360S.
2. Connect the output side of POWER SUPPLIES adapter to POWER SUPPLIES wire of the Livox 3-wire aviation CONNECTORS.
3. Connect the LAN CABLES to the PC.
4. Connect the input side of POWER SUPPLIES adapter to POWER SUPPLIES
→ If you hear a slight operating sound or vibration, it's starting up.
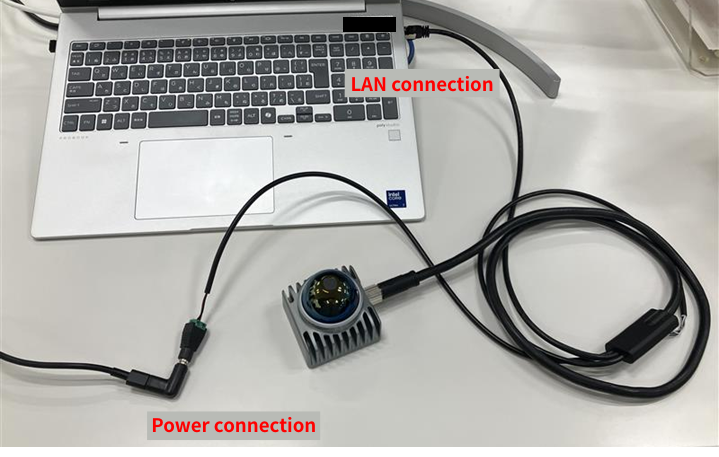
Connection image
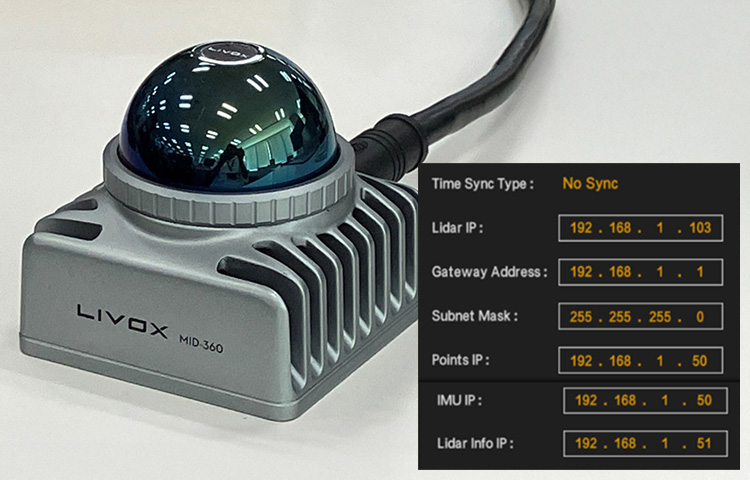
3-2. IP settings for Mid-360S (Static IP address setting for Ethernet)
The initial IP address for Livox products is "192.168.1.1XX" (where XX is the last two digits of the serial number). The serial number is printed on the LiDAR unit and its packaging.
For example, in the case of the attached photo, it would be 192.168.1.182.

Serial code
The PC's IP address should also be set to the same network range. For example, set the PC to "192.168.1.50/255.255.255.0".
For more details, please refer to another column. (here)
4. Steps to view point clouds in Livox Viewer
4-1. Installing the Viewer
The latest version of Livox Viewer 2 is available on the official Livox website. The Mid-360S will not be recognized by older Viewers (such as version 2.3.0), so please be sure to use version 2.4.2 or later. (Download link)
4-2. Verifying Device Recognition
When you open the Viewer, a list of connected sensors will be displayed on the left side.
If you see the name "Mid-360S" and the serial number, communication is working correctly.
Instructions on how to use Livox Viewer 2 are written in a separate column, so please refer to it. (Click here)

The Mid-360S point cloud is displayed in Livox Viewer 2.4.2 or later. If you can confirm this, the basic operation is fine.
4-3. Troubleshooting when the point cloud is not displayed.
Many of the reasons why point clouds are not displayed are related to initial settings or communication issues.
- The IP address setting is incorrect.
- CABLES connection failure
- The Livox Viewer version is outdated (version 2.3.0 or earlier).
- Communication is being blocked by the PC's firewall or security software.
A weak POWER SUPPLIES may cause the device to repeatedly restart, resulting in interrupted point cloud data. Additionally, in environments with firewalls or security software enabled, communication from the LiDAR may be blocked, preventing the device from being recognized in the Viewer. If ping works but the point cloud is not displayed, check your firewall settings to ensure that Livox Viewer communication is permitted.
5. Steps to display the Mid-360S point cloud in ROS 2 (RViz)
Mid-360S can handle point clouds not only with Livox Viewer but also in a ROS 2 environment.
When developing robots or enabling autonomous movement, the ability to view point cloud data on RViz is a crucial checkpoint.
This section provides a general overview of the process of displaying Mid-360S point cloud data in RViz using ROS 2.
We'll skip the detailed customization and applications for now, and aim to simply achieve the goal of "being able to display it."
5-1. Things to prepare in advance
The following environment is required to use Mid-360S with ROS 2:
- Ubuntu (ROS 2 compatible version)
- ROS 2 (Jazzy, Humble, etc.)
- Livox SDK2 (version 1.3.1 or later)
- Livox ROS Driver 2 (version 1.2.6 or later)
The Mid-360S is not recognized by older SDKs (versions 1.2.5 and earlier), so using it with ROS 2 requires the use of the latest SDK 2. If you have any concerns about setting up your ROS 2 environment or installing drivers, we are happy to assist you with environment checks and configuration consultations.
5-2. Livox ROS Driver 2 Configuration Points
With Livox ROS Driver 2, you specify the LiDAR to connect to in the configuration file (livox ros driver2/config/MID360s_config.json).
When using the Mid-360S, configuring the IP address is crucial.
In the configuration file,
- Specify the IP address of the Mid-360S unit.
- Specify the PC's IP address
You need to do that.
If this setting is incorrect,
- The driver starts up, but no point cloud data is generated.
- Nothing is displayed in RViz
This is the state it will be in.
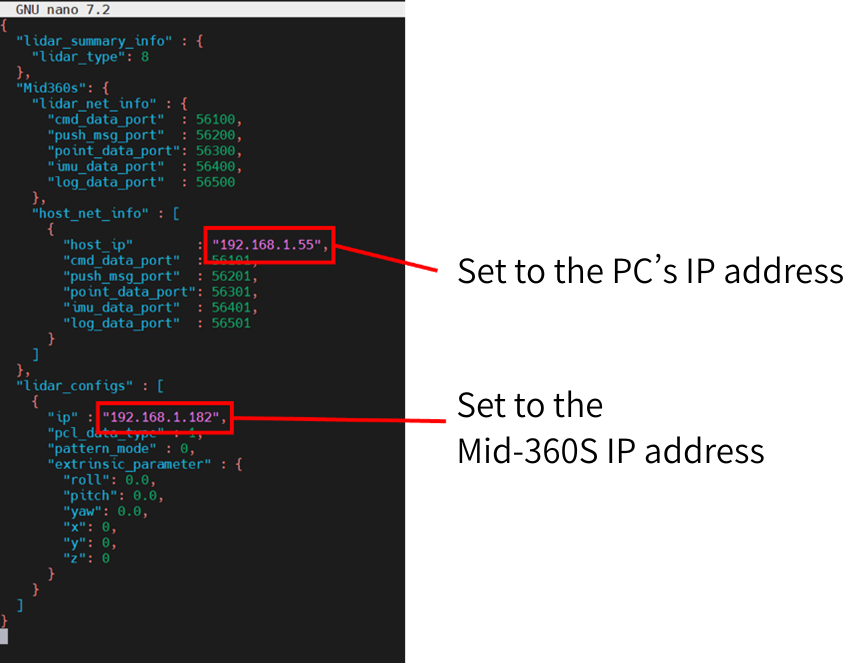
Modifications to the configuration file
5-3. Start the ROS 2 node.
Once the setup is complete, start Livox ROS Driver 2 with the following command.
ros2 launch livox_ros_driver2 rviz_MID360s_launch.py
Executing this command will start Livox ROS Driver 2 and RViz automatically, and point cloud data from Mid-360S will be delivered and displayed as a ROS 2 topic.
If it starts up normally,
- RViz starts up automatically.
- The 360S point cloud is already displayed on the screen.
This is the state it will be in.
In this state, the connection between ROS 2 and Mid-360S has been successfully established.
When it was displayed for the first time,
- The dots appear small.
- The difference in color is hard to see.
You may sometimes feel that way, but you can improve visibility by adjusting the display settings (dot size and color settings) on the RViz side.
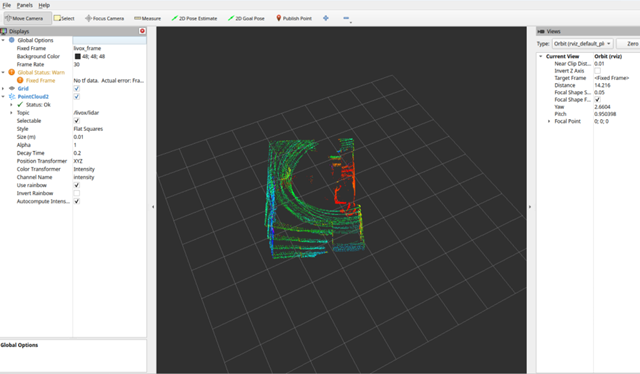
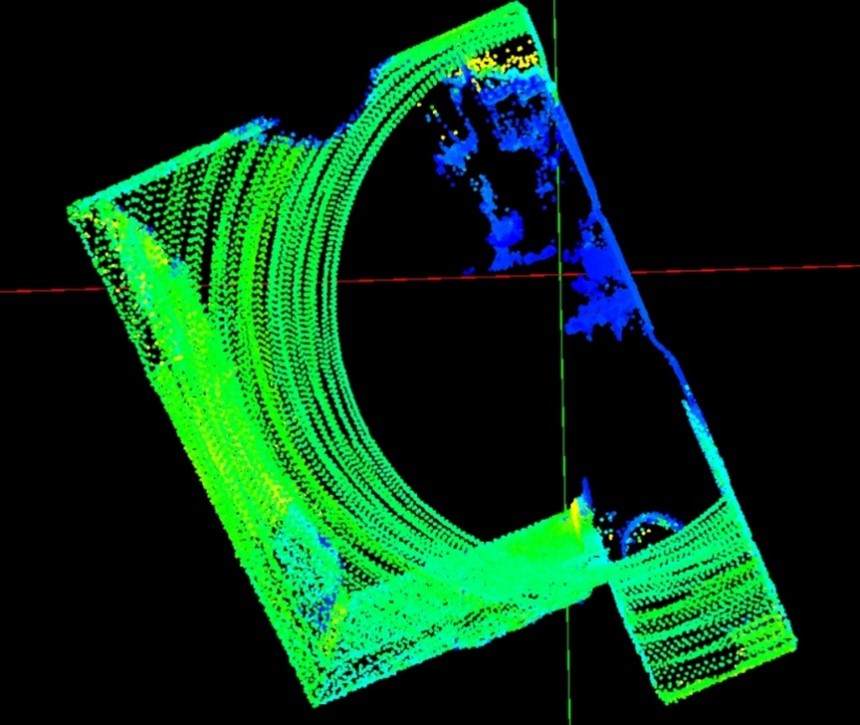
An example of displaying the Mid-360S point cloud on ROS 2 (RViz).
5-4. Points to check if the point cloud is not displayed
If point clouds are not displayed in RViz, it is usually due to one of the following reasons:
- Livox ROS Driver 2 is not starting correctly.
- The device name or IP address in the configuration file is different.
- Not using the latest SDK
- RViz's Fixed Frame is not configured correctly.
- Incorrect specification of point cloud topic to display.
It's rare for the Mid-360S itself to be faulty; most problems can be resolved by reviewing the settings.
For customers who have purchased Mid-360S from our company, we provide support in troubleshooting the issue by checking together "how far it is working" and identifying the point cloud display on RViz.
Summary
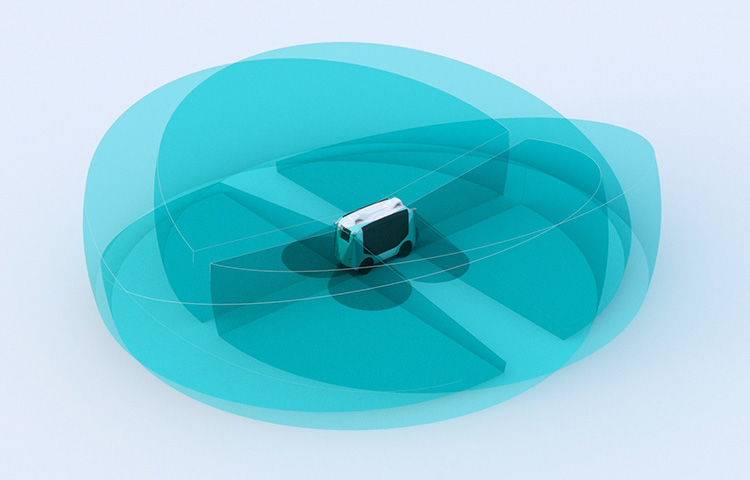
The Mid-360S is a compact 3D LiDAR with a wide 360° field of view and lightweight design, making it suitable for a wide range of applications including robotics, UAVs, and indoor/outdoor measurement.
As explained in this column, if you follow the steps in order from checking the device after unpacking, connecting POWER SUPPLIES, configuring the IP settings, and confirming recognition with Livox Viewer 2 (Note: For Mid-360S, the latest version of Viewer 2.4.2 or later is required), you can easily reach the point cloud display stage.
Furthermore, Mid-360S can be used not only with Livox Viewer 2 but also in ROS 2 environments.
By using Livox ROS Driver 2, you can view point clouds on RViz, enabling its implementation with a view to expanding into robot development such as SLAM and autonomous navigation.
It's also easy to take a step-by-step approach, starting by checking the basic operation with the Viewer and then moving on to ROS 2.
If you are considering introducing Mid-360S and feel unsure about whether it will work in your environment or what preparations are necessary, we offer pre-installation consultations for customers considering purchasing Mid-360S from us.
For customers who have already purchased from us, we also provide support for setup and initial operation checks.
If you'd like to ensure a smooth implementation of Mid-360S, please feel free to make an Inquiry. We can assist you with pre-implementation configuration checks and discuss how to best utilize the system for your specific needs.
Disclaimer
*This column is based on information available as of April 2026.
Please note that the content may change due to future product specifications or software updates.
![Making your own CABLES for the Livox MID-360 [Practical Guide]](/uploads/media_files/livox_10_thumbnail-3954867486.jpg)